Note – You can see detailed explanations and best practices for managing ‘in-session’ access to Connect rooms in my blog post ‘How can I manage access to my Connect Rooms?’ here.
Note – I am not considering Connect Events registration in detail in this blog post. Be aware that you can control access to rooms prior to an event by having attendees register through Connect Events and they would need to use their legitimate email to confirm the registration. You could then accept or decline access prior to the event .
Overview
One of the key benefits of Connect and in particular the HTML/browser-based client is ease-of-access. Nothing to download, just click on the link, enter your name and the room opens in the browser.
But making it easy to enter a room can come at the price or security and privacy if room hosts/instructors/producers are not diligent.
I like to draw the analogy to a physical classroom. You would not typically run a class in your corporate training center and just leave the door to the street open with a stack of ‘Hello, my name is…’ self-serve badges on a table as people enter…
…but that is what sometimes happens in the virtual space.
You should apply the same diligence to your virtual rooms as you apply to your physical rooms. Lets draw comparisons and look at some best practices below.
Levels of Access to Connect Rooms
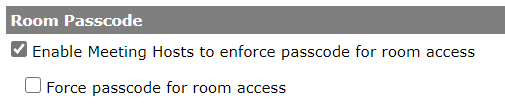
There are 4 main levels of access to Connect rooms, with an option to add a passcode to these if desired (figure 1). Understanding how these access levels function is a good place to start managing your security. We will draw analogies between these levels of access in physical rooms as well.
- Only registered users may enter the room (guest access is blocked) – This is the most secure option and if this is chosen everyone will need a login and password on your Connect account *plus* they will need to be listed as participants/presenters/hosts in the rooms ‘Edit Participants’ area.
- Only registered users and account members may enter the room – This second option is a little bit of an edge-case, but it allows only registered users *plus* anyone in your account with a login and password to enter the room.
- Only registered users and accepted guests may enter the room – This is the most common option, a balance of security and ease-of-access. The presenters and hosts would typically log in with their login and password and be listed in the room ‘Edit Participants’ area as presenters/hosts. The other attendees would enter he room using the ‘Guest’ field and you would typically ask them to enter their first and last name, and maybe an employee number (for example) into the ‘Guest’ field. Guests *must* be accepted into the room by the host to gain access.
- Anyone who has the URL for the meeting can enter the room – This is the least secure option, but the easiest access. The attendee enters their name into the guest field and they are immediately admitted into the room. The host has no option to accept/decline the attendee.
- Optional Passcode Protection – If this is enabled by the Administrator, the host can add a permanent or session-by-session passcode that any attendee will need to add upon entry.
Note – You may not see the passcode option, enabling passcode access is covered later in this post.
Figure 1
Virtual to Physical Comparisons
It sometimes adds perspective to translate the options for your virtual rooms above into physical terms. Below are my security scenarios analogies.
- Only registered users may enter the room (guest access is blocked) – In a physical scenario, you know where the room is (the URL) but you need a key to open the door (your login and password). The key is only given to a list of people (those added to the ‘Edit Participants’ area for your room). If you do not have a key and/or you are not on the list then you cannot get through the door. Your ‘name tag’ is your first and last name.
- Only registered users and account members may enter the room – In a physical scenario, you know where the room is (the URL) but you need a key to open the door (your login and password). The key is given to a list of people (those added to the ‘Edit Participants’ area for your room)*and* anyone in your organization can use their own key (login and password) to enter the room. If you do not have a key and/or you are not on the list and/or you are not a member of the organization then you cannot get through the door. Your ‘name tag’ is your first and last name.
- Only registered users and accepted guests may enter the room – In a physical scenario, you know where the room is (the URL) but you need a key to open the door (your login and password). The key is only given to a list of people (those added to the ‘Edit Participants’ area for your room). You *also* have an option to pick up a ‘Hello my name is…’ tag, add your name in marker using your best handwriting and walk up to the door. At the door you would ask to enter and the doorman would look at your name tag and either let you in or deny you entry. Your ‘name tag’ is whatever you chose to write (My name is…Inigo Montoya’ for example).
- Anyone who has the URL for the meeting can enter the room – In a physical scenario, you know where the room is (the URL) but you need a key to open the door (your login and password)…but there is another entrance…with a pile of name tags and no door at all! At this entrance, anyone who knows where the room is has the option to pick up a ‘Hello my name is…’ tag, add their name (or leave it blank), walk up to the entrance and straight into the room…no questions asked! (no doorman). Their ‘name tag’ is whatever they chose to write (nobody is checking them on the way in).
- Optional Passcode Protection – In a physical scenario this applies in addition to all of the options above. No matter how they try to get into the room (key, name tag or whatever) they will be asked for the secret password in order to enter (like the gruff person behind the little sliding door who asks “what’s the secret password?”).
So how does this translate into best (and less desirable or secure) practices?
Let’s consider some scenarios and how you might set up your access permissions to a room. You can do this on a session-by-session or room-by-room basis. You can even make these changes during the session.
A. Training with a Class Roster – If this were a physical class, chances are you would have a class roster to ensure the right (paid?) people are taking the class. You would have a name badge or at least check their names off before letting them into the classroom. If they were not on the roster, they would not be allowed into the classroom.
In Adobe Connect terms, this would be scenario #3 above. You are a ‘registered user’ and you can open the classroom with your key. Your students login using the ‘Guest’ field with their name and when they request entry to the Connect room you would see a notification that ‘Inigo Montoya would like to enter the room’. You would check the roster for Inigo’s name and either ‘Allow’ or ‘Decline’ his entry.
If you want to ‘close the door’ when the class is ready to go, see ‘Block Incoming Attendees’ in my blog post here.
In this case, the only way an undesirable attendee can enter your room is if you choose to let them in.
B. Training with a Class Roster *plus* Passcode – This is example ‘A’ above but with the addition of a passcode. Everything is the same but after the students enter their name into the ‘Guest’ field, they are asked for the secret passcode you gave them as a part of your communications…if they do not enter the correct passcode they will not even have the chance to request entry of you. You will not even see the notification that ‘Inigo Montoya would like to enter the room’.
You are stopping ‘undesirables’ before they even reach the door.
C. Locked Down Room – In this scenario, you have a Board Meeting (for example) and you want to lock it down completely. Use scenario #1 above.
You will make a login (email) and password for each board member and communicate this to them. You would then add each board member login to your room under ‘Edit Participants’ and give them the role of ‘Participant’.
To enter the room they would need to enter their login and password into the login page. There is no option for them to join as a ‘Guest’ or to request entry in any other way. You as a host would not need to accept or decline the attendees.
D. Locked Down Room *plus* Passcode – This is example ‘C’ above but with the addition of a passcode. Everything is the same but after the board member enter their login and password they are asked for the secret passcode you gave them as a part of your communications…if they do not enter the correct passcode they will not be granted access to the room.
This might seem redundant, but you might use this if you run a session multiple times (weekly) and you want the added security of a weekly passcode, even for registered attendees. The registrants remain the same, but the passcode changes.
E. Company All-Hands (bulk import of attendees) – There are a few ways to approach this, depending on how much security you want for the event. Chances are you want to limit this to your organization , but it is likely you also do not want to manually accept or decline hundreds of people (accepted guests).
The most security would be using scenario #1 above, adding all company attendees to your account with a login and password. You can do this easily if you have your account synchronized using LDAP (for example). Add all of the company to a group for this session. If you do not have Connect synchronized then you can add all of the company attendees to your account by using a CSV import (see here).
In either case, then add the group to the room using ‘Edit Participants’ and give the group the role of ‘Participant’.
Each company attendee would need to use their login and password to enter the room, no ‘Guest’ access would be available to them.
F. Company All-Hands (Connect Events registration) – This is also a perfect scenario for using Connect Events (registration) as you would send the registration link to your organization and each person would either use their existing Connect credentials to register, or make themselves and account and register for the event.
In this case you would again use scenario #1 for access permissions. The attendees would need to register with Connect Events to have access to the session and in fact they would not event see the option to login as a ‘guest’ as it would bypass the login page and essentially ‘mask’ the room URL.
Using Connect Events has the added benefits of you being able to see who has registered prior to the event and to filter out (deny) access to anyone not using their company email account (for example). Connect Events would also send the appointment, reminders, follow-up emails.
F. Company All-Hands (All Account Users) – This would be used if you have already given created logins for all of your company team members in your Connect account.
The room would have access set to scenario #2 above (‘Only registered users and account members may enter the room’). The key here is that anyone with a login on your Connect account would automatically have the rights to enter the room (they do not need to be in the ‘Edit Participants’ section of the room.
To be honest, this is pretty much an edge-case scenario, but I would see this as valuable if you wanted to have a meeting with any of your Connect hosts as you know they have account logins…but in truth it is just as easy to add the ‘Meeting Hosts’ group etc. to your room under ‘Edit Participants’.
G. External Vendor Training Class – Here we have a typical mix of registered users and guests as the instructor would need a login and password to be the host for the session, and the students would likely enter as ‘Guests’ as most instructors do not want to add the complexity of a login and password for each student.
In this case we would be using scenario #3 but as always the diligence is with the instructor to manage access to the room as per example ‘A’ above and checking access against the class roster.
As the external students request entry to the class, the instructor would check them against the class roster and accept or decline them based on their name or email (whatever was communicated as the information to be entered into the ‘Guest’ field).
Be aware that the instructor will not only see the option to ‘allow’ or ‘Decline’, but also the option to ‘Decline with a message’. This latter option allows the instructor to ‘correct’ a login…if a student was supposed to login with their company email, but entered their personal email address, the ‘decline message’ would instruct the student to try again with their company email address, which the instructor would of course still check against the roster.
Again, you can add the passcode option from scenario #5 and change this by session if you want to add a level of security on top of the class roster.
H. Drop-In Session – This is really the only broad scenario that I can imagine using scenario #4 (‘Anyone who has the URL for the meeting can enter the room’).
This might be a session for parents to drop-in with questions on financing for their university-bound family. Security is not really an issue and ease-of-entry is key. This might also be an open session for potential attendees in a future session to ensure that they are able to join a room without issue.
In these scenarios there is really no concern that entry needs to be limited to a certain group.
Managing Unruly or Undesirable Participants
In any scenario, the ability to manage undesirable attendees, messages, cameras, links etc. is critical and with minimal preparation in your room you can plan for everything going well, but allow for things to go wrong as well.
One option is to create a layout which is the equivalent of ‘safe-mode’ in your room to give you time and a place to sort things out. In this ‘Safe-Mode’ layout you can move the Attendee List Pod into the Presenter Only Area (POA), have moderated chat pod (Q&A Pod) on stage and manage those questions in the POA as well. It is not a bad idea to have a simple slide/graphic communicating ‘Normal service will resume as soon as possible‘.
Just moving to this layout will immediately remove any immediate opportunity for rogue messages, cameras etc. while you work out what is going on.
You can see more detailed explanations of how to manage the actions below in my blog post here.
Removing Users – You can select one or more users in the Attendee List Pod and then in the ‘Pod Options’ menu select ‘Remove Selected User(s)’. Once you have removed an undesirable attendee(s) you can block incoming attendees from re-entering or even requesting entry.
Put the room on ‘Hold’ – This option allows the presenters and hosts to remain in the room, but places the participants on a ‘hold’ outside of the room. Again this allows you to take some time to change room permissions, add a passcode or check the roster. You can have a message shown to the participants that explains what is happening.
Camera Pod – If your issue was attendees turning on their cameras (something you would have needed to explicitly allow BTW) then one-click tot he ‘safe-mode’ layout would remove the camera pod…giving you time to think and turn off camera rights…or be more selective with them.
Q&A Pod – You can use the Q&A Pod to send a message to the attendees and communicate widely or to an individual without disruption.
End the Meeting – Worst case scenario, you can go to the ‘Meetings’ menu and use ‘End Meeting’ to remove everyone and start again.
Enabling Passcode for Connect Rooms (Administrator)
The room passcode option listed as scenario #5 in the options above is not active on your account by default. This needs to be activated by your Connect account Administrator. Instructions for this are below.
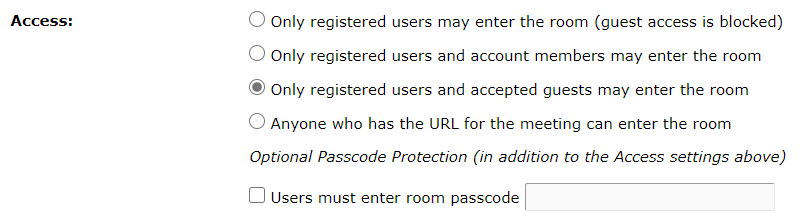
As an Administrator, go to the ‘Administration’ tab and then ‘Users and Groups’>’Edit Login and Password Policies’. Scroll down on the page to ‘Room Passcode’ and ‘Enable Meeting Hosts to enforce passcode for room access’, scroll to the bottom of the page and ‘Save’ (figure 2).
The meeting hosts will not wee the option to enforce a passcode for their rooms. They can change this from ‘Edit Information’ for the room and the passcode will remain until it is removed or it is changed.
With this administration setting, the meeting hosts have the option to enforce a passcode.
If the second checkbox in figure 2 is also enabled (‘Force passcode for room access’) then when the host goes to ‘Edit Information’ for their room, they will not be able to close or save the information *without* entering a passcode. You have now enforced passcodes for all new or edited rooms in the account.
Figure 2