Overview
At the time of writing this post (August 2020), the Adobe Connect conversion process does not support video inserted onto slides. Although it is commonplace to extract (save) the video separately and load this into the Connect room into a separate Share Pod…sometimes it is desirable to have a more ‘seamless’ presentation that is easier for non-technical presenters.
This can be achieved using Adobe Presenter. This is a standalone tool that is essentially a plugin to PowerPoint. It will appear as a menu in your PowerPoint application once installed.
You can download a free trial of Adobe Presenter from the link below or contact your Adobe Connect account manager as we may be able to add this to your Connect subscription.
https://www.adobe.com/ca/products/presenter.html
Overall Adobe Presenter Process
It is worth understanding where we are trying to go overall with this. The way Adobe Presenter works is that you can add narration to slides, sync it with the animations and slide changes, add quizzes and interactions, add media (in our case video) and then this content is ‘published’ as interactive and media-rich content.
The typical publishing options would be to an LMS (such as Captivate Prime), or to your desktop as a PDF or zipped standalone file, or in our case directly to Adobe Connect.
Finished Product – Recording
To give this tutorial some context, I have included a quick recording of the finished product below. This will let you see what we are trying to achieve before we get into the tutorial.
I suggest you view this recording using the Connect Desktop App. if you see any issues viewing this in the HTML client. The first video is a little ‘heavier’ than I would typically use.
http://getconnect.adobeconnect.com/pfmu1xo9ddeg/
Getting Started
Open PowerPoint and load the slide deck that contains the video(s). You will see something similar to figure 1 below.
The Adobe Presenter plugin appears as a menu/ribbon in PowerPoint. for the purposes of this example we will have both regular slides and slides with video that has been inserted (or drag-and-dropped) into PowerPoint.
Installing Adobe Presenter is a prerequisite to this tutorial.
Save your slide deck into a project folder before we begin.
Figure 1
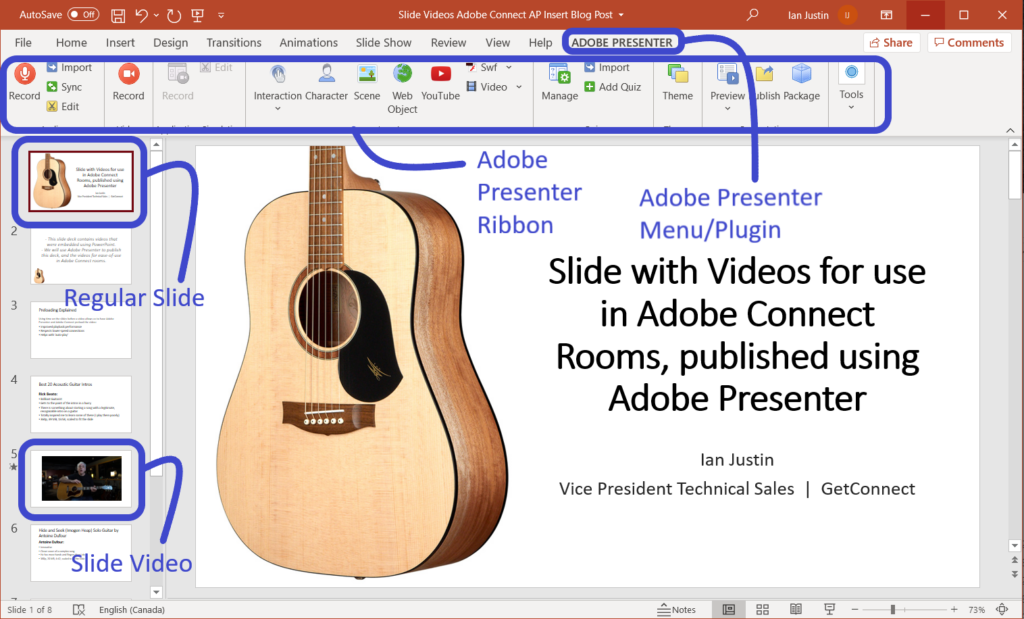
Regular Slides
You can leave the regular slides with their animations and transitions, assuming you want to translate these into your Connect room. You can also add a narration but in our case we are assuming the narration is live in the Connect room.
Slides with Video
Adobe Presenter does have the capability to simple publish the slide deck with the video that has been added to the slide, with no intervention and no matter how it was added. In my experience, just publishing as it stands will cause issues with sync between users in Connect rooms, it will not be consistently viewable on HTML and the legacy Connect Desktop App.
My process is as folows:
- Select the video and right-click, select ‘Save Media as…’ and save this into your project folder (figure 1).
- Delete the video from the slide.
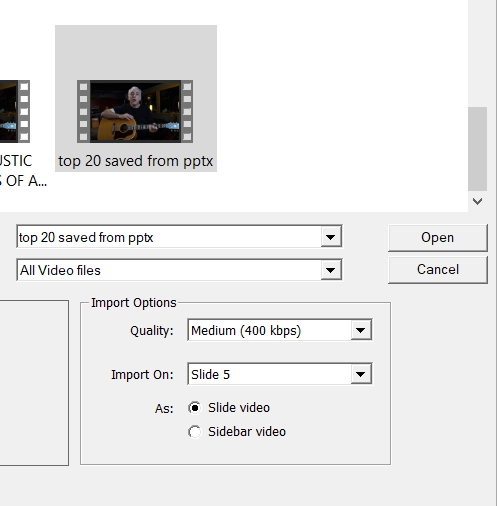
- In the Adobe Presenter menu, select ‘Video’ and ‘Import’ (figure 3).
- The defaults for the video should be good, mine defaults to ‘Medium’ quality and it should also default to ‘Slide Video’ (you do *not* want ‘Sidebar Video’). See figure 4.
- Resize and position the video on your slide (hold down the ‘Shift’ key to maintain the aspect ratio).
- Repeat this process for any other videos (it should take less than 30 seconds per video at the most).
- Save the PowerPoint deck.
Note – I tend to be overly cautious with video bandwidth so I take the video into an encoding program and re-encode it to a reasonable format, say 480p, 720p at the most, before loading it back into PowerPoint using Adobe Presenter.
If the video in your final presentation seems to be not appearing in Connect, chances are that it is loading, but rather large for the connection.
Figure 2
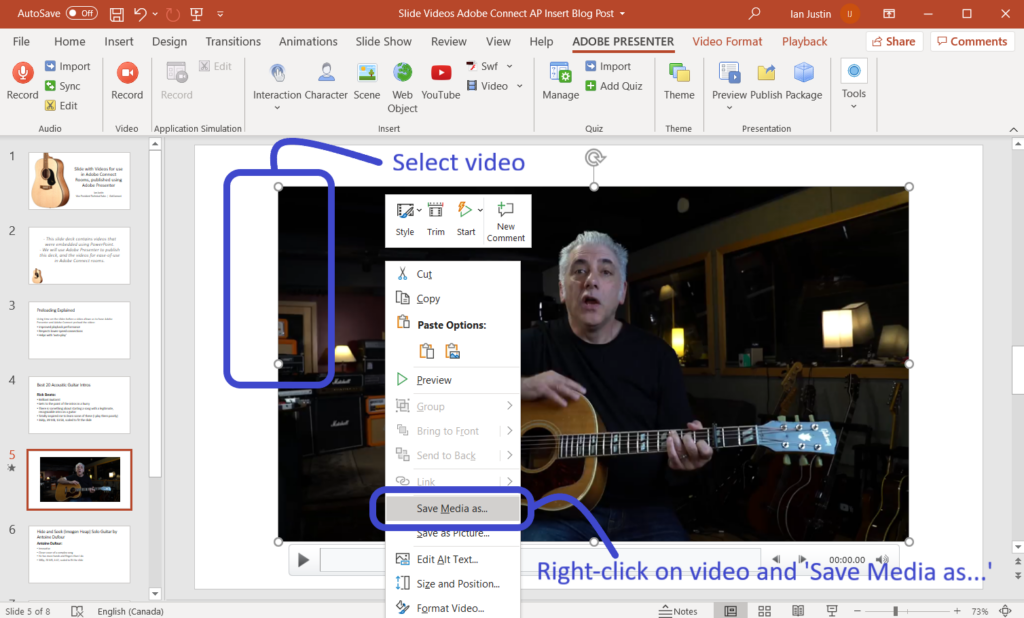
Figure 3

Figure 4
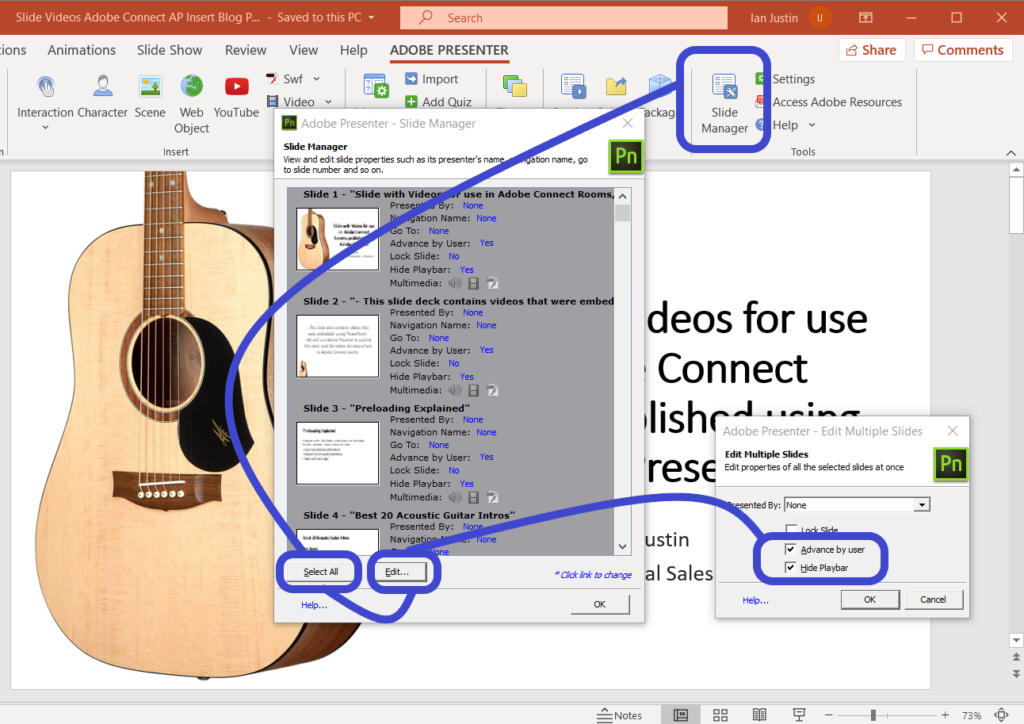
Configure the ‘Slide Manager’
Now we are going to move through a few settings to make this work within Adobe Connect.
Open the ‘Slide Manager’ (note that this option may be ‘hidden’ under ‘Tools’ if your PowerPoint application is not wide enough on-screen)
Choose ‘Select All’ and ‘Edit’ in the next pane, then ensure to check ‘Advance by user’ and ‘Hide Playbar’ in the next pane. Click ‘OK’ and ‘OK’ to close these panes (figure 5).
Figure 5
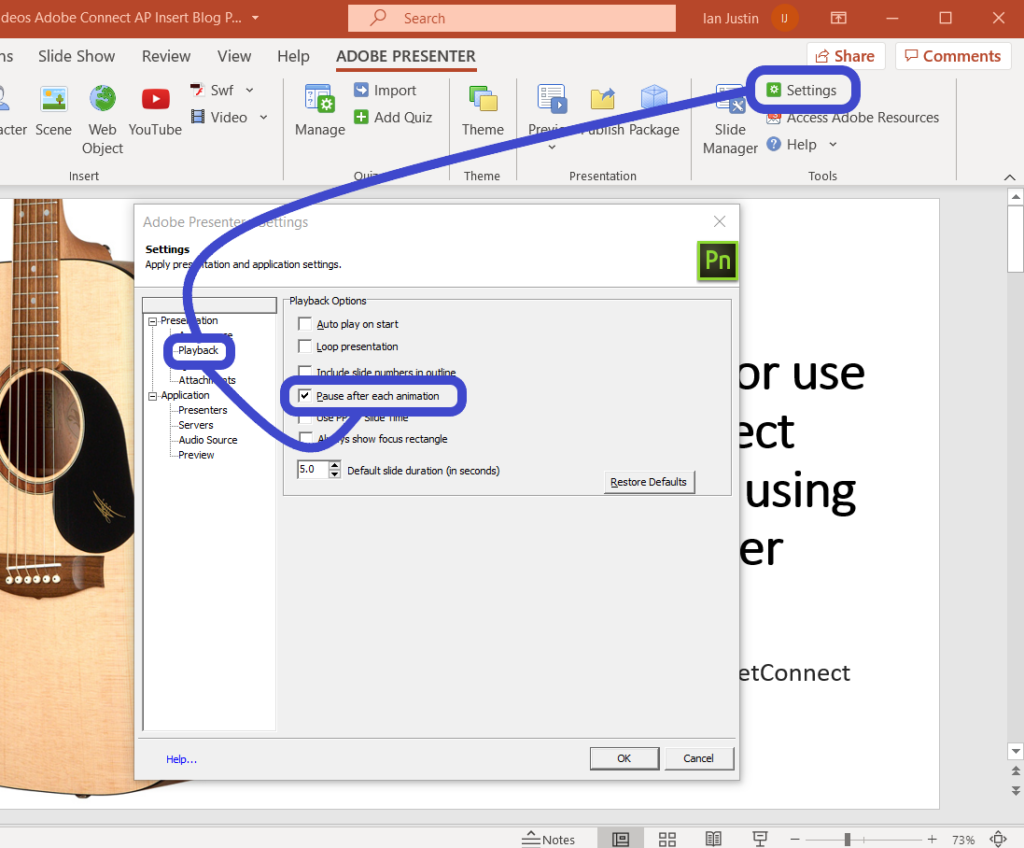
Configure the ‘Settings’ Pane
Now open ‘Settings’ (again, note that this option may be ‘hidden’ under ‘Tools’ if your PowerPoint application is not wide enough on-screen).
Select the ‘Playback’ option and ensure you have checked ‘Pause after each animation’. Click ‘OK’ to exit this pane.
Figure 6
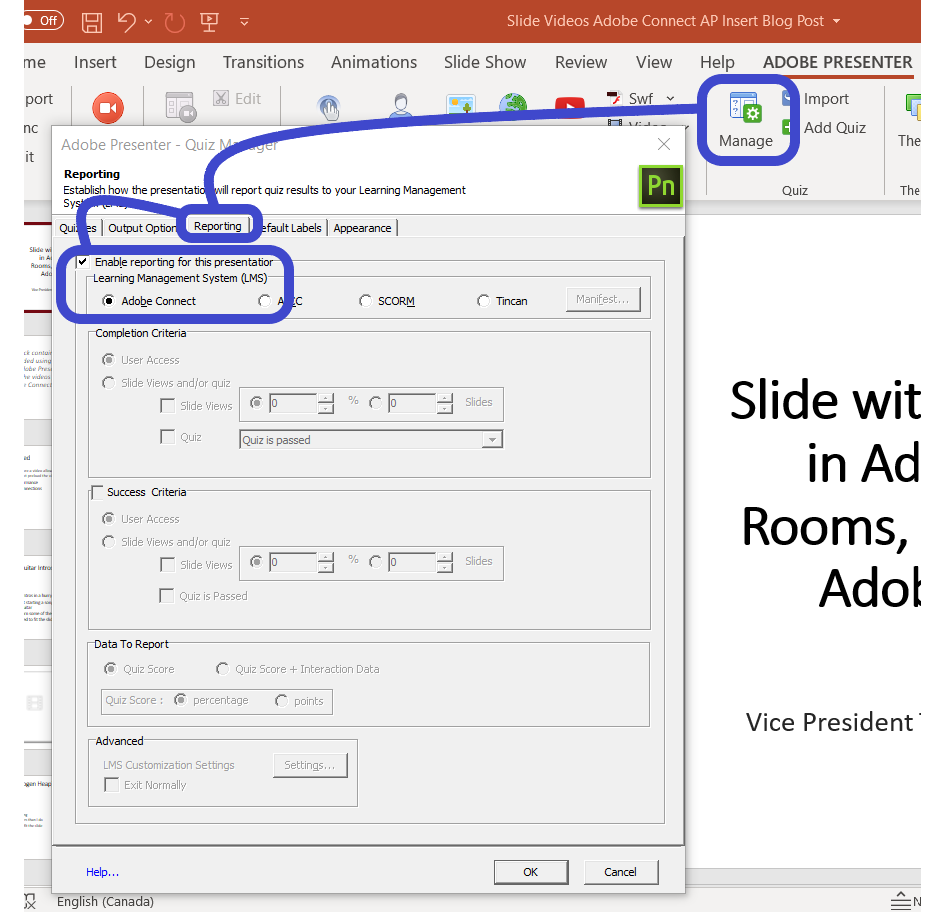
Configure the ‘Quiz Manager’
This is an odd one…but in order for the content to be visible in the Connect account you need to do the following.
Go to ‘Manage’ in the ‘Quiz’ secito9n of the Adobe Presenter ribbon, now select the ‘Reporting’ tab and ‘Enable reporting for this presentation’, select ‘Adobe Connect’.
Again, you are not reporting a quiz or adding questions…just go with this one or it is possible that the presentation will not appear as valid content in Connect.
Figure 7
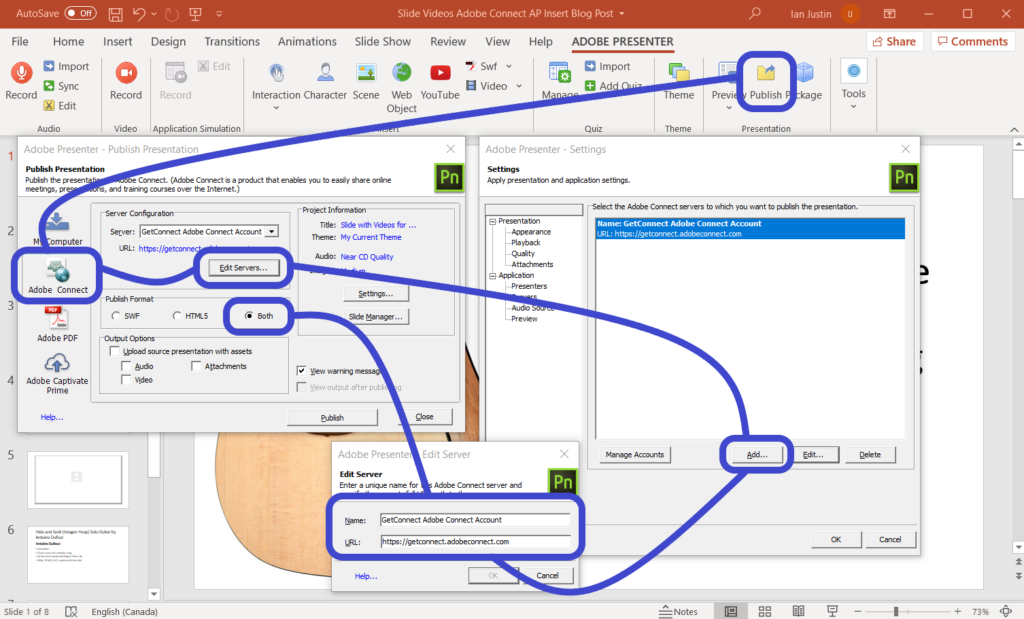
Publish your Presentation to your Connect Account
Now to publish the content. As this is the first time you have done this (along with most of these settings) you will need to do some first-time configuration. You can follow along in figure 8 below.
Click on ‘Publish’ in the Adobe Presenter ribbon, then select ‘Adobe Connect’ as the destination. As you have not configured any servers yet, you want to tell Adobe Presenter which account you are using, so select ‘Edit Servers’.
In the next pane select ‘Add’ and in the ‘Name’ field you just want to add an identifier for your benefit, in the URL field add your Connect account domain (in my case ‘https://getconnect.adobeconnect.com’).
Now close these panes and in the main ‘Publish Presentation’ pane select ‘Both’ under ‘Publish Format’ as you want this to be visible in the legacy Connect Desktop App. and in the HTML/browser-based client.
Note – It is likely that you will just select ‘HTML’ when the v11 Connect accounts are active.
Start the process by selecting ‘Publish’.
Figure 8
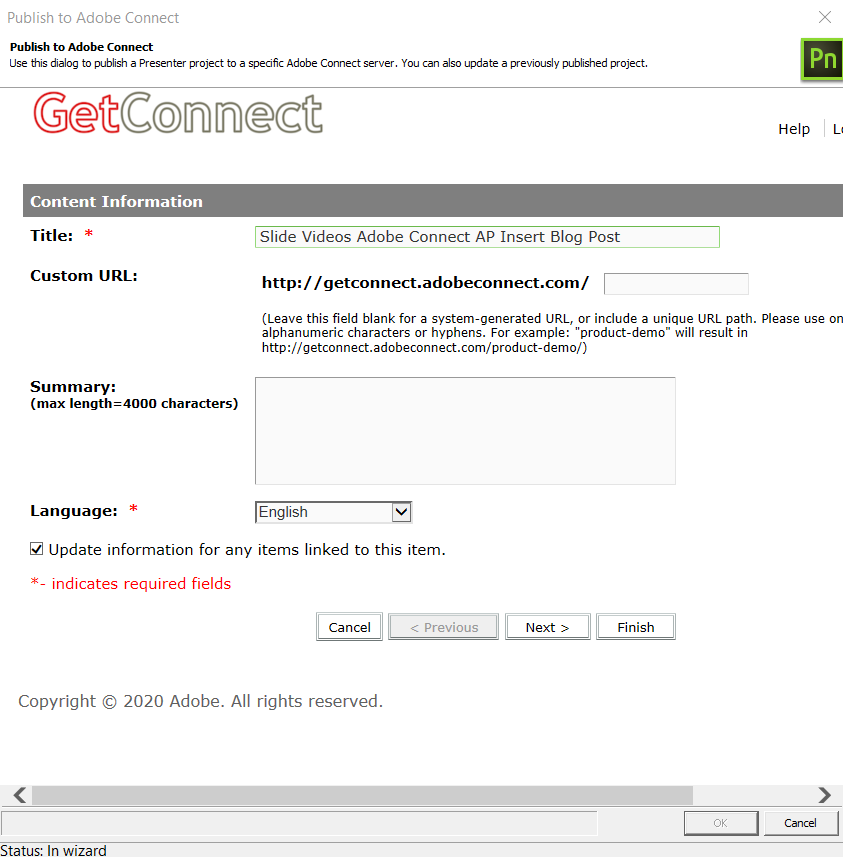
You will be asked to login to your Connect account so add your login and password to get to your account (figure 9).
In your account, you will be taken to the ‘Content’ tab. Select the folder (or make a new folder), give the content a name and ‘Finish’ 9figure 10). The content will now be formatted and loaded into your Connect account.
Note – If you have previously published this content, you will have the option to publish it again (update the existing content) or to create a new version.
Figure 9

Figure 10
Using the Presentation to your Connect Room
Open your Connect room as a Host and find a Share Pod. In the Share Pod select ‘Share Document’ and navigate to the document in the ‘My Content’ or ‘Shared Content’ section (depending on your publish location). Add the content to your room Share Pod.
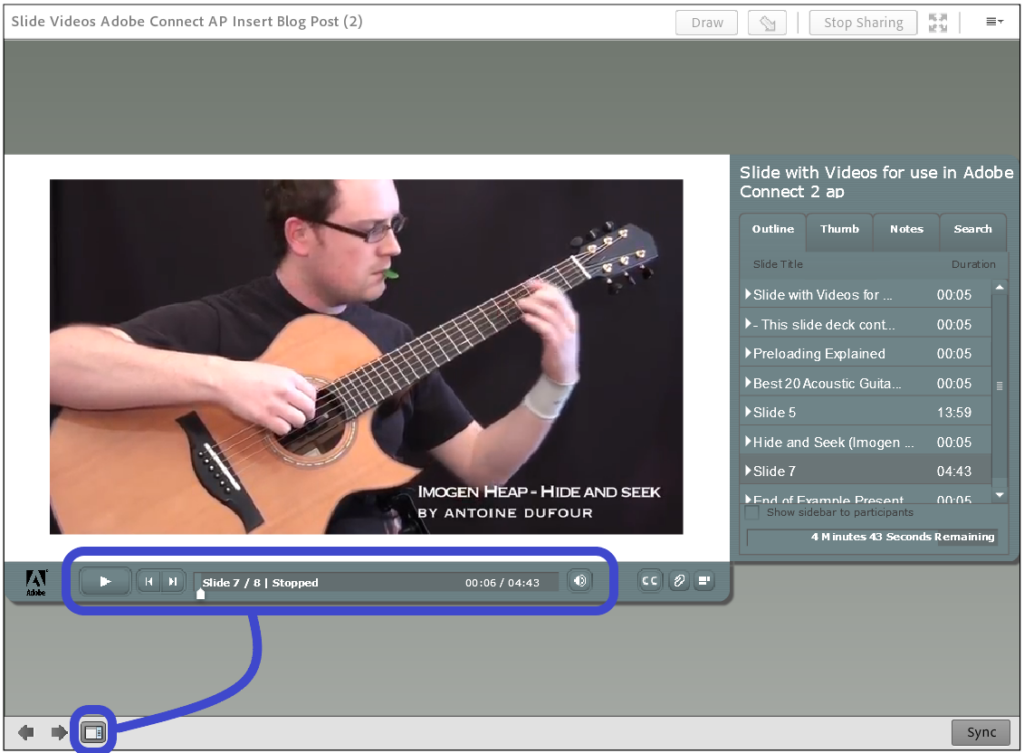
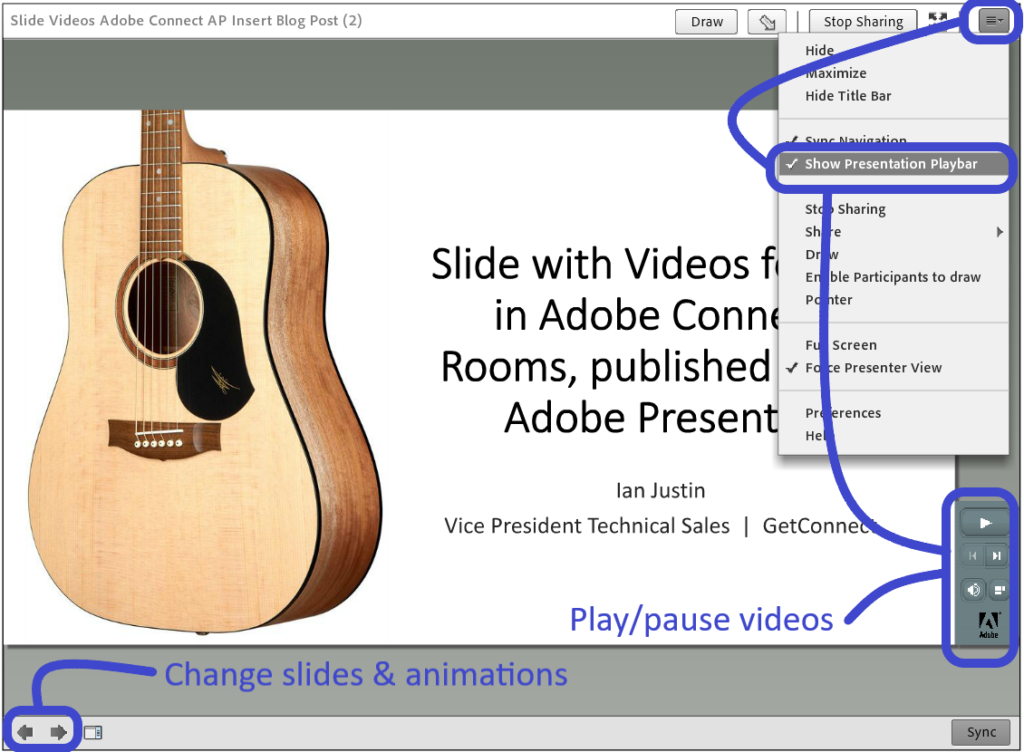
Go to the ‘Pod Options’ menu to the top-right of the Share Pod, turn on ‘Show Presentation Playbar’ and the video controls will appear to the bottom-right of the Share Pod.
To run the presentation, use the regular slide/animation arrows to the bottom-left of the Share Pod. When you get to a video slide, use the playbar video controls to the bottom-right.
Figure 11
To move the video to a specific time-stamp you can toggle on the ‘Side Bar’ (really the bar across the bottom is what we need). Click on the small box icon to the right of the slide arrows to the bottom-left of the Share Pod (figure 12).
Remember that the participants are not seeing any of these controls.
Figure 12