Sometimes you will need to show a participant exactly what you are doing on your computer desktop.
You can share either your whole desktop, or a specific desktop (if you have more than one monitor) or individual applications or windows in Connect Meetings
First let’s understand the options of just what you can share
Desktop – In this option you are sharing your whole monitor, which is good in that your participants will see everything you are doing…of course this can also be bad because participants can see everything you are doing! You would use this technique if you were either showing people something that involved desktop interactions or if you were jumping between many applications
Application – If you choose this option then you are able to share (for example) the whole Excel application. In this case any workbooks or copies of Excel you have open are available to be shared with clients. This works well for example if you have a browser and you want to share both the web sites and any other sites or windows that are spawned by a web site (such as a pop-up form to get help)
Window – In this case you are choosing to share a very specific window (or group of windows). This means that you can be very confident that you are only sharing a single spreadsheet for example, not accidentally sharing a more private or confidential spreadsheet with your audience
So how does this work exactly?
When you are in a Connect Meeting you need to use the ‘Share Pod’. In the center of the ‘Share Pod’ is an option that says simply ‘Share My Screen’ (Figure 1). When you click on this option you will see a dialogues box, this box will differ slightly in look on a Mac or a PC, but the functionality is essentially identical
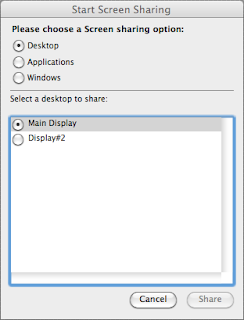
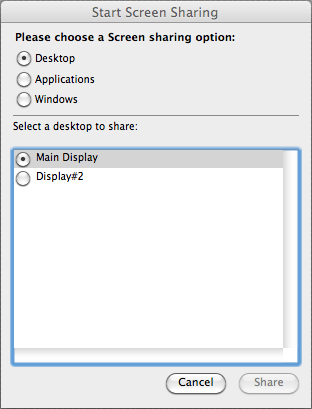
If you select ‘Desktop’ then you are going to share your desktop with the participants. If you have more than one monitor connected to your system then you will see the option to select the monitor you wish to share (Figure 2). Note that a good best practice is to have your Meeting Room on one monitor and then share the screen or applications from another monitor, that way you can see both your meeting and the applications you are sharing at the same time and see just what your participants are seeing (see here for more information on this technique)
Figure 1

Figure 2
If you choose the option to share ‘Applications’ (Figure 3) then you will be presenter with a listing of all of the applications that are currently open on your computer. In the example I am using (Figure 3) I have chosen to share Microsoft Word only, but note that I could choose to share Word and Safari if I wanted to select multiple items
Figure 3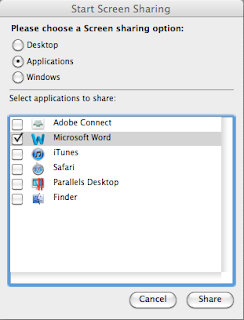

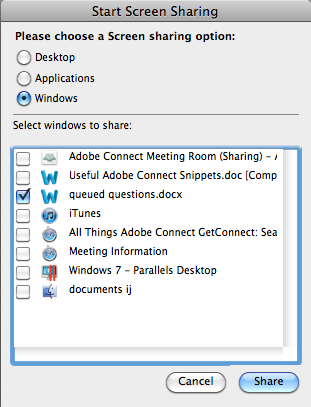
The final option is to share a ‘Window’. This is similar to the option to share an ‘Application’ but you are specifying exactly which window you wish to share, for example just a single Word document when you have more than one document open on your desktop. The example I am using (Figure 4) shows that I have two Word documents available to me, but I have chosen to only share ‘queued questions’ with the participants
Figure 4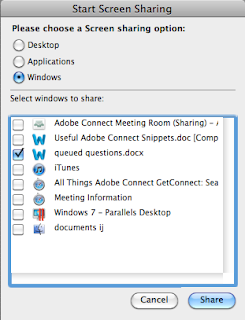
If you are sharing a ‘window’ or an ‘application’ and you open another window over the top of your shared item, then you will see it perfectly (as you are the presenter), but participants will see a hatched blue box. Connect in this case is ensuring that you are not sharing content by accident. For example if you shared your browser as an application and then opened an IM window, you would see the IM perfectly, but participants would see a hatched blue box instead of the IM window (see Figure 5)
Figure 5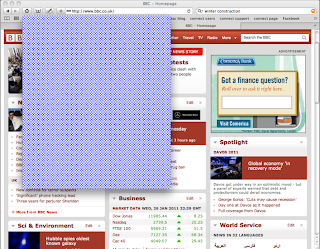

Now there is a little bit of confusion sometimes about what happens next. When you select ‘Share’ your Connect Meeting Room will seem to disappear, which can be a little disconcerting to say the least. Connect is actually minimizing your meeting as it assumes you actually don’t want to share the meeting itself, you actually want to share something on your screen, so it puts Connect away for a while. It is still there, it is the small-minimized green icon in your Toolbar (Figure 6)
Figure 6
You do not need to open the meeting again, but often you might want to ‘maximize’ the meeting again from the icon so that you can have the meeting on one monitor and the items you are sharing on your other monitor (for more information on ‘seeing what you are sharing’ see also here)
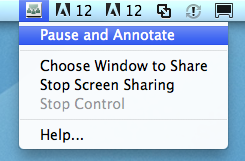
White-boarding when Sharing you screen – if you want to white-board over the items you are sharing from your desktop then you have the option to ‘Pause and Annotate’. You can achieve this by finding the little green icon for your Connect Meeting while you are sharing (from your Toolbar), right-click or click on the icon and select ‘Pause and Annotate’ (Figure 7). This will drop an image of whatever you are sharing into a whiteboard in your ‘Share Pod’ and start the Whiteboard, you can sketch away to illustrate points and then when you want to continue click ‘Resume’ to move back to sharing your screen
Note – this happens very quickly so you may not even realize you have moved to the whiteboard or back to sharing your screen, try it a few times and it will make sense
Note – this is the one time when whiteboards in Connect Meetings are not persistent and saved, when you resume sharing your desktop the whiteboard is erased. If you want to save the markup then you can print it using the ‘Print’ option from the ‘Pod Options menu, you will find this at the top-right of the ‘Share Pod’. If you want to reuse the whiteboard in the session, you can print this to a PDF printer and drag the PDF back into your ‘Share Pod’
Figure 7
When you are done sharing your screen, you can stop sharing by clicking on the green icon and selecting ‘Stop Screen Sharing’ (Figure 8) to bring back the Meeting Room again, alternately if you want to move to another window to share seamlessly then you can select ‘Choose Window to Share’ (Figure 8) and then select the next window as we discussed earlier in this document
Figure 8
