With the social-distancing in the wake of Covid-19, many physical exhibitions and conferences are being canceled and the alternative is to create virtual sessions.
This blog post covers a relatively simple approach to virtualization using Adobe Connect.
Scenario – in this example we will look at creating a main conference room (where larger joint sessions would occur) and 4 smaller rooms (where focused breakout sessions will occur).
The intention is to allow attendees to self-choose the breakout sessions they attend and to allow individual reporting from all sessions (to allow a formal attendance credit for example).
Licensing Requirements – The type of Adobe Connect license used for this example is actually irrelevant, what is relevant is that there needs to be 5 independent licenses in this scenario to allow 5 independent rooms to run at the same time.
What determined the licenses used is the capacity required in the main room and the breakout rooms.
In this example we are going to use a Named Virtual Classroom Manager license (200 capacity) for the main room and 4 Named Host licenses (100 capacity) for the 4 Breakout Rooms.
Why not use the regular Connect Breakout Room functionality? – The Breakout Rooms that are included in all Connect licenses have huge potential for group learning, role-play, individual testing etc. But they do not allow self-direction to rooms by attendees, they do not report attendance or polls independently and they are limited to a maximum of 200 total attendees in total across 20 Breakout Rooms.
Adobe Connect Breakout Rooms are massively powerful, but this use-case is a different scenario.
Build the Main Room – As discussed, in this scenario, the main room is going to use the 200 person Named Virtual Classroom Manager license.
Go to the ‘Training’ tab and ‘New Virtual Classroom’ and build your main room.
Depending on whether you choose to have people register using ‘Connect Events’ for this session, you will need to choose the appropriate ‘Access’. This use-case is also suited to the ease-of-access and functionality in Connect HTML client so select ‘Enable HTML client for participants’.
In the main room you will set up your layouts as usual for your presentations and your main session. PowerPoint files, videos, as usual.
You will add another layout that will be used to let attendees self-direct themselves to their chosen breakout sessions. Just leave it with an unused Share Pod for now.
Build the Breakout Rooms – The Breakout Rooms in this scenario will be built in the ‘Meetings’ tab using the Named Host licenses.
As the Breakout Rooms are (by definition) similar in their function, it makes sense to build the base room in the ‘Shared Templates’ area and then it can be cloned to make the other Breakout Rooms.
Navigate to the ‘Meetings’ tab and ‘Shared Meetings’>’Shared Templates’. Select ‘New Meeting’ (it really should say ‘New Meeting Room’ BTW) and build the template for your Breakout Rooms here.
The structure of the room is again up to you, but as this is a template for multiple rooms, add any layouts or content that will be consistent to all Breakout Rooms into this room.
For example, you may have a layout which contains multiple polls that are used as an end of session evaluation in all Breakout Rooms, add this to the template so that you do not have to recreate these polls in each Breakout Room. You can also add blank ‘Share Pods’ into which you can load the relevant PowerPoint presentations or videos, multiple layouts mean that you can have ‘spaces’ for multiple sessions in each Breakout Room.
Ideally, plan to build anything you can into the template to avoid having to rebuild layouts and content multiple times in the individual rooms.
With the Breakout Room template completed, go to the ‘Meetings’ tab and build your Breakout Rooms by ‘cloning’ the template.
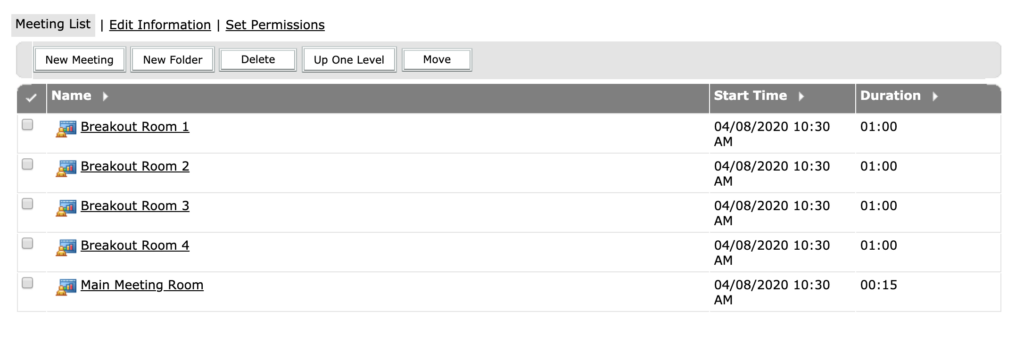
Depending on how you want to manage your Breakout Rooms, you can build them in the ‘My Meetings’ area (each Named Host license holder builds their Breakout Room in their own area). Alternately you can build the Breakout Rooms in the ‘Shared Meetings’ area so that they can be accessed and managed by multiple Named Host license holders. Example in figure 1 below.
Remember to add the Named Host license holders as ‘Hosts’ to each room from ‘Edit Participants’ if you are sharing responsibilities for managing the rooms.
Figure 1
Building the ‘Self-Directing’ PowerPoint – In order to allow attendees to self-direct their attendance in the Breakout Rooms, the simplest method is to create a simple PowerPoint slide that includes links to each Breakout Room.
For this you need to use hyperlinks in PowerPoint, the simplest option here is to use ‘Shapes’>’Action Buttons’. In PowerPoint, select ‘Insert’>’Shape’>’Action Button’…I have chosen the ‘Forward or Next’ button (figure 2 below).
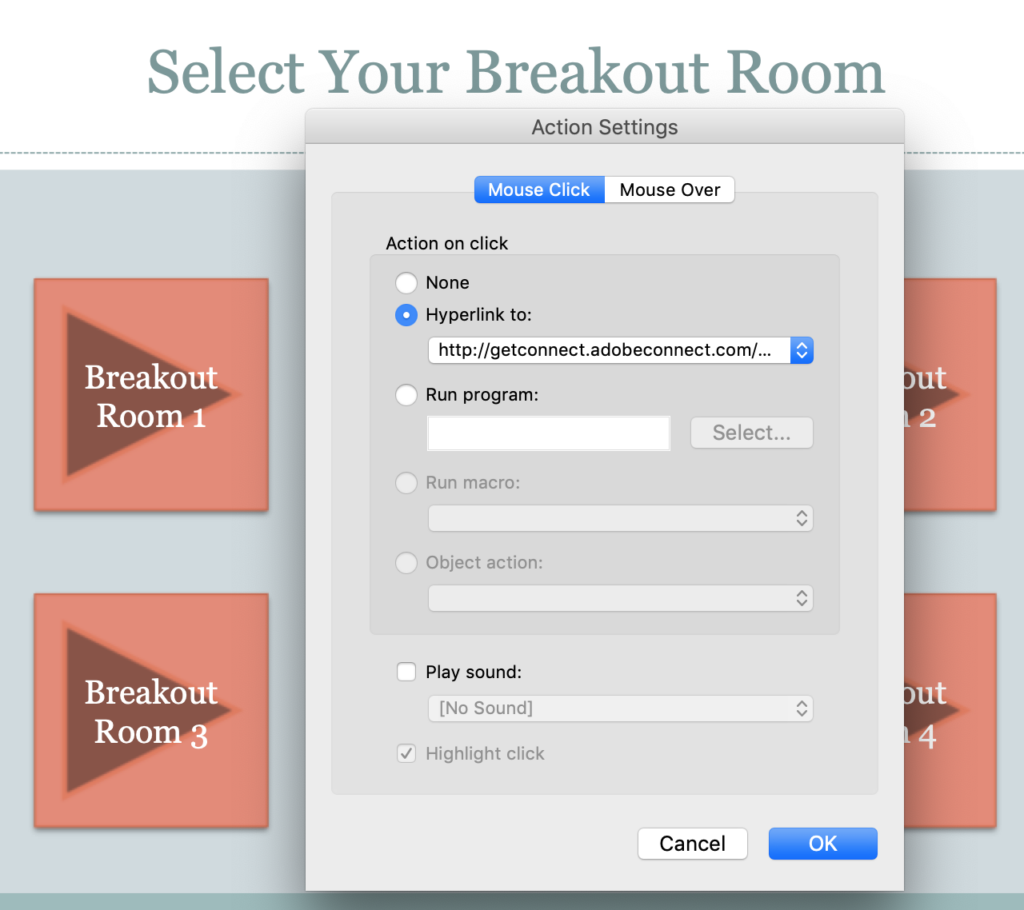
Add this object to your slide and ‘Edit Text’ to give it a helpful name (in figure 3 I have chosen ‘Breakout Room 1’ through to ‘Breakout Room 4’). When you add the Action Button, you will be prompted to select an action. In my example we have chosen ‘Hyperlink to:’ and I have inserted the link to Breakout Room 1 (created earlier).
Repeat this process (copy and paste the existing Action Button and change the link to the corresponding Breakout Room).
Note – If just the room URL is included as a hyperlink, then the attendees will have the option to open the room using a browser or the Connect Desktop App. In this example we want them to use the HTML client, and to choose ‘browser’ to open the room. If you want to force attendees to use the HTML client when they open these rooms, you can append ‘?html-view=true’ to the room URL in the Action Button hyperlinks.
Figure 2
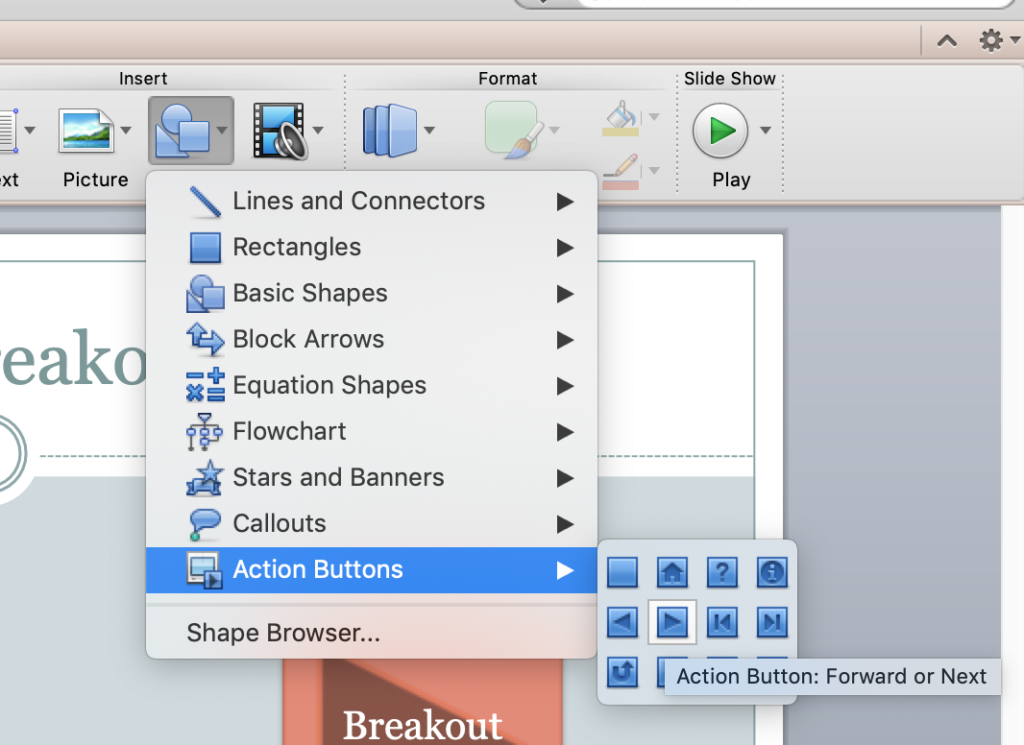
Figure 3
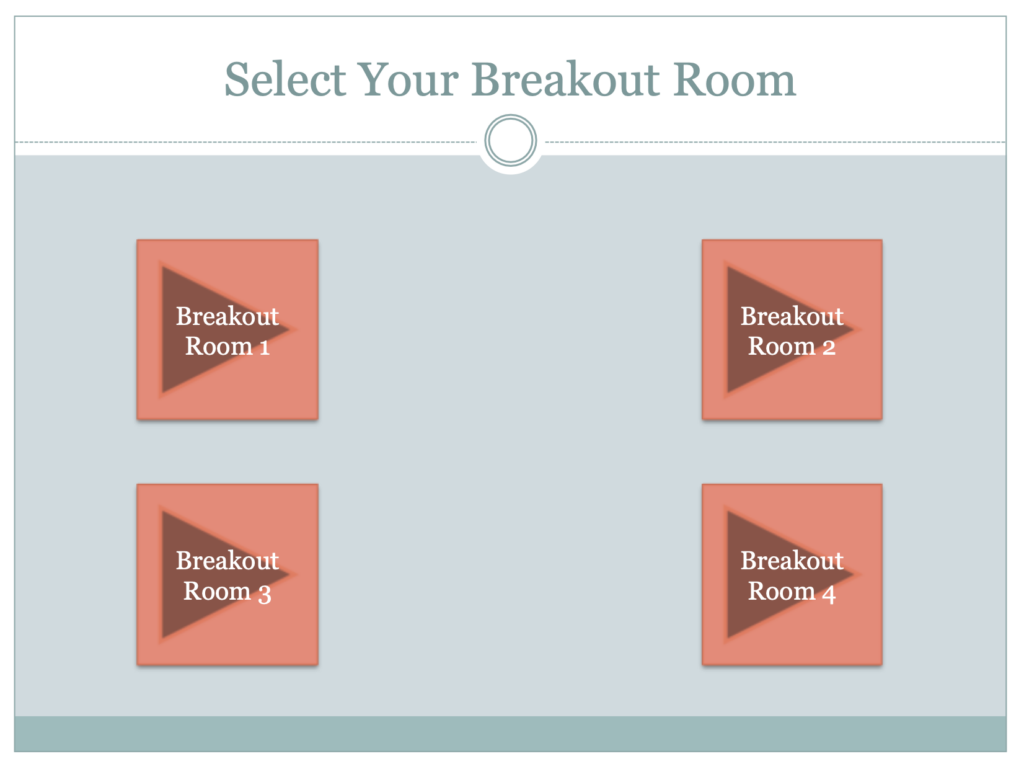
The finished slide will let attendees choose their Breakout Room (figure 3).
Figure 4
Now add the PowerPoint deck to the ‘Share Pod’ you created earlier in the main room. When you click on the Breakout Room buttons it will open the appropriate Breakout Room. The main room will remain and you can instruct attendees to close the main room, or they can leave it open in another tab. The advantage of leaving it open is that it will still be there when you close the Breakout Room sessions.
Preparing/Populating the Rooms – Now that you have the room ‘infrastructure built, you can populate the rooms with the content for the Breakout Room sessions.
My suggestion is to have a lobby area where you can let people wait if necessary. Just have a slide letting the attendees know they are in the right Breakout Room and it can be good to have an MP3 loaded into a small ‘Share Pod’ to let attendees hear that the room is ‘active’ while they wait.
If you are going to have multiple sessions in the Breakout Rooms then creating a layout (or multiple layouts) for each presenter will help you to prepare the rooms and to easily manage changes during the sessions. Essentially you would want to simply move to a new layout which is pre-populated with the appropriate content for each presenter.
As you are probably aware, loading content into the Connect Rooms not only allows you to prepare effectively, it also allows you to save huge bandwidth vs. screen-sharing.
Running the Sessions – Technically a single ‘producer’ could manage this whole process when it is live. The technology is relatively simple…but managing hundreds of users, multiple presenter in multiple rooms is challenging. You will know what you are capable of better than anyone.
#1. Open the Main Room – In this case, this would be the Virtual Classroom. If this room is going to be used for say the first morning, or even the first day of the event then you do not need to open the Breakout Rooms at all yet.
You will need to open the main room with ‘Host’ rights…so in this example you would need to be in the ‘Training Managers’ group and be listed as a ‘Host’ in the ‘Edit Participants’ area for your room.
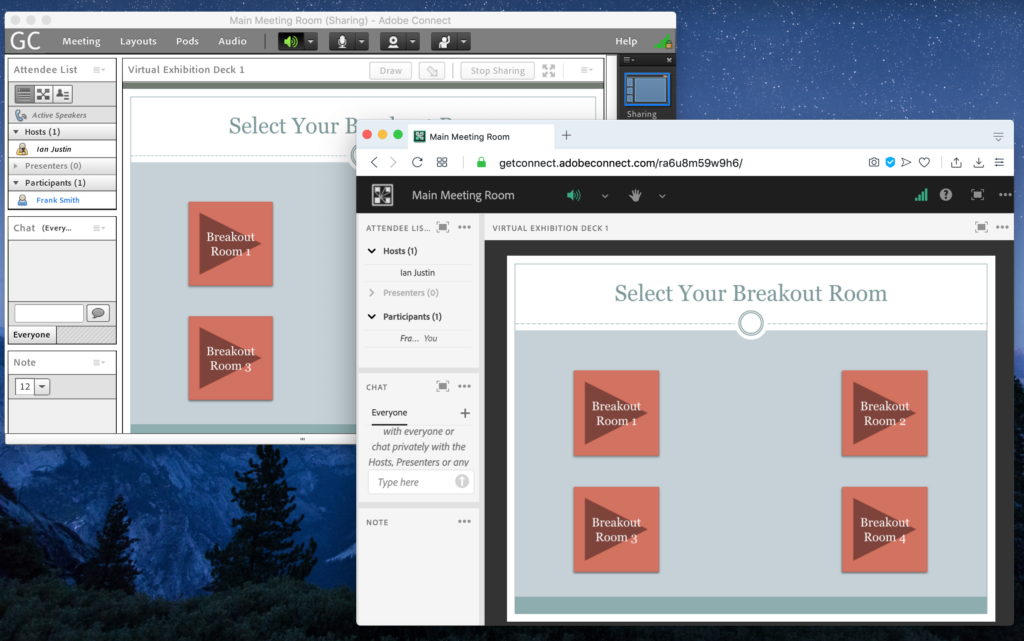
In figure 5 below you can see both the main room as a ‘Host’ (top-left) and the attendee logged into the main room using the HTML client (bottom-right). Note that in the ‘Host’ room you can see the attendee’s name is in blue, this indicates that ‘Frank Smith’ is using the HTML client.
Figure 5
#2. Open the Breakout Rooms – When you are getting close to the breakout sessions starting, open the other 4 Breakout Rooms. You can run more than one room at a time on your PC, but for redundancy and failover (and your sanity!) you might want to have more than one computer and ideally more than one host looking after these Breakout Rooms with you.
Be sure to login separately for each room into a *different browser* if you are using the same PC for all of the rooms. Logging into the same browser in different tabs will not work. Again, different computer and different supporting ‘producers’/hosts would be helpful.
Allow your presenters and session leaders into their respective Breakout Rooms and ensure that they use the Connect Desktop App. at this time (they may be able to use the HTML client in the future, but as of the writing of this blog post the HTML client is for attendees only).
Do not have your presenters login via the buttons in the main room as this may force them to use the HTML client (if you have used the HTMl link noted above).
In the Breakout Rooms, promote your presenters and session leaders to ‘Presenter’ level as necessary. They can lead their session and you can demote them back to ‘Participant’ level. Connect allows as many presenters as you wish, but remember that as presenters they can change slides, use the whiteboard etc. and you do not want the presenters compromising one anothers’ presentations.
#3. Start the Breakout Sessions – At the appropriate time in the main room, explain the process and move to the ‘Breakout Room Choice’ slide we created above. The attendees can choose the Breakout Room they wish to attend and click on that button. The Breakout Room will open in a new tab in their browser (unless you ask them to specifically close it, the main room will remain in a separate tab).
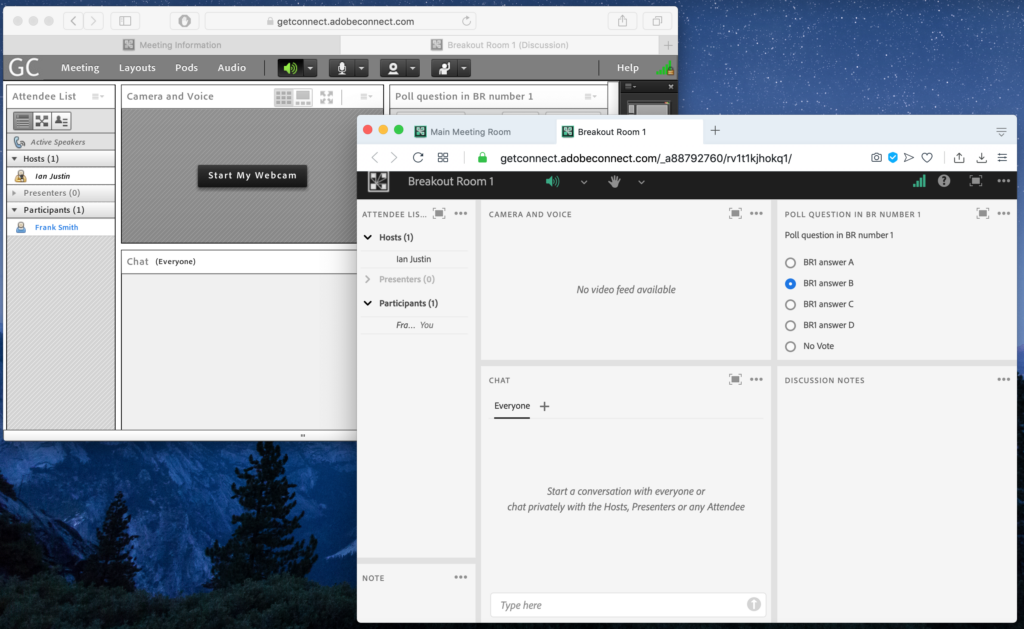
When the attendees click on the Breakout Room button, their credentials will automatically be passed to the new room, they will not need to login again. You can see the Breakout Room ‘Host’ view (top-left) and the Breakout Room attendee view (bottom-right) in figure 6 below.
You can also see that the original ‘Main Meeting Room’ is still in the left-most tab in the attendee browser.
Figure 6
Be aware, that as the Breakout Rooms in this example have a capacity of 100 and the main room has a capacity of 200, it is possible that too many people will try to get into one of the Breakout Rooms. It is up to you how you manage this process…but essentially you will do what you would do in a physical session. Physical rooms have a capacity too, so you can either:
- Let it just happen. If one of the Breakout Rooms is full then the attendees will see a message to that end and will close that tab, return to the main room and choose another Breakout Room.
- Pre-filter the main room attendees and suggest that one group chooses Breakout Room 1 or Breakout Room 2 for t his first session, the other group Breakout Room 3 and Breakout Room 4 for this session. January to June birthdays for example are the first group.
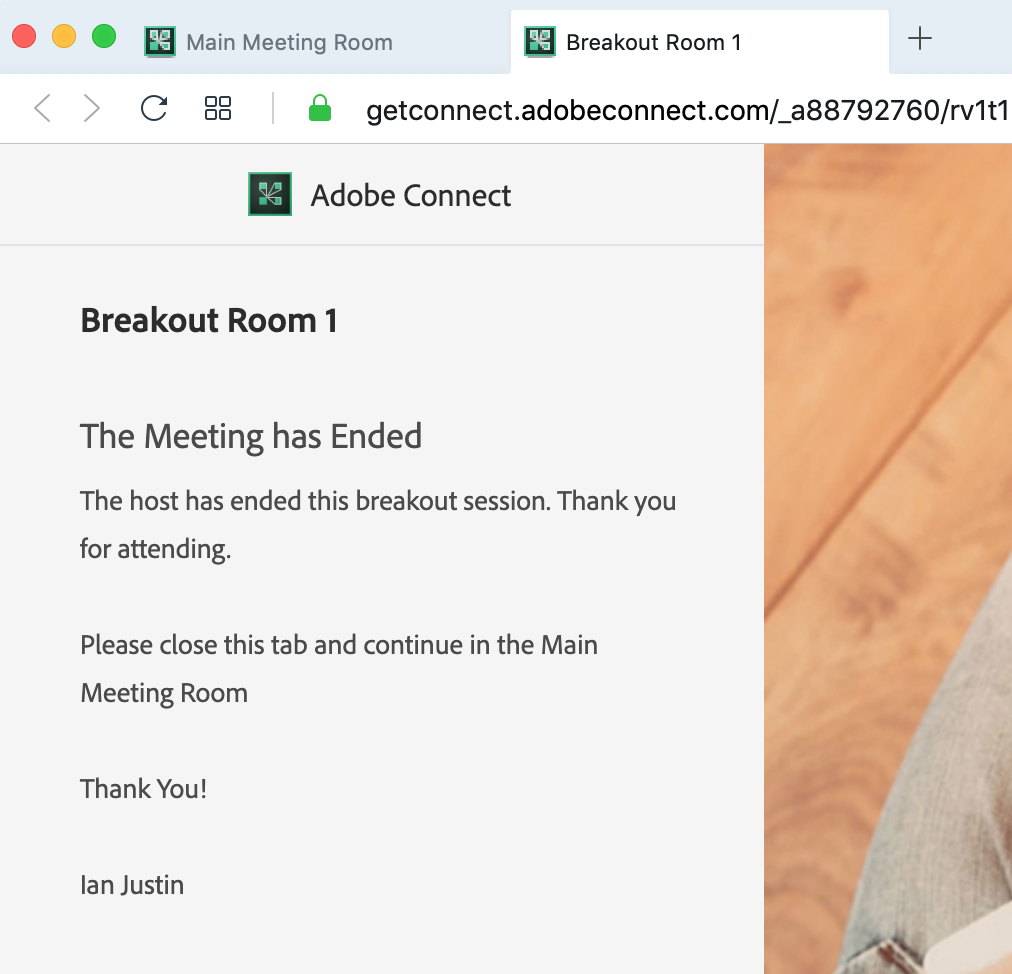
In each Breakout Room the presenter will be able to present their slides, videos and open poll questions etc. When the session is over, you can end the meeting (in Connect) and everyone will be removed from the room. They would go back to the main room and either continue another general session or at the appropriate time, select their next Breakout Room session.
If you use the option ‘End Meeting’ from the ‘Meetings’ menu, you can also give clear instructions to the attendees in the Breakout Rooms on where to go next (figure 7).
While the attendees are in the main session you can prepare the Breakout Rooms for the next presenter/session.
Figure 7
Recordings – The Breakout Rooms are full Connect rooms so it is completely appropriate to record the sessions. I suggest as a best practice that each session is recorded separately to avoid a single, monolithic recording.
Polls – Any poll questions asked in the Breakout Rooms in this scenario will be tracked to the ‘Reports’ section for the individual room. Similarly, any poll questions asked in the main room will be reported individually.
Attendance Reports – Each attendee in the main room or the Breakout Rooms will have time-in/time-out reports in the ‘Reports’ section for the rooms.
Bandwidth – In order to respect the bandwidth of the attendees…if you leave the main room open during the Breakout Room sessions, ensure that you simply leave the Breakout Room self-directing slide on the screen. No video or audio as this will use unnecessary bandwidth and of course in the case of voice/audio it will interfere with the audio in the attendee breakout session.
Ending the Event – Logically, you would end the event in the main meeting room and that will also give you an opportunity to allow any final Q&A, file downloads and end of session evaluations (either as pols or by launching a survey).