Templates allow you to ‘clone’ a room. You may want to clone the ‘structure’ of a room and then populate it with your own content, or you may want to clone a fully functional classroom (for example) with all of the associated PPT, PDF, polls, Breakout Rooms etc. ready to go.
Templates allow you to build a room once and then have all of your users benefit from the effort and they will not need to ‘reinvent the wheel’).
You can build as many templates as you like and make them available to yourself only or to your whole account.
Where do Templates reside? – There are 2 main places where you will create templates in your account:
- ‘My Templates’ – This is found under the ‘Meetings’ tab and under ‘My Meetings’. Any templates in this folder are available to *only* you for cloning.
- ‘Shared Templates’ – This is found under the ‘Meetings’ tab and under ‘Shared Meetings’. Any templates in this folder are available to your whole account for cloning.
To be clear, templates are actually just rooms that reside in a special folder on your account that allows them to be cloned.
Important – Note that you must build templates under the ‘Meetings’ tab. You cannot build templates under the ‘Seminars’ or ‘Training’ tab (Virtual Classrooms). This is why all accounts are provisioned with at least one ‘Meeting’ license, to build templates. You can however clone a template form the ‘Meetings’ tab into the ‘Seminars’ or ‘Training’ licenses.
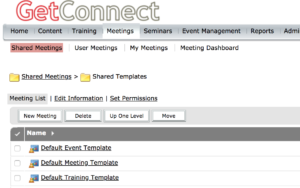
Default Templates – All accounts are provisioned with three ‘Default Templates’ in the ‘Shared Templates’ folder. These are the templates used when you create your first meeting rooms. You can see these in Figure 1 below.
Important – I strongly recommend that you do not edit these ‘Default’ templates, keep them as if there are ‘out-of-the-box’ so that you always have a ‘clean’ template to go back to in case of issues.
Figure 1
Here is the process I follow for creating and making templates available on my account.
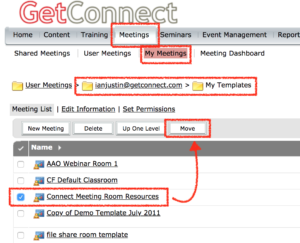
Build and test in your own templates folder – I build templates in the ‘Meetings’ tab and in the ‘My Templates’ folder. This way I can practice and perfect a template before making it more widely available on the account. Remember that if you are practicing in the ‘Shared Templates’ folder, others can clone your half-finished work.
Tip on Process – Consider the ‘My Templates’ folder your ‘staging’ area. When you have perfected a template/room, move it over to the ‘Shared Templates’ folder and consider that the ‘live’ area.
Go to ‘My Templates’ and create a new room, choose the template you wish to clone from the ‘Select Template’ option, typically it is either ‘Default Meeting Template’ for general rooms or the ‘Default Event Template’ for larger webinars. These templates are optimized for these use-cases.
Note – All of these will work for virtual classroom use-cases, the ‘Default Training Template’ is typically only used for LMS integration. Feel free to open any of the default templates however and see if they work for you.
Figure 2
When you have built your room, enter the room and create the layouts you need and even populate it with content (PPT, PDF et.). You can add new layouts, create whiteboards, add text to notes pods or chat pods. Everything will be cloned when you build a room using this template so also be conscious that if you leave the template on a particular layout, at a particular slide and with a messy whiteboard…this will be cloned exactly as well.
Breakout Rooms – If you use Breakout Rooms you can create these as a part of the template and they will be cloned as well.
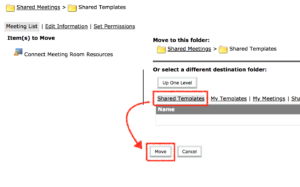
When you have tested your template, you can move it over to the live area (‘Shared Templates’). To do this, show the list of templates/rooms, select the check-box to the left side of the template to move and select ‘Move’ (Figure 3). You will be able to navigate to ‘Shared Templates’ and then ‘Move’ (Figure 4).
Figure 3
Figure 4
Now the template will be available to your account users when they build a new room.
Turning an existing room into a template – Any room can be a template, but you need to be able to move the room to one of the templates folders and these all reside under the ‘Meetings’ tab. If it is a room that resides under the ‘Meetings’ tab then you can move the room to one fo the templates folders to be used as a template just as shown above.
If the room resides in the ‘Seminars’ or ‘Training’ tab then this cannot be moved using the Connect Central user interface you normally use. The only way these rooms can be moved is using the API so this should be a call to Adobe Support unless you are confident with using the API in Connect.
For more details on using templates please also see my Blog Post here.
For more details on how to set up layouts in a Connect room please see my Blog Post here.


