The breakout room functionality in Connect is incredibly powerful. It allows you to create groups of Participants and let them complete assignments as a team or individually in a separate set of environment within your Connect Meeting Room
When you use Connect Breakout Rooms, you are by definition sending your Participants off to separate rooms, so managing and communicating with everyone can be a little challenging unless you think it through. Much of this has nothing to do with technology, it has a lot to do with best practices and planning
It helps to sometimes think of this in terms of the physical breakout rooms you would have in a hotel rather than virtual rooms in Connect. Most people are good at managing physical breakout rooms, so just try to translate this to the virtual world of Adobe Connect
Here are a few pointers that seem to work well for me
Audio
Remember that you can only use VoIP *or* the fully integrated audio if you want to have the voice follow the participants from room to room (see here for details on audio options in Connect in breakout room and here for overall audio information)
Generally, the audio will simply ‘follow’ the participants and leaders from Breakout Room to Breakout Room so it pretty much manages itself
Facilitators and Team Leaders
As a Host, be sure to brief your Participants prior to beginning the breakout sessions. You would not send everyone off to physical breakout rooms at a hotel without briefing them first, so follow the same best practice in Connect. Brief your Participants in the main Meeting Room and if necessary, brief your team leads and facilitators as well.
If you want to brief the facilitators for the breakouts separately, then of course take them off to a Breakout Room in Connect while the main group remains in the main layout
It is also pretty critical that the facilitators have an understanding of Connect as they will need to help the other Participants use the Whiteboard or the Notes Pod during the breakouts, otherwise as a Host you will be running between the breakouts trying to help people change a colour on the Whiteboard!
Broadcasting Messages
As a Host, you can broadcast messages to the folks in the Breakout Rooms using the ‘Broadcast Message’ option. You can find this (kindof hidden) by clicking on the Breakout Room icon (the little yellow cross-thingy) to the top-right of the room. from here you can select to broadcast a message to everyone in all Breakout Rooms. You can see how this works and how it looks from the composite diagram in Figure 1 below
Figure 1

Creating the Breakout Rooms
There are a couple of things to remember when you are creating Breakout Rooms, particularly if you want to sync the rooms to some degree. Here are some pointers that seem to work for me
Creation of Breakout Rooms – a good best practice in Connect is to create a new layout in your main Meeting Room that represents the structure you need for your breakouts. When you create a new Breakout Room (from the Attendee List Pod) the new breakout will be a copy of whatever layout you are currently using. If you keep a layout called ‘Breakout Template’ for example, then you can very quickly rebuild all of your breakouts with just a few clicks
When a layout is ‘cloned’ to create a Breakout Room, each of the pods is essentially duplicated and given the name of the Breakout Room, so ‘Chat’ duplicates to ‘Chat – Breakout 1’, ‘Share’ to ‘Share – Breakout 1’ etc. Each of these pods is behaving completely autonomously. This means that the chat will be confined to each breakout and to the members of that breakout, similarly a whiteboard or a PPT will just display in the individual Breakout Room
It is important to note that content in the pods will not duplicate with the exception of content loaded into a Share Pod such as a PPT or a Flash Movie. Content such as whiteboards, chats, notes etc. will be cleared in the Breakout Rooms
Creating new breakouts from a Layout ‘template’ is a great technique if you want to create clean Breakout Rooms each time, quick and simple
Synching across the Breakout Rooms
There is a little trick that you can employ to sync your content across the Breakout Rooms. First you can build your breakouts as you would normally (as noted above). Ensure that you have a pod that you want to sync in your main Meeting Room Layout (a PPT with assignment instruction for example)
Now go into each Breakout Room and if you want to have the Share Pod with the PPT sync across the Breakout Rooms and the main Meeting Room, you need to add the pod from the ‘Pods’ menu, so select the ‘Pods’ menu, then ‘Share’ and the PPT you require. You will notice that it is a little different in that a pod that was created with the initial Breakout Room is duplicated and titled ‘assignments.pptx – Breakout 2’, whereas the pod you have just added is titled ‘assignments.pptx’ (See figure 2 below)
Now, when you as a Host change the slide in this pod in the Main Meeting Layout, any slide in the Breakout Rooms will change at the same time. This is useful if you have an assignment or detailed instructions that you want to send to all rooms immediately without stopping and starting breakouts each time and bringing everyone back to the main Meeting Room
This is more graphically pleasing and has more potential than the messages you can broadcast to the breakouts as well (as noted earlier in this article)
Figure 2

You can extend this a little further to help you with breakouts
for example, I have 2 Chat Pods in each breakout Room I use, one is a regular ‘duplicated’ Chat Pod and the other is added using the technique above. In this case, the ‘duplicated’ Chat Pod only communicated to the Breakout Room it is occupying, whereas the Chat Pod added in the manner above communicates across all Breakout Rooms and the main Meeting Room. As a Host you can chat from there or see if people across many rooms have questions and then answer to all rooms or jump to the right breakout and help them in person. It is a good idea to rename the Chat Pods to make it clear just what they do (See Figure 3 below)
Figure 3

This also works with the following, this might get you thinking of the possibilities:
File Share Pod – add files for download to the pod in the main Meeting Room and then they are propagated across all Breakout Rooms as well
Whiteboard – Draw in the main Meeting Room and have the diagrams and notes sent dynamically to all Breakout Rooms
Timer – Add the .swf (Connect Extensions) time to a Share Pod in the main Meeting Room and it will count-down equally and sync across all breakouts
Hopefully you get the idea, quite a lot of fun to have this much control and reach in a Meeting Room!
Moving between Breakout Rooms
This really is simple for the Host, just drag your name int he Attendee List Pod from room-to-room and you will be dropped into the correct graphical session and the correct sub-conference for audio. You can move participants around in a similar manner
Helping People and working with Individuals
Breakout Rooms can be used by an instructor to work with people needing a little extra help by simply taking them to a breakout from the main session (ideally leaving another person in the main Meeting Room to continue running the class!)
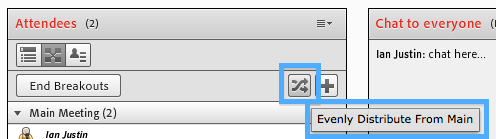
This also works well as a method for testing individuals away from the main group and if you wish to have a number of individuals (up to 20) work independently on an assignment then just drop each one into a Breakout Room alone with the content in there ready to go and let them have at it. If you want the distribution to happen easily then you can use the option in the Attendee List Pod to ‘Evenly Distribute from Main’ (See Figure 4 below), this lets you send 20 people to 20 rooms with one click
Note – Connect can handle 20 Breakout Rooms with a combined population of up to 200 people, or of course maybe less people as dictated by your Connect Meeting Room license
Figure 4
Helpful Tips and Tricks to Remember
A few things related to Breakout Rooms in Connect that you should remember
Recordings – Connect Recordings capture the ‘Participant Persective’ of a Meeting Room, and that does not capture the Breakout Rooms. it is possible I imagine that this would happen in the future, but it seems like a terrible bandwidth situation so the current workflow is about right:
- Run your breakout sessions
- End the breakouts
- In the main Meeting Room, ask the breakout teams to present their ideas/findings/diagrams to the larger group
- Use the ‘Pods’>’Breakout Pods’ menu to navigate to the content they produced and display it in the main Meeting Room for all to see (this will also be captured in the recording)
Managing Attendees – when Breakout Sessions are started, the ‘Presenter Only Area’ is disabled. there is a logic to this as all of the Participants are promoted to ‘Presenter’ status and you would not want them to see your private conversations etc. this does cause a challenge however if you are in the habit of keeping your ‘Attendee List Pod’ off-stage in the ‘Presenter Only Area’, it is not gone and you cannot promote, demote or carry out other tasks
When you are using Breakout Rooms, you will need to ensure that you have the ‘Attendee List Pod’ in the breakouts to be sure you can manage your attendee and to ensure that you, as the Host can jump easily between the Breakout Rooms
Connect Mobile – Adobe Connect Mobile 2.0 works incredibly well with the breakout room functionality in Connect. The main challenge is that there are still some options that are unsupported on the mobile devices for Connect (.swf files, downloads etc.), but overall it is an incredibly good implementation and very useable