Sometimes you will want to limit the participants in a room to a certain department or group of people, there are a few ways you can achieve this in Connect and the degree of security often maps to the degree of effort required to implement.
How does access to a room work in Connect?
When you build a Meeting Room or a Seminar Room in Connect, you are automatically given the rights of a Host for that room. Even if you were to build the room in another person’s ‘My Meetings’ area, you are given Host rights as you are logged in as yourself. By default, no other person has rights to enter that room unless you allow them access.
Connect Events – It is worth quickly mentioning Connect Events here as that is the registration tool for Connect and this allows you to create a registration page to let people register to enter your room at the time of the session. when they register they will be given a name and password (or they use their existing name and password) and they will be granted access to your room for the time you have scheduled your session. This automates the process of granting access.
Managing Permissions using Connect Meeting or Seminar Rooms Only
Note – Assume that ‘Meeting Room’ also refers to ‘Seminar Room’ unless otherwise stated.
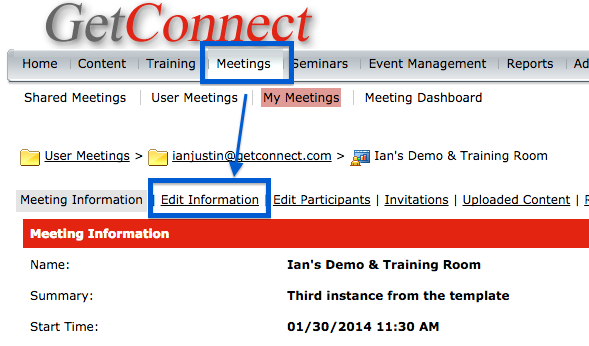
When you build a Meeting Room you have the option to manage permissions from the ‘Access’ section (not that you can change this at a later date by navigating to your Meeting Room in Connect Central and then selecting ‘Edit Information’ (Figure 1).
Figure 1
If you scroll down you will see the ‘Access’ section and some radio buttons. here are some scenarios for access permissions to the Meeting Room.
Login Controlled Access (more work, more security) – In this case select the option ‘Only registered users may enter the room (guest access is blocked)’ (Figure 2). This means that to access your room the attendees will need their Connect login and password *and* you will have also given the individuals the right to enter the room.
Figure 2
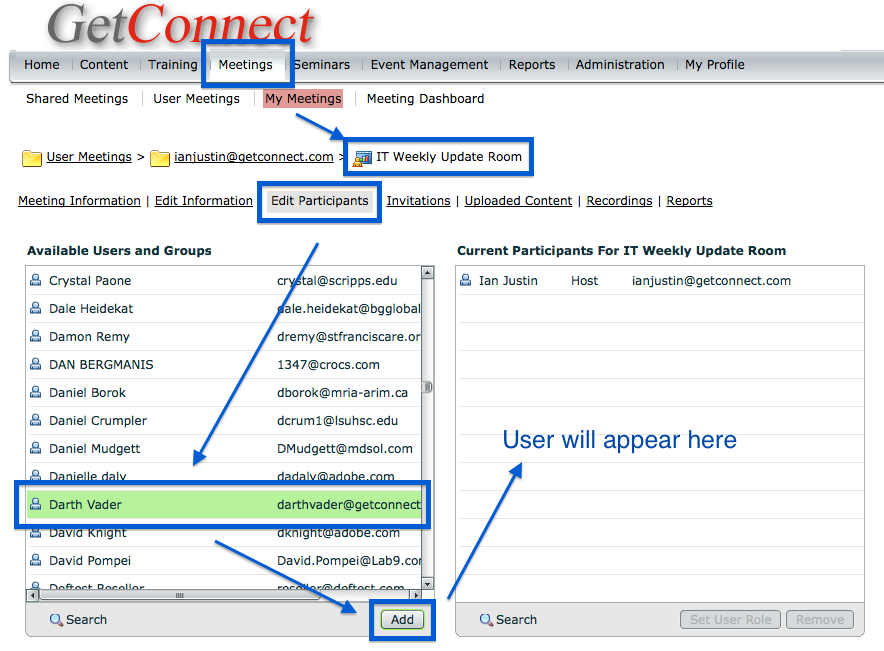
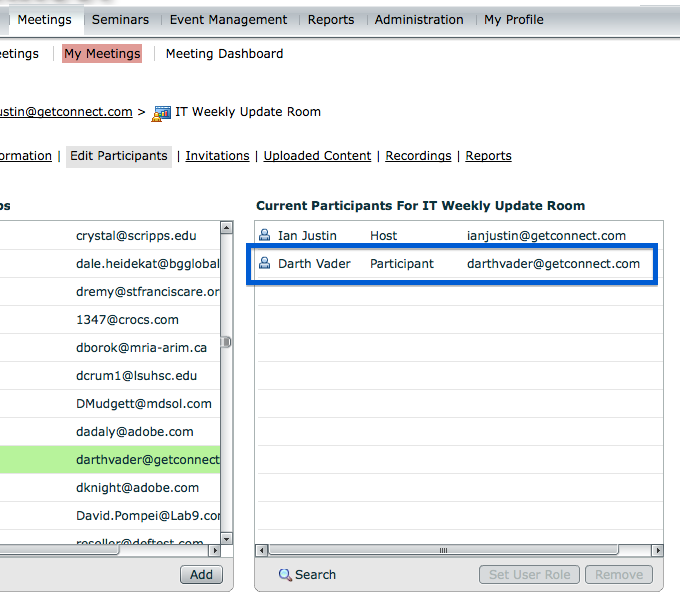
To give the users access you again navigate to the Meeting Room in Connect central and then select ‘Edit Participants’. Select the name (or shift-select multiple names) and then click the ‘Add’ button. This will move the name(s) over to the right-hand list and give the users the right to login to your room with their login and password. They will have ‘Participant’ status by default (Figure 4).
Figure 3
Figure 4
If you want to add multiple users and avoid individually selecting names, you can create a group in Connect that contains these users and then you just have to add the group to the Meeting Room permissions in the same manner as Figures 3 and 4 above. Note that you need to be an Administrator to create groups in Connect so you may have to request this of your Connect Administrator.
The permissions you are adding above will stay with the Meeting Room.
At the time of the session, your attendees will use their login and password to enter the room and as they have pre-determined permission, you will not have to let them in. In this case, the analogy would be that there is a door on the room and you have given them a key.
Easier Entry and Passcode Controlled Access (medium work, medium security) – In this case you can choose either of the lower option in the ‘Access’ section (Figure 5).
The option ‘Anyone who has the URL for the meeting can enter the room’ means that attendees would just type in their name in the ‘Guest’ field’, or enter their login and password and they would come straight into the room. It is as if there is no door on the room.
The option ‘Only registered users and accepted guests may enter the room’ means that they can enter their name in the ‘Guest’ field’, or enter their login and password and they would see a message that a request to enter has been sent to the Host (you) and you will see a message to ‘Allow’ or ‘Decline’ their access in the Meeting Room. In this analogy, there is a door, they ‘knock’ and you choose whether or not to let them in.
Figure 5
As we are looking at a more secure option here however, you will also add a ‘Passcode’ to the Meeting Room. In the ‘Access’ area, check the box beside ‘Users must enter room passcode’ and then you can enter a passcode that they will be asked to enter before being let into the room (Figure 6). You can of course change this passcode for each meeting and only give it to the people you wish to attend.
Figure 6
In this analogy, you are asking them for the password before opening the door or letting them into the room.
All of the options above can be used interchangeably and changed as you wish to change the security of your Meeting Room from session to session.
Note – If you do not see the option to enter the passcode, speak to your Connect Administrator and have them turn this option on in the account.


