IMPORTANT– It is significantly easier and faster to actually use the HTML5 client for Adobe Connect than it is to document all of the features. The best way to experience the new HTML5 client is to actually *experience* the new HTML5 client for yourself.
This post is very detailed and intended to be a reference for Hosts and Presenters to let them see what is happening from a wider perspective and to give insight into some of the best practices I can see for the HTML5 client so far.
Ironically, the HTML5 client is a very intuitive and simple way to attend a Connect room but documenting it is a much more complex and onerous task.
I guess I am telling you not to be overwhelmed by this blog post…the HTML5 client is a lot easier to use than I probably make it seem in the text below.
A quick history lesson and why we are here
Adobe has announced the public beta of the new HTML5 client for Adobe Connect. As you may be aware, Flash Player will be discontinued (End-of-Life or EoL) at the end of 2020. Flash Player was likely the most ubiquitous pieces of software in history and a consistent and easy way to access a Connect room.
As browsers have become more security-conscious, any add-in or plugin is increasingly hard to distribute and enable…this applies to almost every online industry to some degree.
The potential panacea in this world is often seen as HTML5, but be aware this option is very limited in that it does not inherently include any way to access a camera or a microphone (for example), let alone share a screen. It is really intended to display static web pages, but it does have the advantage of being the intended common standard across all browsers including mobile devices.
Adobe has created an HTML5 ‘client’ for Connect. It may be easiest to think of this as another ‘window’ into your Connect rooms. The room in Connect remains the same, the possible ‘windows’ into your rooms are the Connect Desktop App., Flash Player, the Connect Mobile App. and now the HTML5 client. The HTML5 option requires no download whatsoever, it is all done through the browser.
The other ‘window’ options are still available to you and your attendees/learners. Flash Player will be available until 2020 at least, the Connect Desktop App. is installed in a matter of a few seconds and requires no admin rights on your machine and the Connect Mobile App. is still the leader in the field.
The HTML5 client evolutions seems logically to initially have the most requested features to attend Connect sessions, but it will likely evolve over time to include more engagement, host and presenter features and become the go-to option for all attendees, presenters and hosts.
Even in the initial beta version of the HTML5 client for Connect, the depth of functionality is in excess of the more mature final download products for the majority of other tools in the field.
Remember, nothing has gone away in how you attend Connect rooms and all of your rooms, content and standards are still there…this is adding another evolving option for you to attend Connect sessions.
HTML5 Client Capabilities
The first release of the HTML5 client will of course not have the full functionality of the other clients and you can see a full list of the current capabilities at the link below:
Adobe Connect Capabilities in HTML Client:
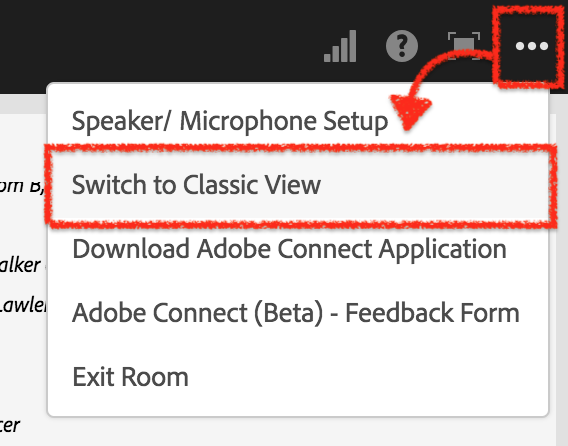
In this post I have tried to focus on what *can* be achieved with the new client, not the limitations. Many of the basic premises of Connect are absolutely maintained when using the new client and of course anyone can always use Flash Player or (better still) the Connect Desktop App. to attend a session. The HTML5 client has the option to switch to ‘Classic View’ (figure 1 below). This will give you the option to use/install the Connect Desktop App. or to use Flash Player to rejoin the room.
The use-case for this might be an attendee who joined using the HTML5 client and then wants to share their screen so they would then quickly install or launch the Connect Desktop App.
Figure 1
Beta Account – Creating a room and joining using the HTML5 Client
As the HTML5 client is now in beta testing, if you are to use this option you will need to be assigned a beta account. Contact your GetConnect sales executive to request a test account (note that not everyone will have the option to have a test account, depending on numbers the program may need to be capped at some stage).
There are some special steps that need to be taken when using the beta testing account (you would not want the HTML5 client to be launched from your regular Connect account by accident for example).
Here is the overall process:
- If you want *every session* on this account to force the HTML5 client to be used for participants, go to ‘Administration’>’Compliance and Control’>’HTML Client Settings’ and check whatever licenses you wish to test with this client (figure 2). Note – If you do not check this option you can still enable this client for individual rooms as noted below.
- If you want to enable the HTML5 client on a room-by-room basis, edit the room in question and scroll down below the room ‘Access’ controls and you will see the option to force the HTML client for this room (figure 3). Note – as noted above, this will not be necessary if step 1 has been completed.
- The link you send to attendees who you want to use the HTML5 client needs to have some syntax appended to the regular room URL as follows: https://companyname.preview.adobeconnect.com/roomname?launcher=false&html-view=true. The regular room URL will have the characters ‘launcher=false&html-view=true’ (no quotes) appended to the end of the string and this will launch the HTML5 client in the beta account. Note – If you do not append these characters to the end of the room URL, Connect will try to launch using the Connect Desktop App. or maybe Flash Player.
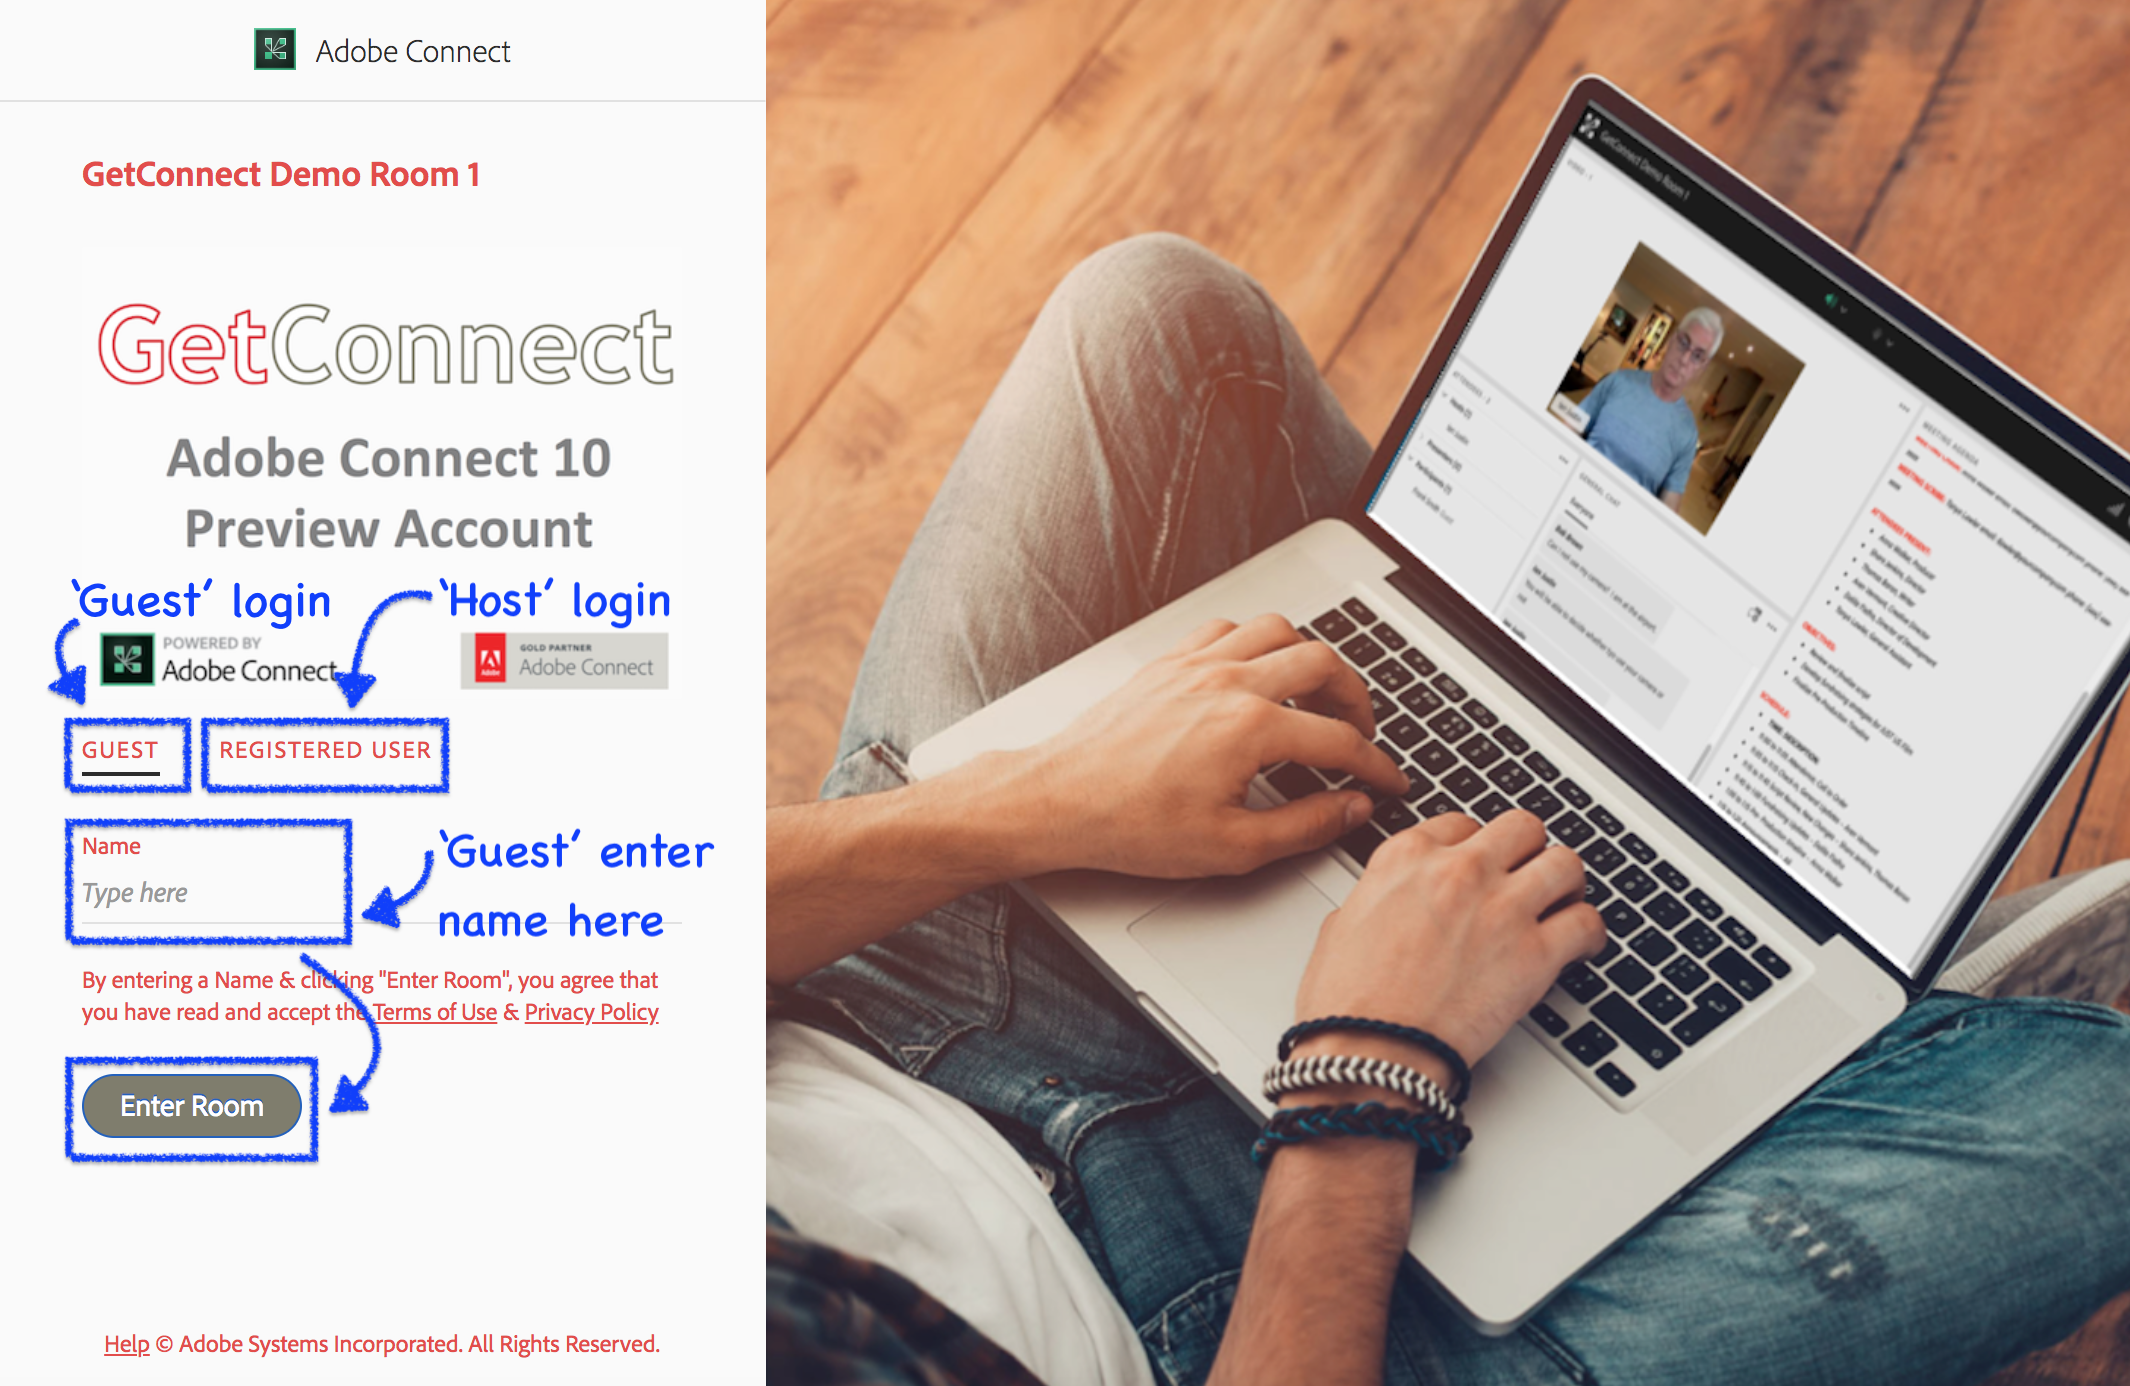
- For regular testing of the HTML5 client, it is easiest to have attendees login using the ‘Guest’ field. Ensure that you have set your room access controls to allow ‘Only registered users and accepted guests may enter the room’. This is the most forgiving option for testing (figure 4).
- IMPORTANT – You as a host enter the room using the regular room URL and using the Connect Desktop App. or Flash Player (the Connect Desktop App. is the recommended option). As you should have built your room and as you are the host of your room, you will enter with host rights.
- When you and your attendees go to enter the room you will be presented with a new and cleaner login page (figure 5). You will login using the ‘Registered User’ field and they will login using the ‘Guest’ field. Click the ‘Enter Room’ button to join the session. Note – This login page, the colours and the images can be edited from the regular ‘Administration’>’Customization’>’Login Customization’ interface.
You should notice a very significant speed improvement on entering the room, the HTML5 client is very fast when you join the session.
Note – If you have issues with the HTML5 client, just refresh your browser and you will rejoin the room
Figure 2
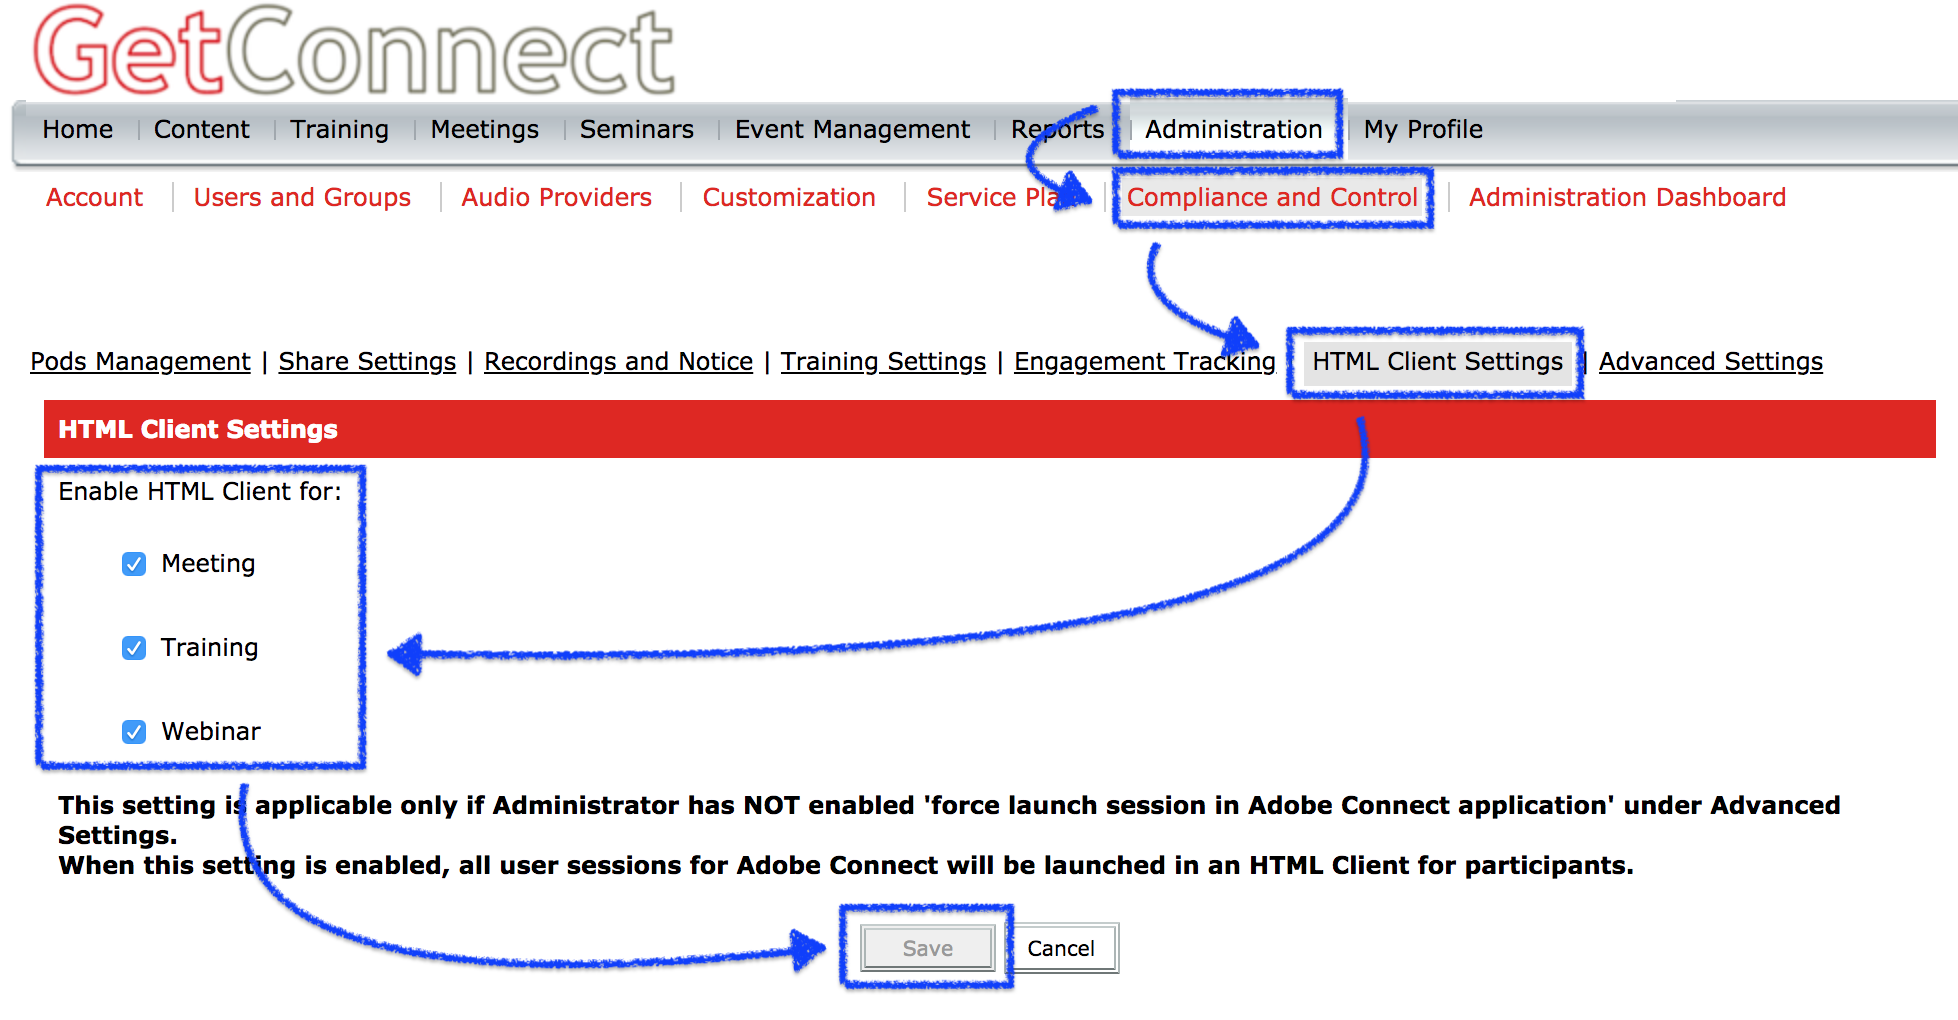
Figure 3
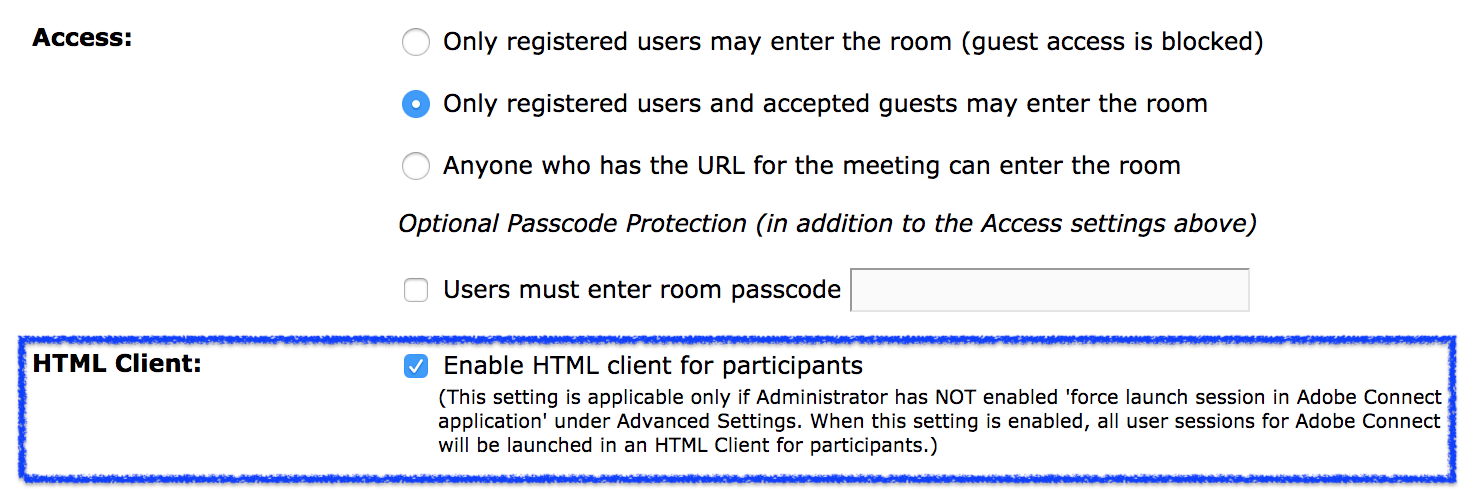
Figure 4
![]()
Figure 5
Granting Access to the Room as a Host
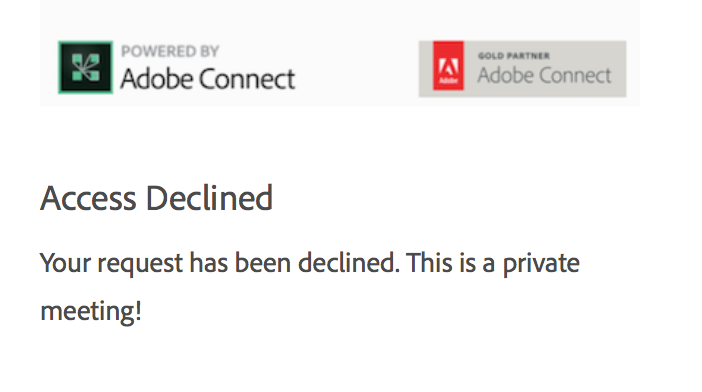
As a host in the room you will notice a small, but very helpful addition to the option to allow or deny a request to join the room. Beside the ‘Allow’ or ‘Deny’ options there is also an option to ‘Deny with a message’ (figure 6). If you select this option you can send a short message to accompany the denial to the room as shown in figure 7.
Figure 6
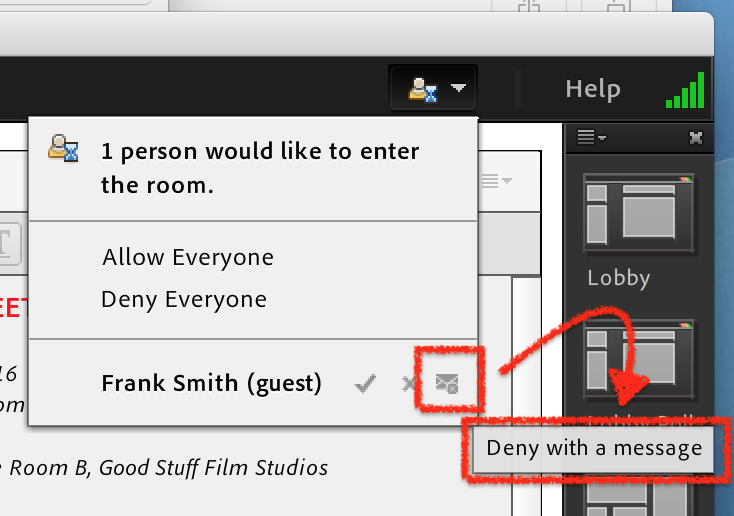
Figure 7
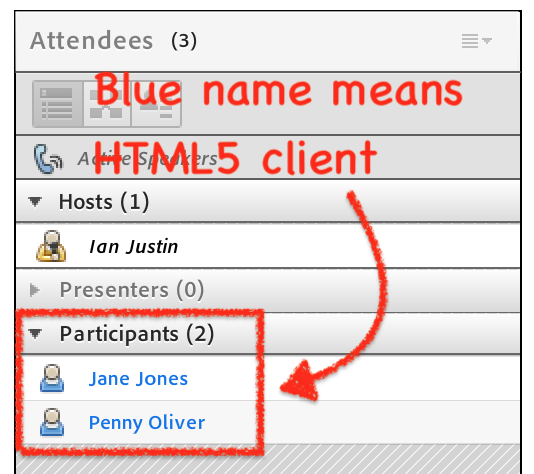
Note – For hosts in the room, HTML5 attendees will appear in the Attendee List Pod with their names in blue text as shown in figure 8. This helps the hosts determine the capabilities of the room attendees overall.
Figure 8
HTML5 Client Interface Overview
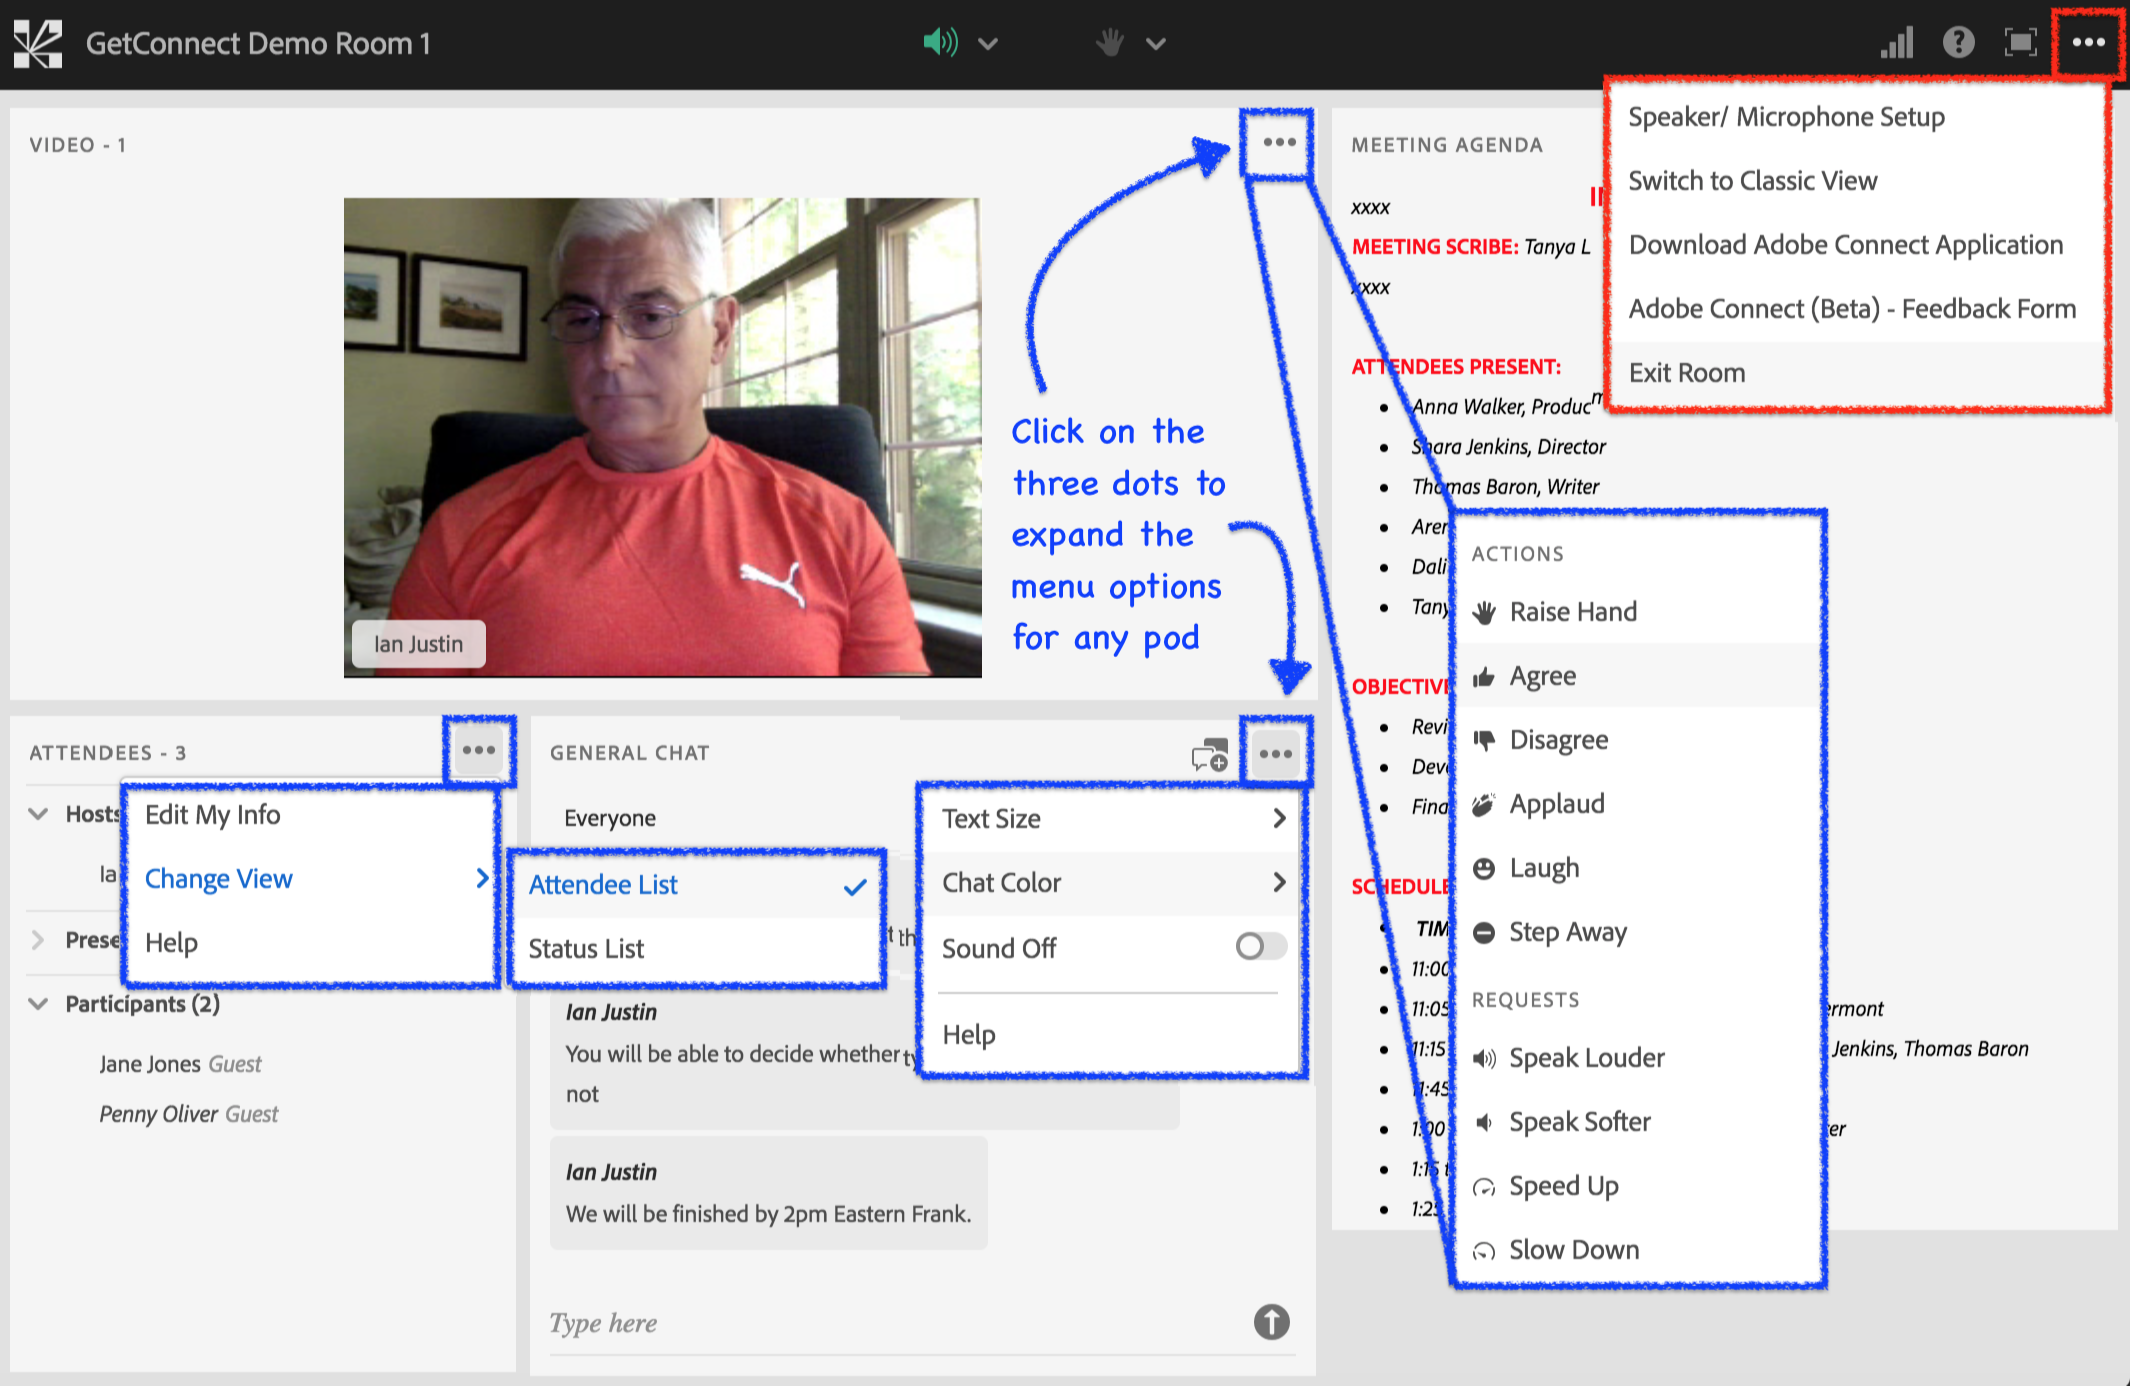
The overall interface for the HTML5 client is incredibly clean and consistent with a more modern look-and-feel that we see in many products today. The basic functionality is accessed via the three ‘dots’ to the top-right of any pod or area (You see a similar interface in Google Chrome, Opera etc. Safari and Firefox use three lines but you get the idea).
Click on the three dots for any pod and you will see the options available to you such as chat colour or text size in a chat pod. You can see an overview of the typical options in figure 9.
Figure 9
The Chat Pod
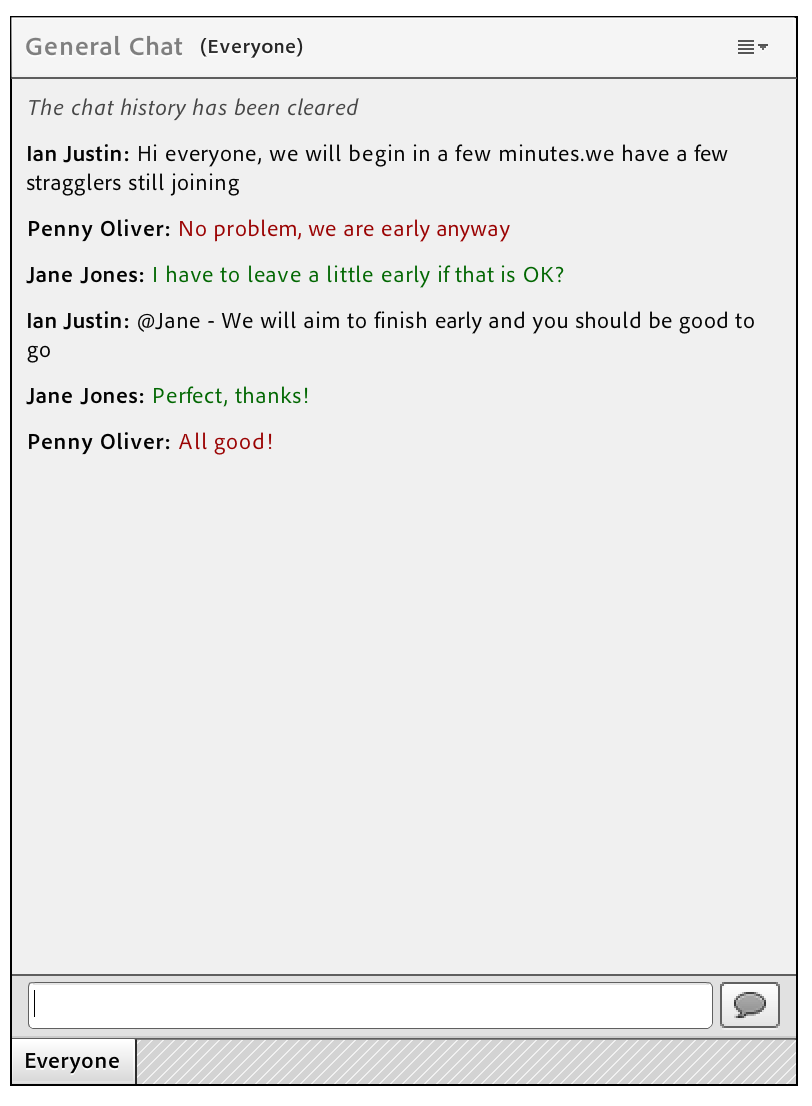
The HTML5 client Chat Pod has a interface and look that is far closer to traditional messaging and chat options we see everywhere (figure 10).
Note – I have not added any markup to the graphic below as I believe it is self-explanatory and effective to see the clean look.
Changing the colour of your chat in the new HTML5 client does improve the readability. You can still of course see the colours in the regular Connect Desktop App. as shown in figure 11 below. Same room, same chat, different ‘windows’ into the room.
Figure 10

Figure 11
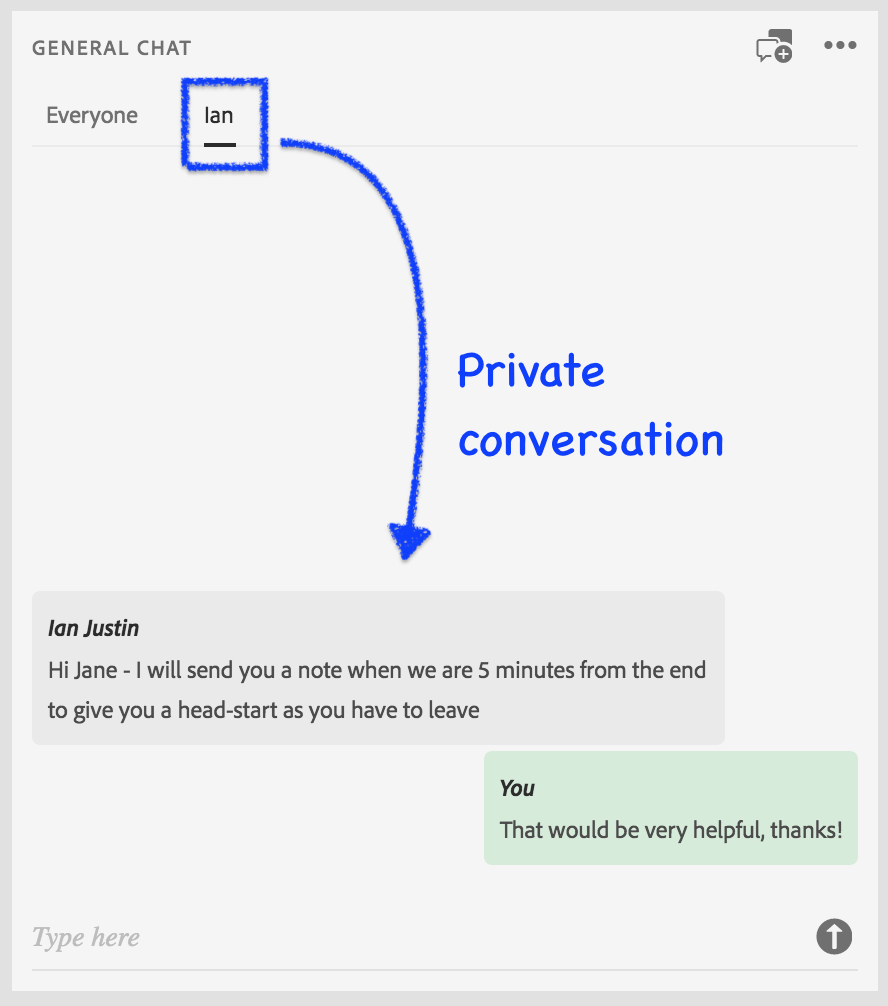
Private Chat still works as an option and the HTML5 Client allows you to start a private chat (if enabled) using the icon to the top-right of the chat pod (figure 12). Just choose the person you want to chat with from the list. The private chat will appear as another header in the chat pod (figure 13).
Figure 12
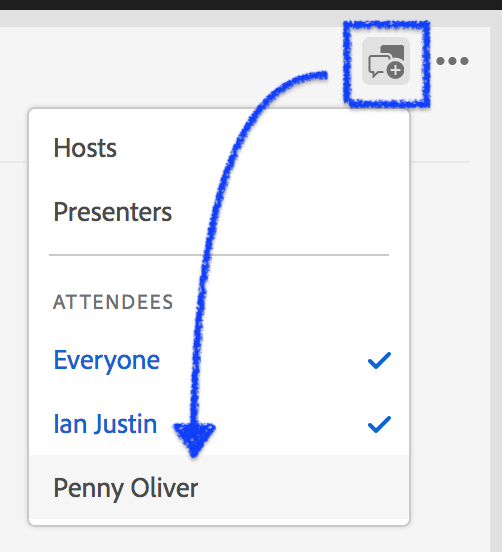
Figure 13
The Share Pod
There are some controls available to the HTML5 Client, mostly related to scaling content.
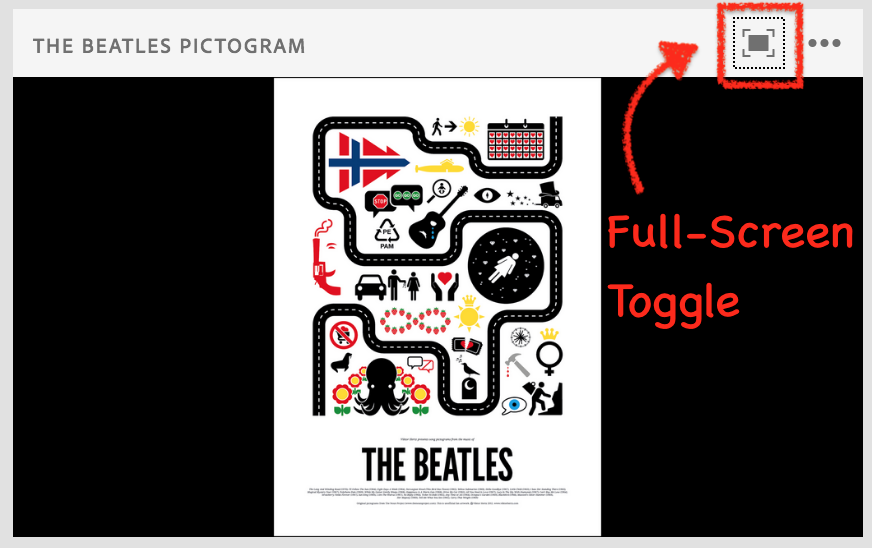
If the host has chosen not to ‘Force Presenter View’ in the Share Pod then you will see an icon to the top-right of the pod that allows you to toggle to full screen and back (or return using the ‘esc’ key). See figure 14.
Figure 14
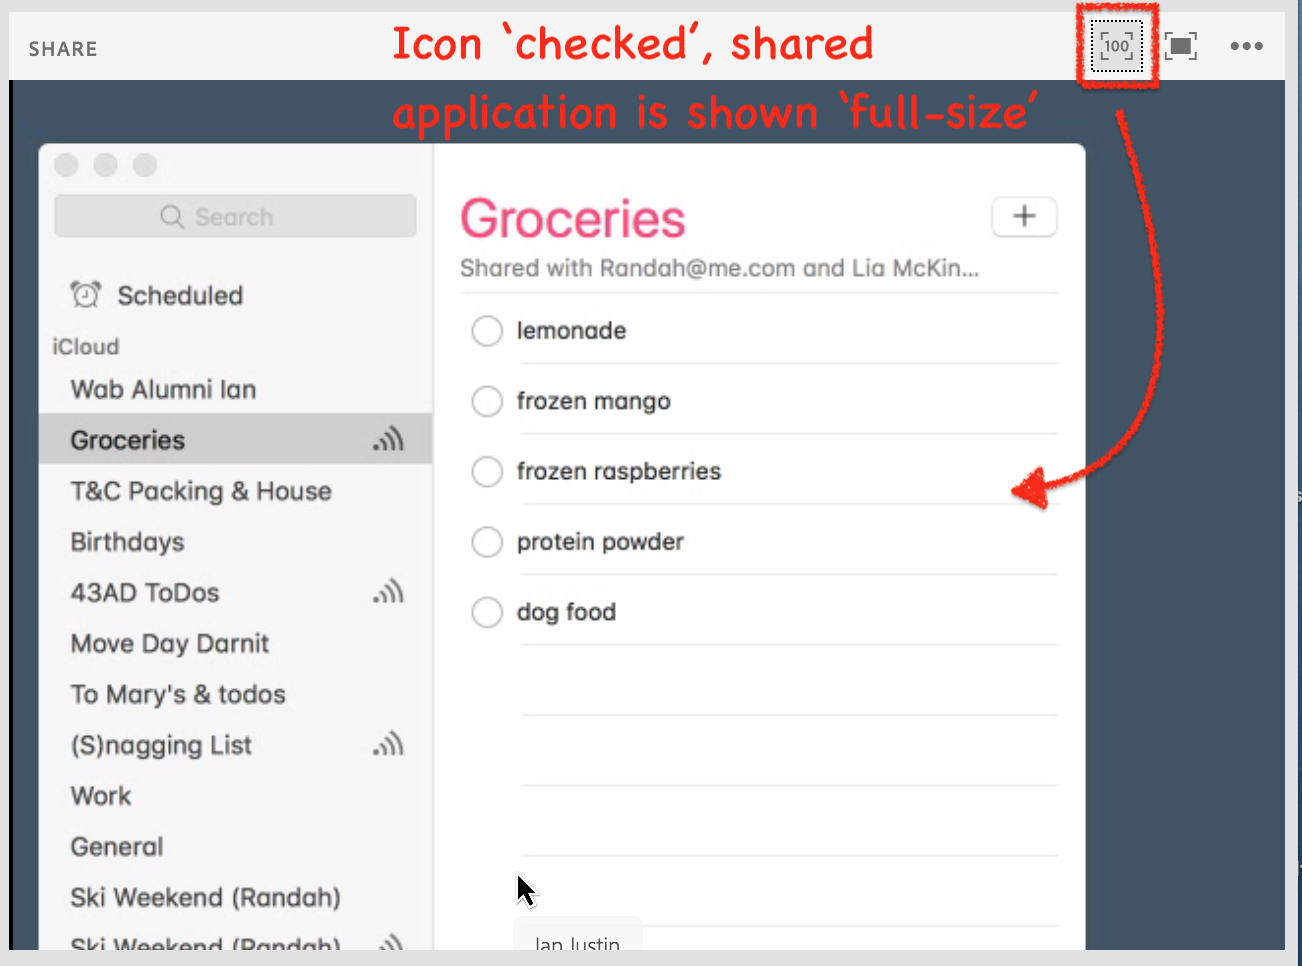
If the host or a presenter are sharing their screens, you will see the option to the top-right of the Share Pod to ‘Scale to Fit’ or ‘View Actual Size’. This let’s you toggle between the shared content being represented as a part of the whole shared screen or full size (where you see it at full resolution). You might need this if the host or presenter is sharing a high resolution monitor, say 1920x 1200, but you have a far lower resolution monitor. Connect would need to ‘squeeze’ the shared screen into your resolution so it can be hard to read (figure 15)…click on the icon and the shared content is shown at full resolution on your screen and your view will follow the cursor of the presenter (figure 16).
Figure 15
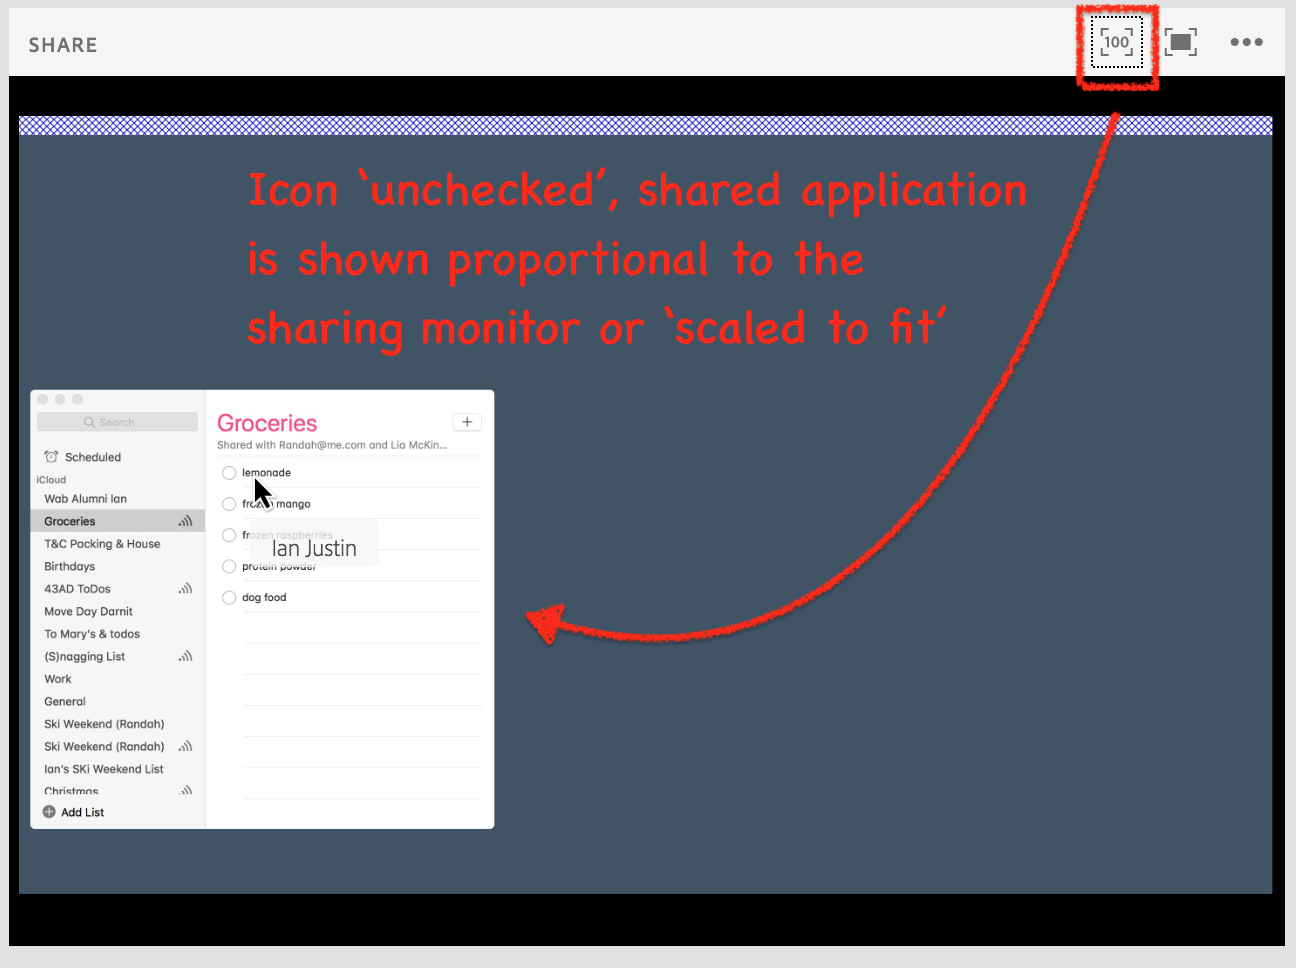
Figure 16
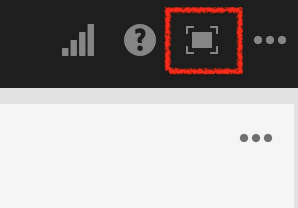
Note – You can also improve your experience if the content looks a little small by using the full-screen toggle for the room to the top-right of the room itself (figure 17) or the Share Pod full-screen toggle shown above in figure 14.
Figure 17
Camera/Video Pod
There is really very little that you would need to do to interact with the Video Pod when using the HTML5 client as you can only view a camera feed, not share your camera. If you want to share your camera you would switch to ‘Classic View’ and the Connect Desktop App. as discussed in figure 1 above.
You can toggle the Video Pod to full-screen provided the host has disabled ‘Force Presenter View’. If you do not see the icon as shown in figure 14 then you do not have the rights to toggle the size independently.
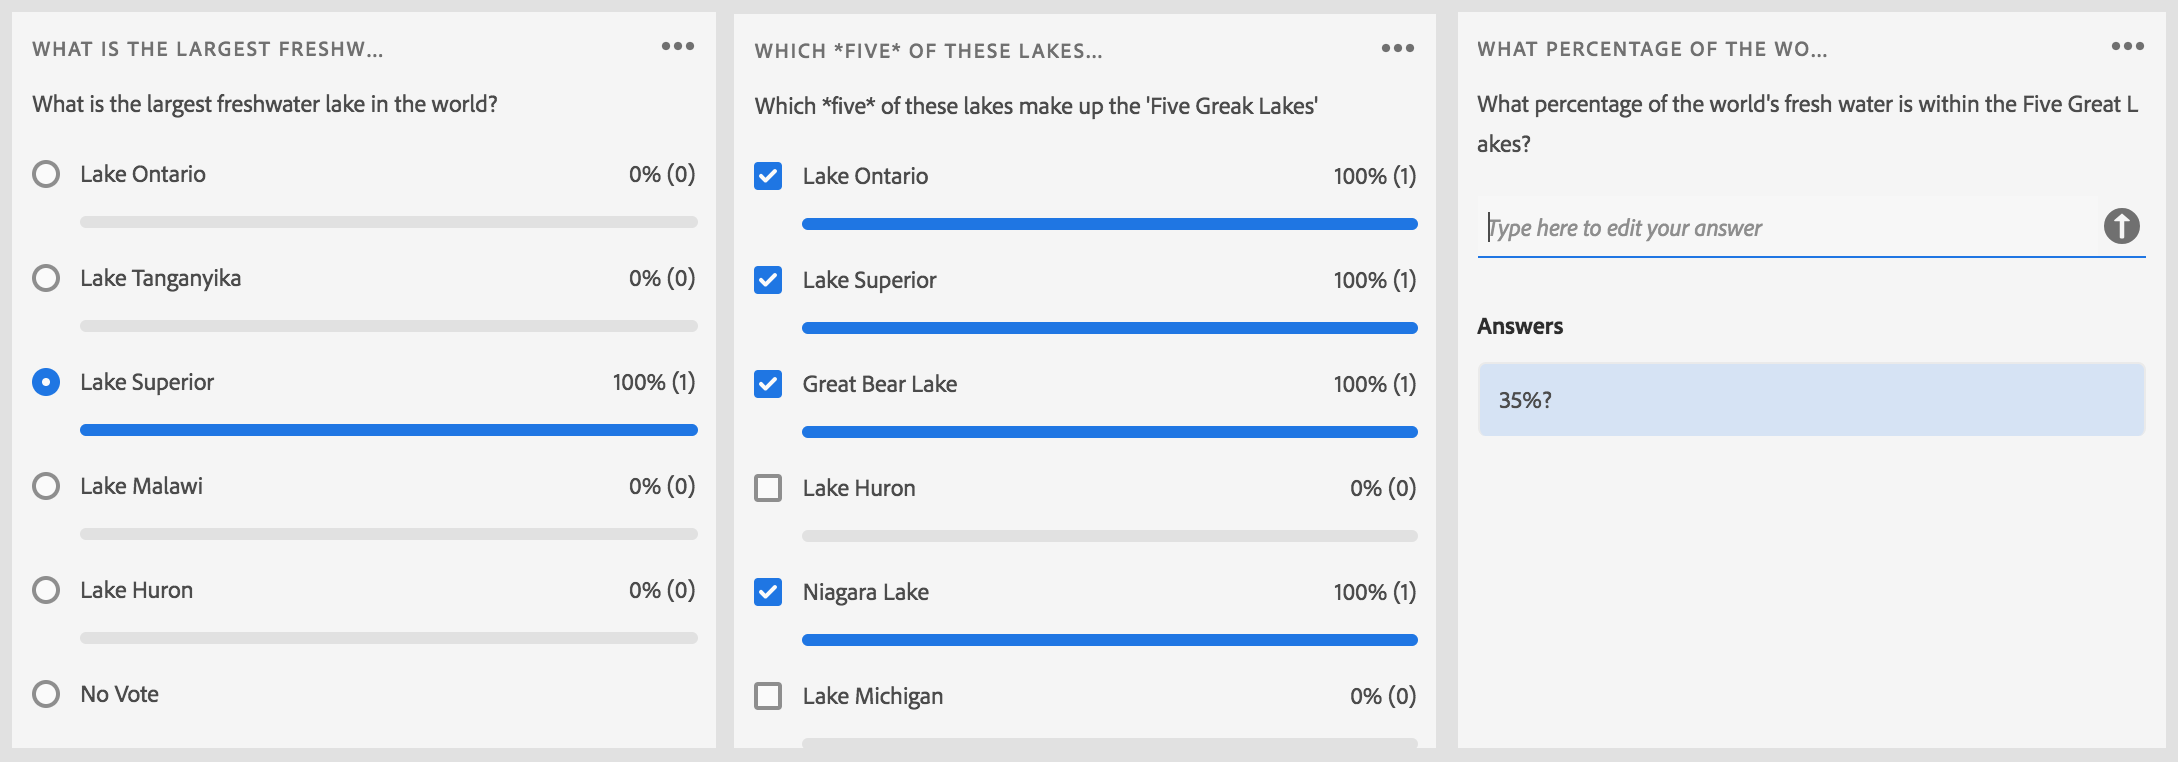
Poll Pods
There is very little difference from the attendee perspective when it come to the Poll Pods. The look-and-feel is definitely a lot cleaner in the HTML5 client, but the functionality from the attendee and the host/presenter perspective is the same. You can see example live Poll Pods in figure 18 below.
Figure 18
Q&A Pod (moderated discussion/questions)
This pod really takes to the new look-and-feel well in my opinion. I particularly like the way the new style of chat improves the readability and ease-of-understanding for attendees.
From the host/presenter perspective it functions in exactly the same way, from the attendee perspective the process is the same in that you ask a question that only you see amongst the attendees, the hosts/presenters can choose to answer to everyone and quote your question and answer, or to answer privately to you. As before the names can be removed.
As you see in figure 19, the HTML5 client Q&A Pod has the same styling as the Chat Pod (‘messenger’ style) and it has some nice prompts to help attendees understand what is happening. There is a clear message in the center of the pod “This is a moderated session. Ask your questions here.” and when a private response is given, it is clear with the text “Answer only visible to you”.
Otherwise this pod functions as in the other Connect clients.
Figure 19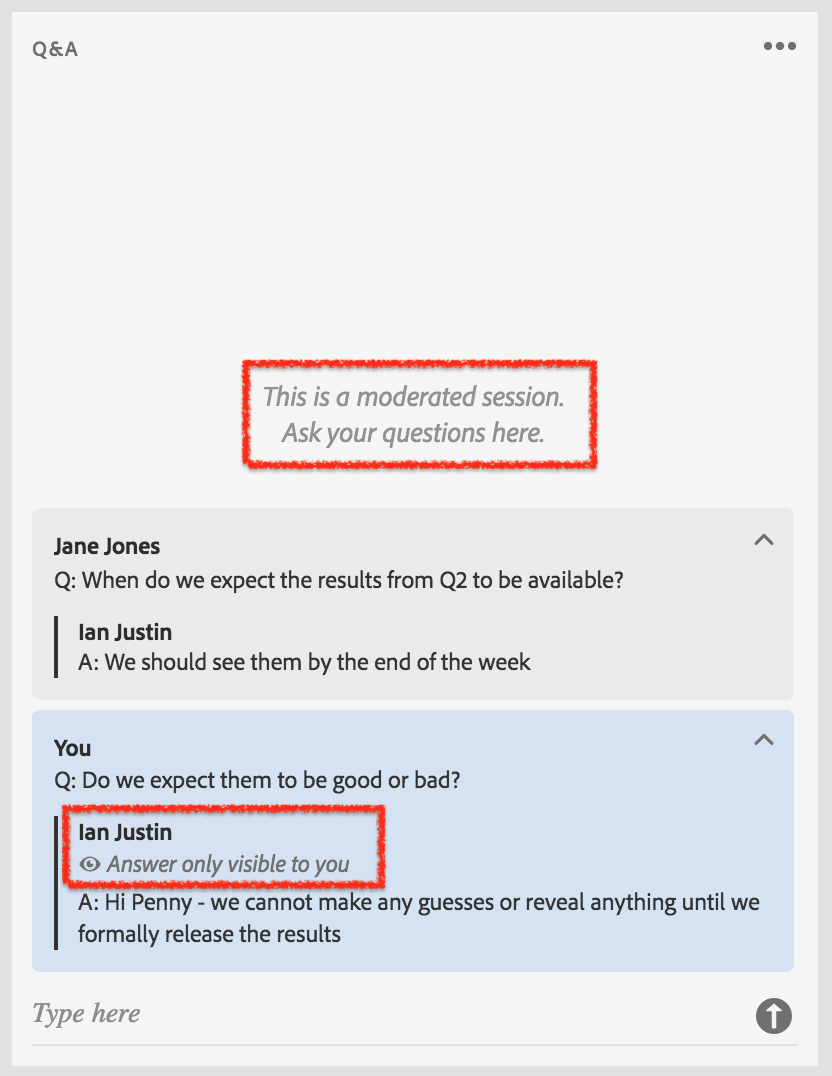
File Share Pod & Web Links Pod
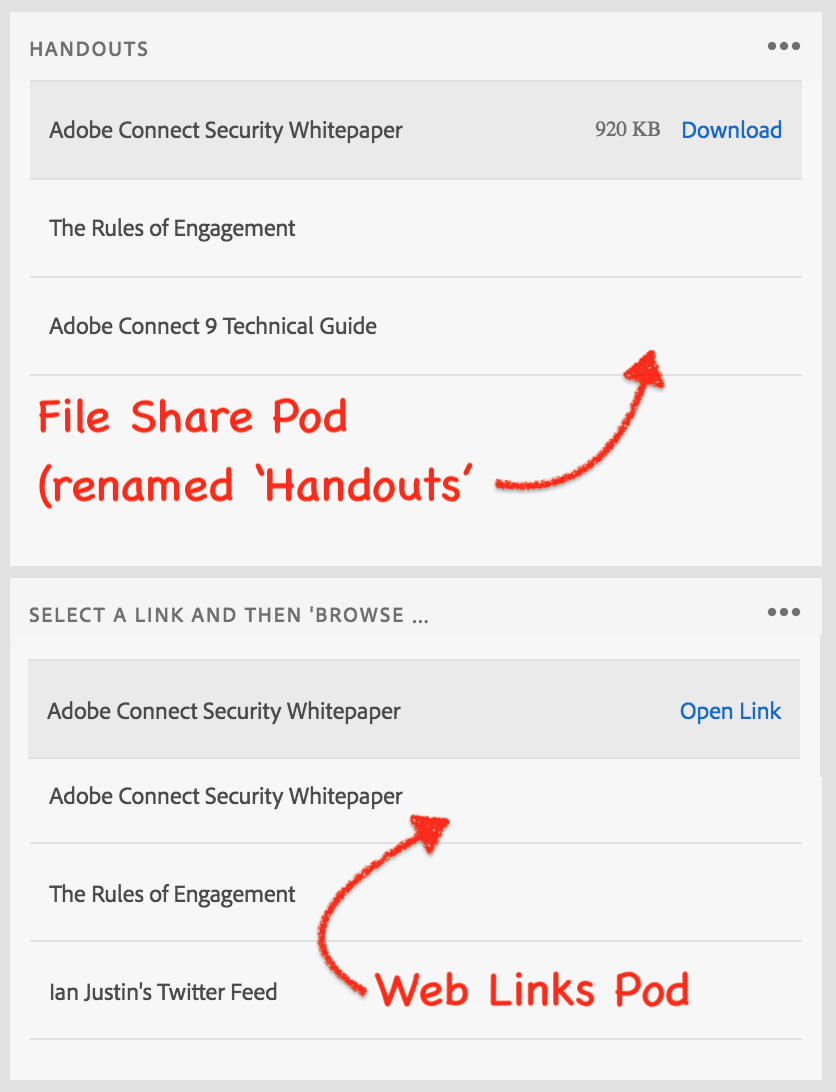
These pods are identical again from the perspective of the host/presenter, but they are more intuitive I believe in the HTML5 client. As you can see from figure 20 below, the pods are again clean and consistent with the new interface. the cleaner part for me is that you can just mouse-over a file or a link and you will see the option to ‘Download’ or ‘Open Link’.
Figure 20
Best Practices – Making the most of what we have from day one!
The final section of this blog post covers what I perceive as the best practices you can apply in the Connect room to be able to respect the attendees on the HTML5 client.
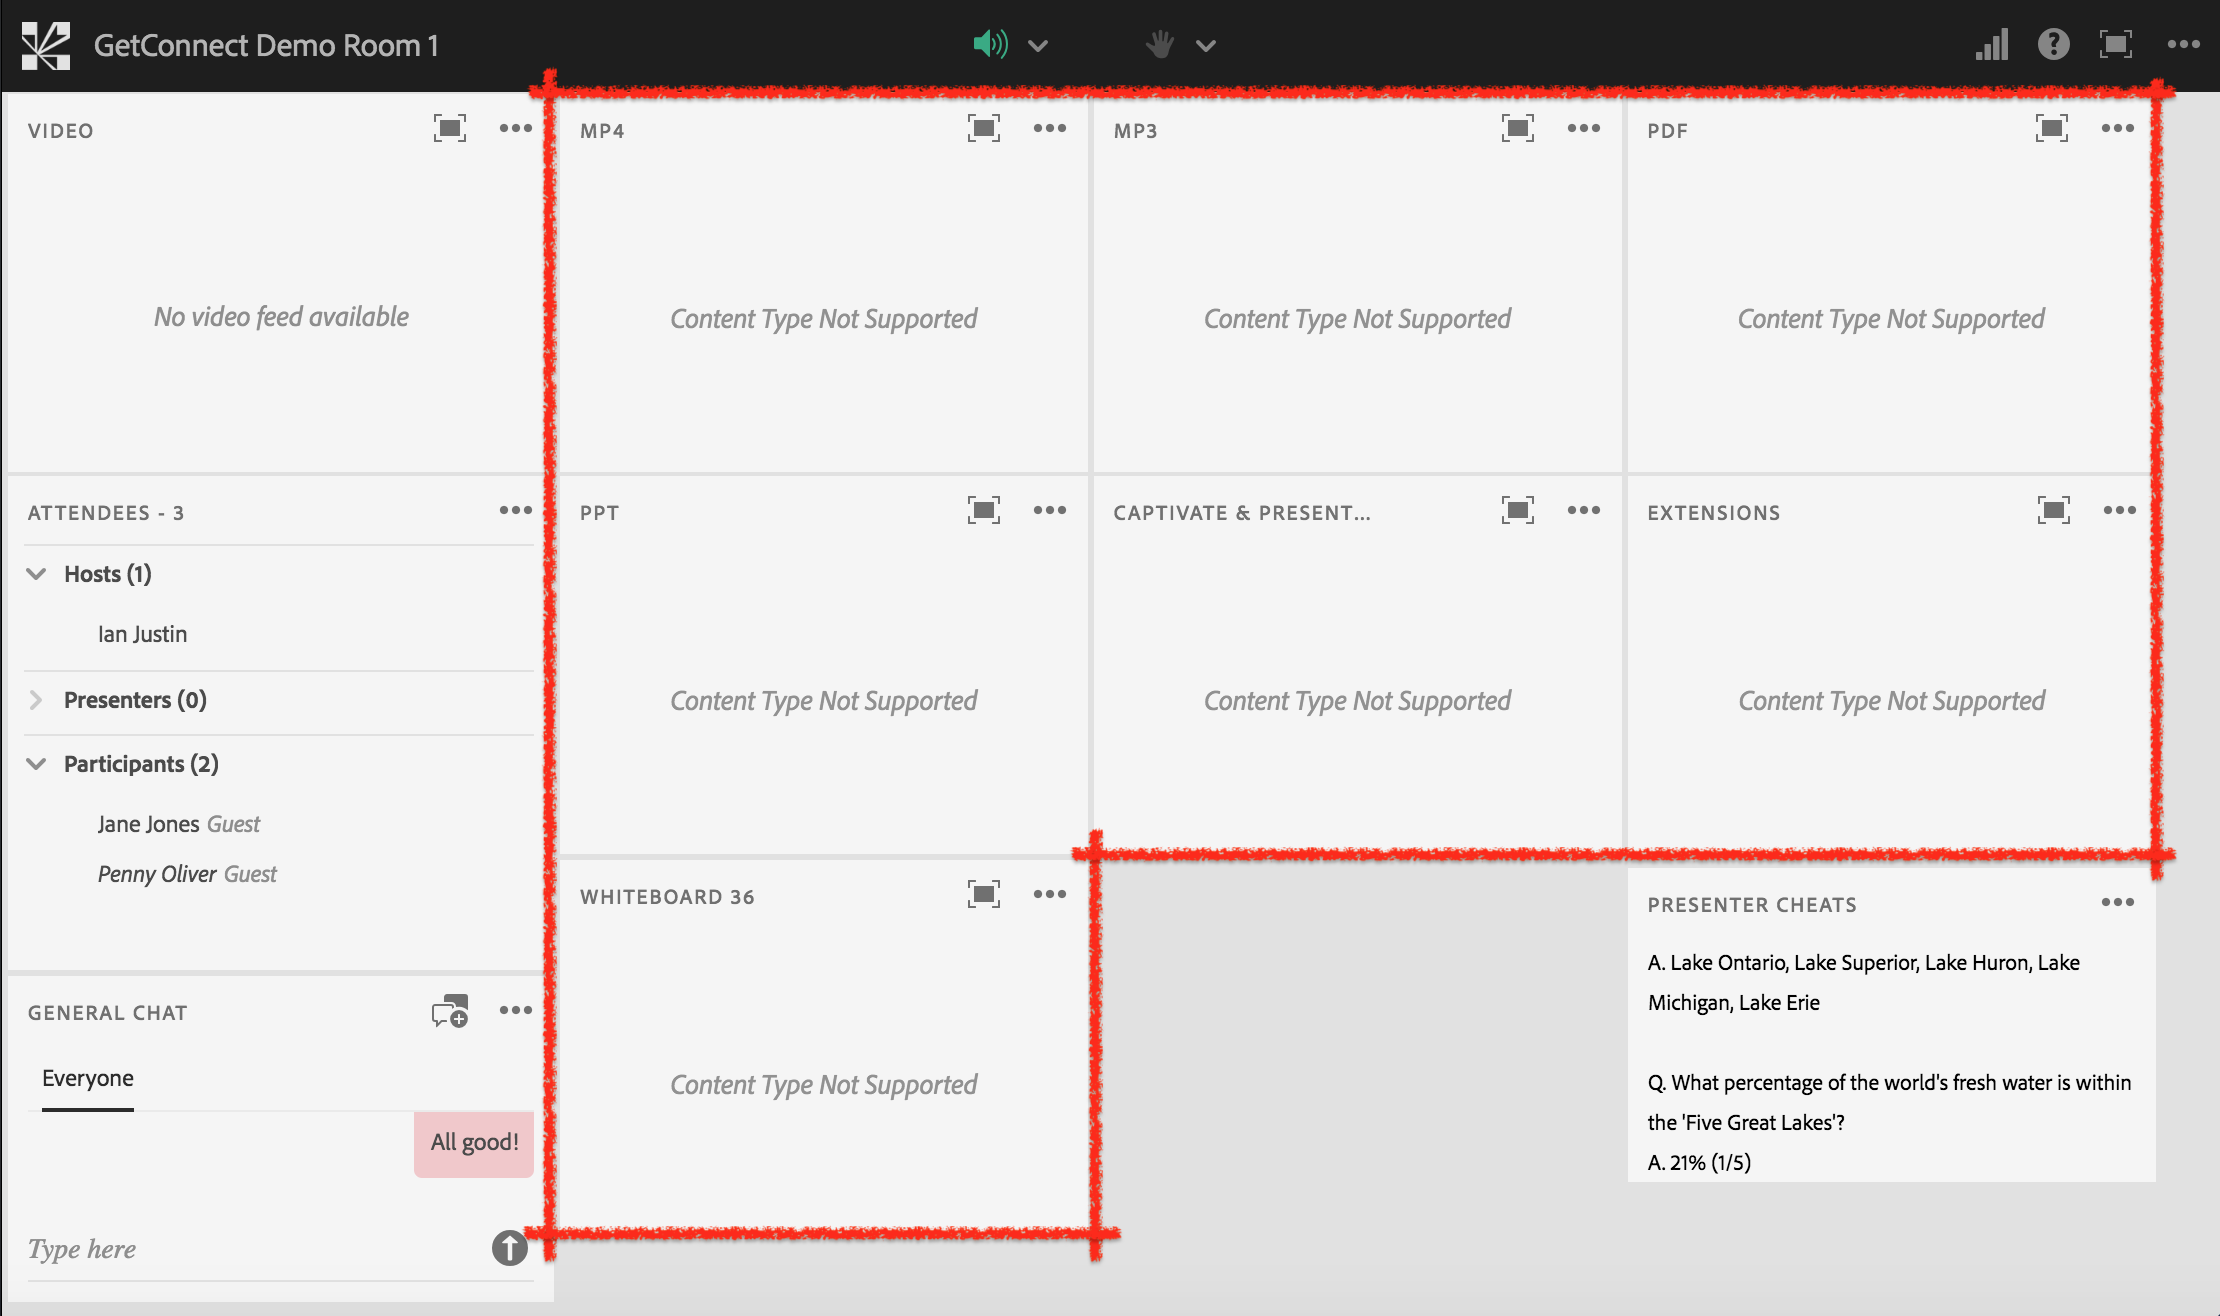
Overall it would make sense to avoid any pods that are not supported in the main room so that the HTML5 attendees do not see that message. I personally have a separate layout in my room templates that has the unsupported pods so that I can both see what does not work and so that I can very easily confirm if a new pod becomes supported…it will appear live in this layout.
You can see the unsupported pods in figure 21. The idea, of course, is that the population of this layout would become smaller and smaller over time. The title of the pod tells you the content in the pod.
Figure 21
Generally
The consistent advantage of using Connect lies with persistency, the maintenance of the state of the room and the consistency of a URL (for example). All of these benefits can still be utilized when using the HTM5 client.
Granted, there are less tools available to you in the HTML5 client in its first iteration, but there is still a lot that can be done that exceeds many, many other tools in the industry. That is the intent of the examples below.
Remember that you always have the option of the Connect Desktop App. and Flash Player and the Connect Mobile App. so you still have all of the capabilities of Connect available to you and your attendees…the HTML5 client is the start of the path to access using a simple browser only and based on my experiences (outlined below) you can still have an exceptional session using the first set of capabilities in the HTML5 client.
Lobby Layout
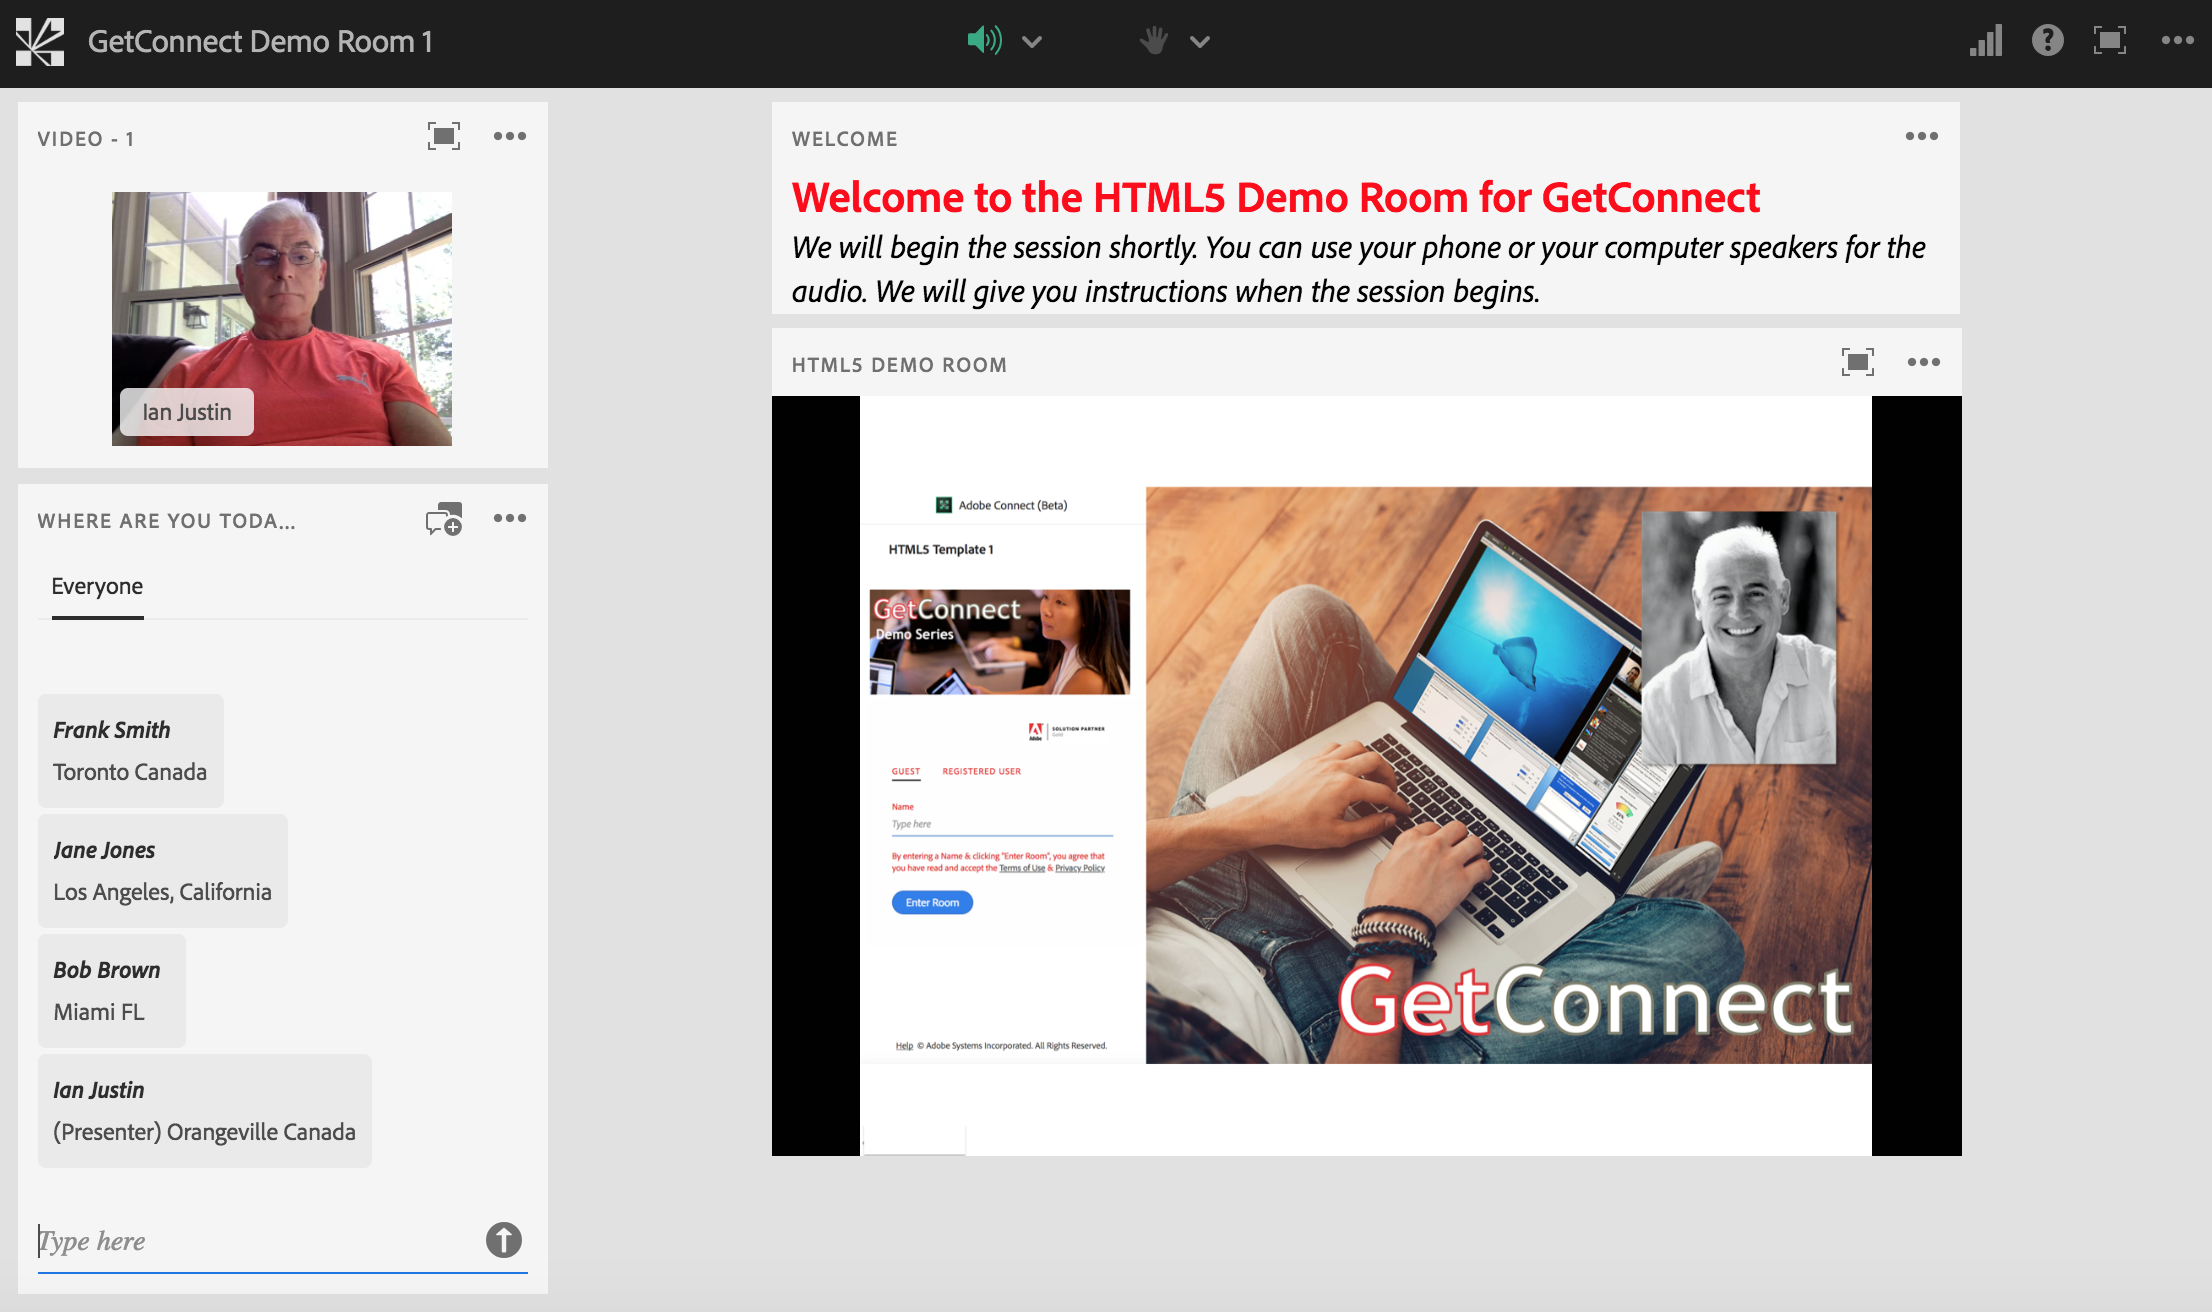
Making use of what we have available to us in the initial HTML5 client, figure 22 below shows how I personally set up my lobby for sessions.
The main Share Pod in the center of the layout is a JPEG snapshot of my opening slide (we cannot load PPT at this time into a pod, so I use a JPEG as an opening slide.
Above the share Pod I have a Notes Pod where I have taken some time on the formatting. The formatting looks good in the HTML5 client and this is a simple way to take advantage of room persistency and simple messaging.
To the left I have a Chat Pod that has been changed to ‘Where are you today?’. This encourages attendees to identify their location while they wait. In my experience this helps to both raise awareness of the distributed nature of the attendees/learners and in the lobby it shows dynamic interactions and this allays any fears around whether the session is frozen or live.
In the example below I have myself as the Video Pod camera feed, but in a lobby I would absolutely point the camera at my aquarium, at my lava lamp or outside to the trees. This sounds a little odd, but it creates dynamic movement on the camera feed and this again relaxes attendees as the session is clearly active and ready to go. BTW, aquariums have excellent lighting and colour by definition so they look great on camera…plus if you do this it ensures you take good care of your fish!
Another option you can consider is to have a Share Pod screen-share of a timer from your desktop. We cannot yet load an MP4 for the HTML5 client to view (unsupported) but this is an easy workaround.
Figure 22
Lobby Poll Layout
A great first interaction is to change layouts and in this example the only thing that changes is that the ‘where are you today?’ Chat Pod is replaced by a Poll Pod enquiring of the experience of the attendees with Adobe Connect as shown in figure 23 (it could be anything of course). Jumping into a poll allows you to share the results with the attendees so that they know the people around them a little better it is another dynamic interaction (is you display the results of the poll live it works well)…you can also use this as an opportunity to call out anyone who did not answer the poll yet from the Poll Pod ‘View Votes’ option. This has an interesting effect on attendees thinking they can just pay ‘lip-service’ to the session and not interact.
Figure 23

Agenda Layout
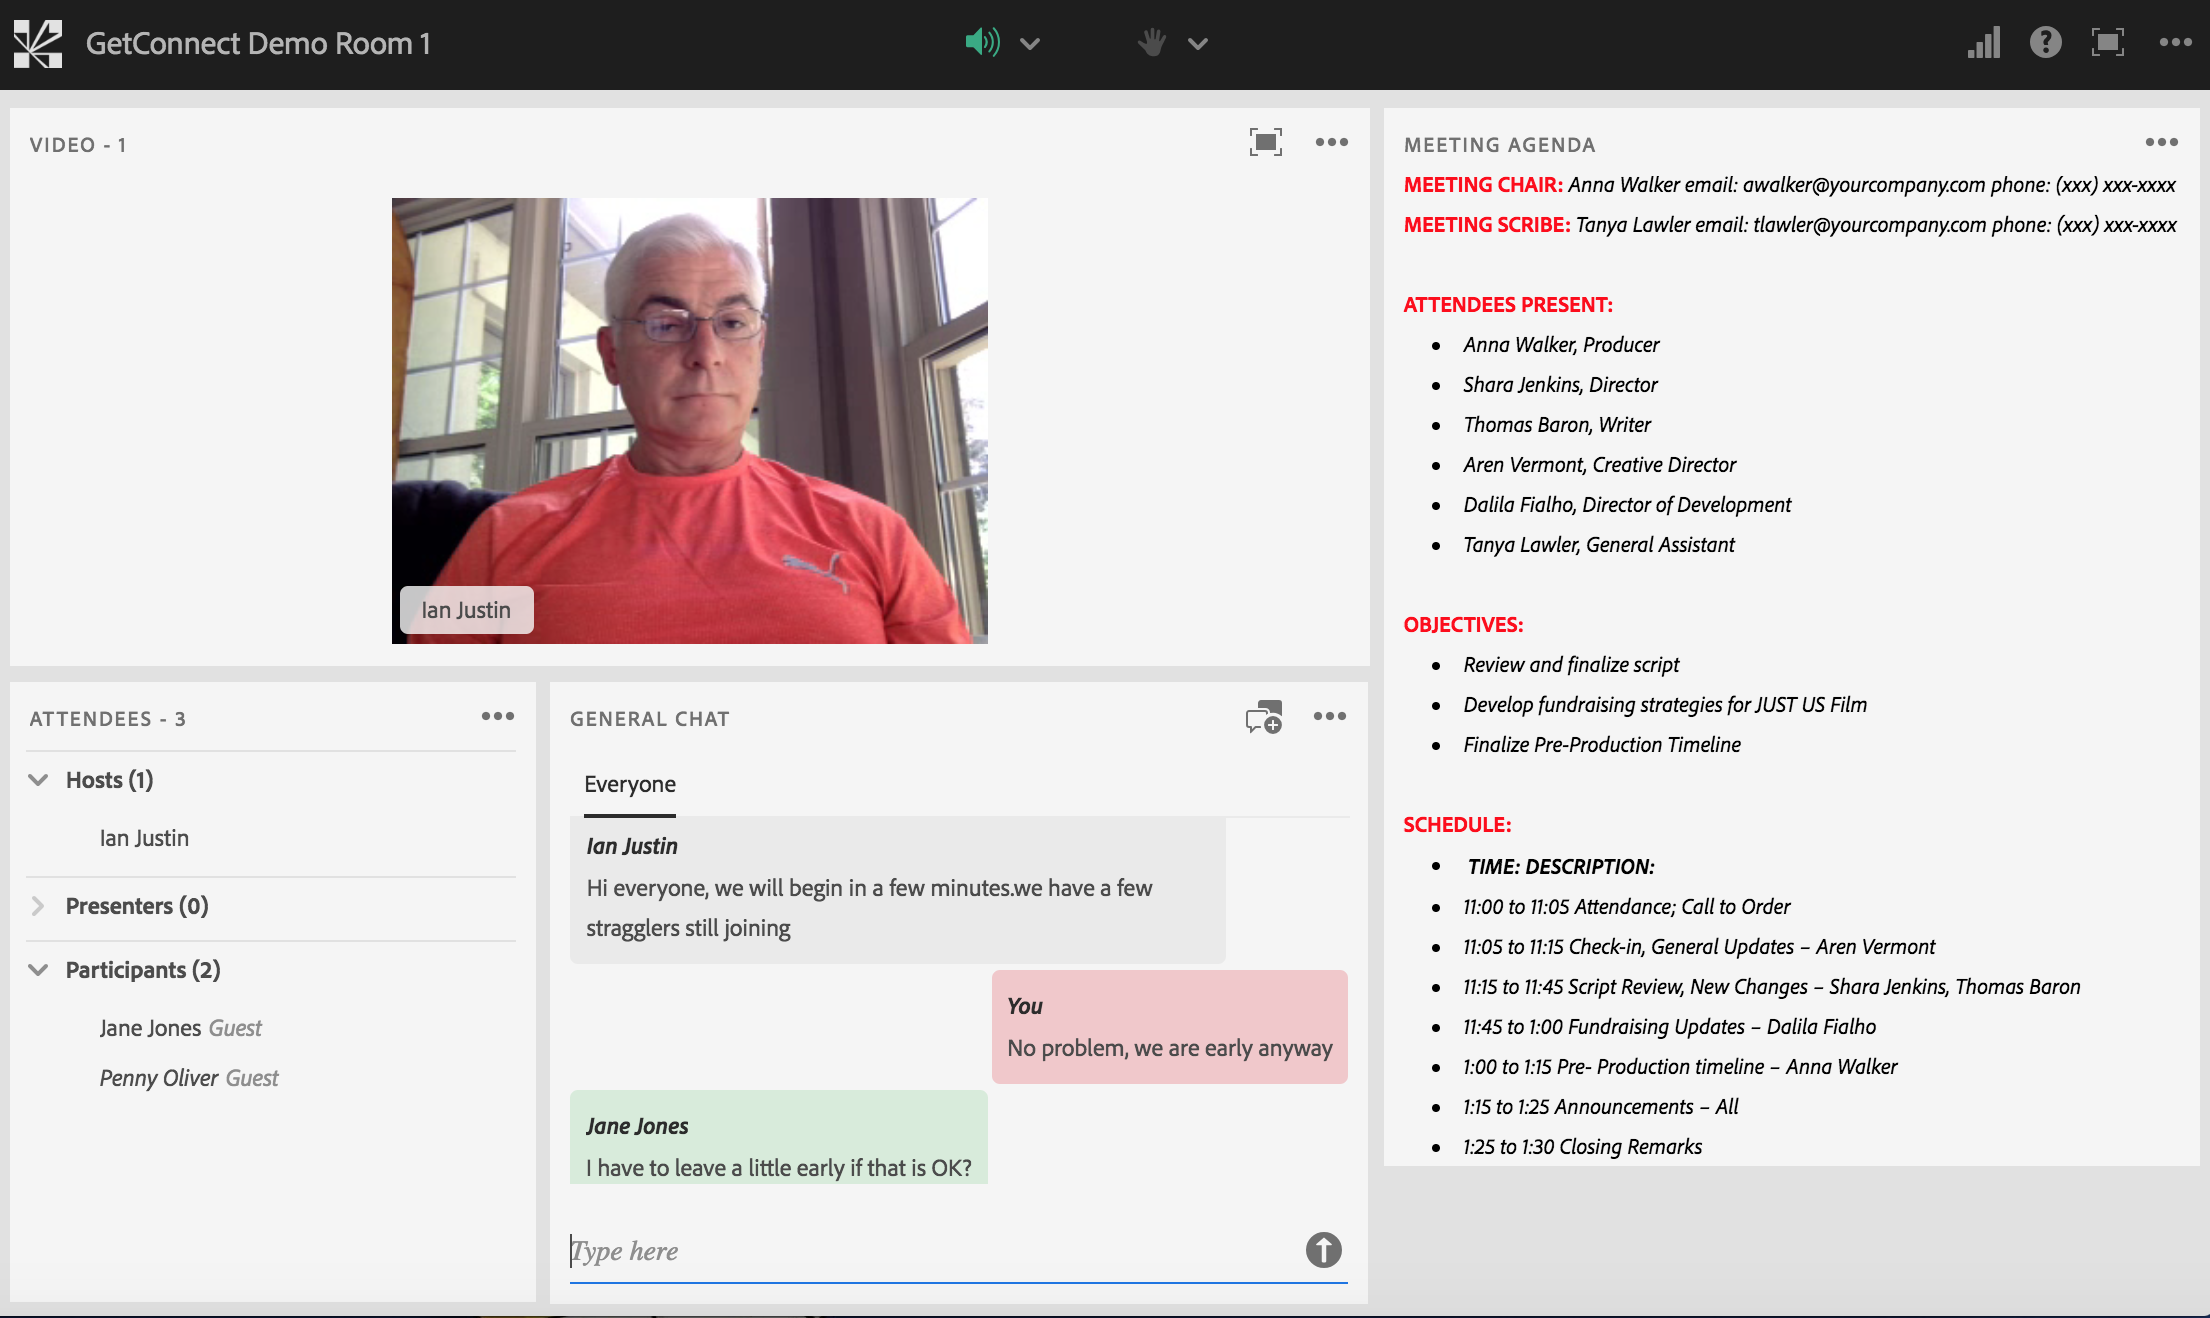
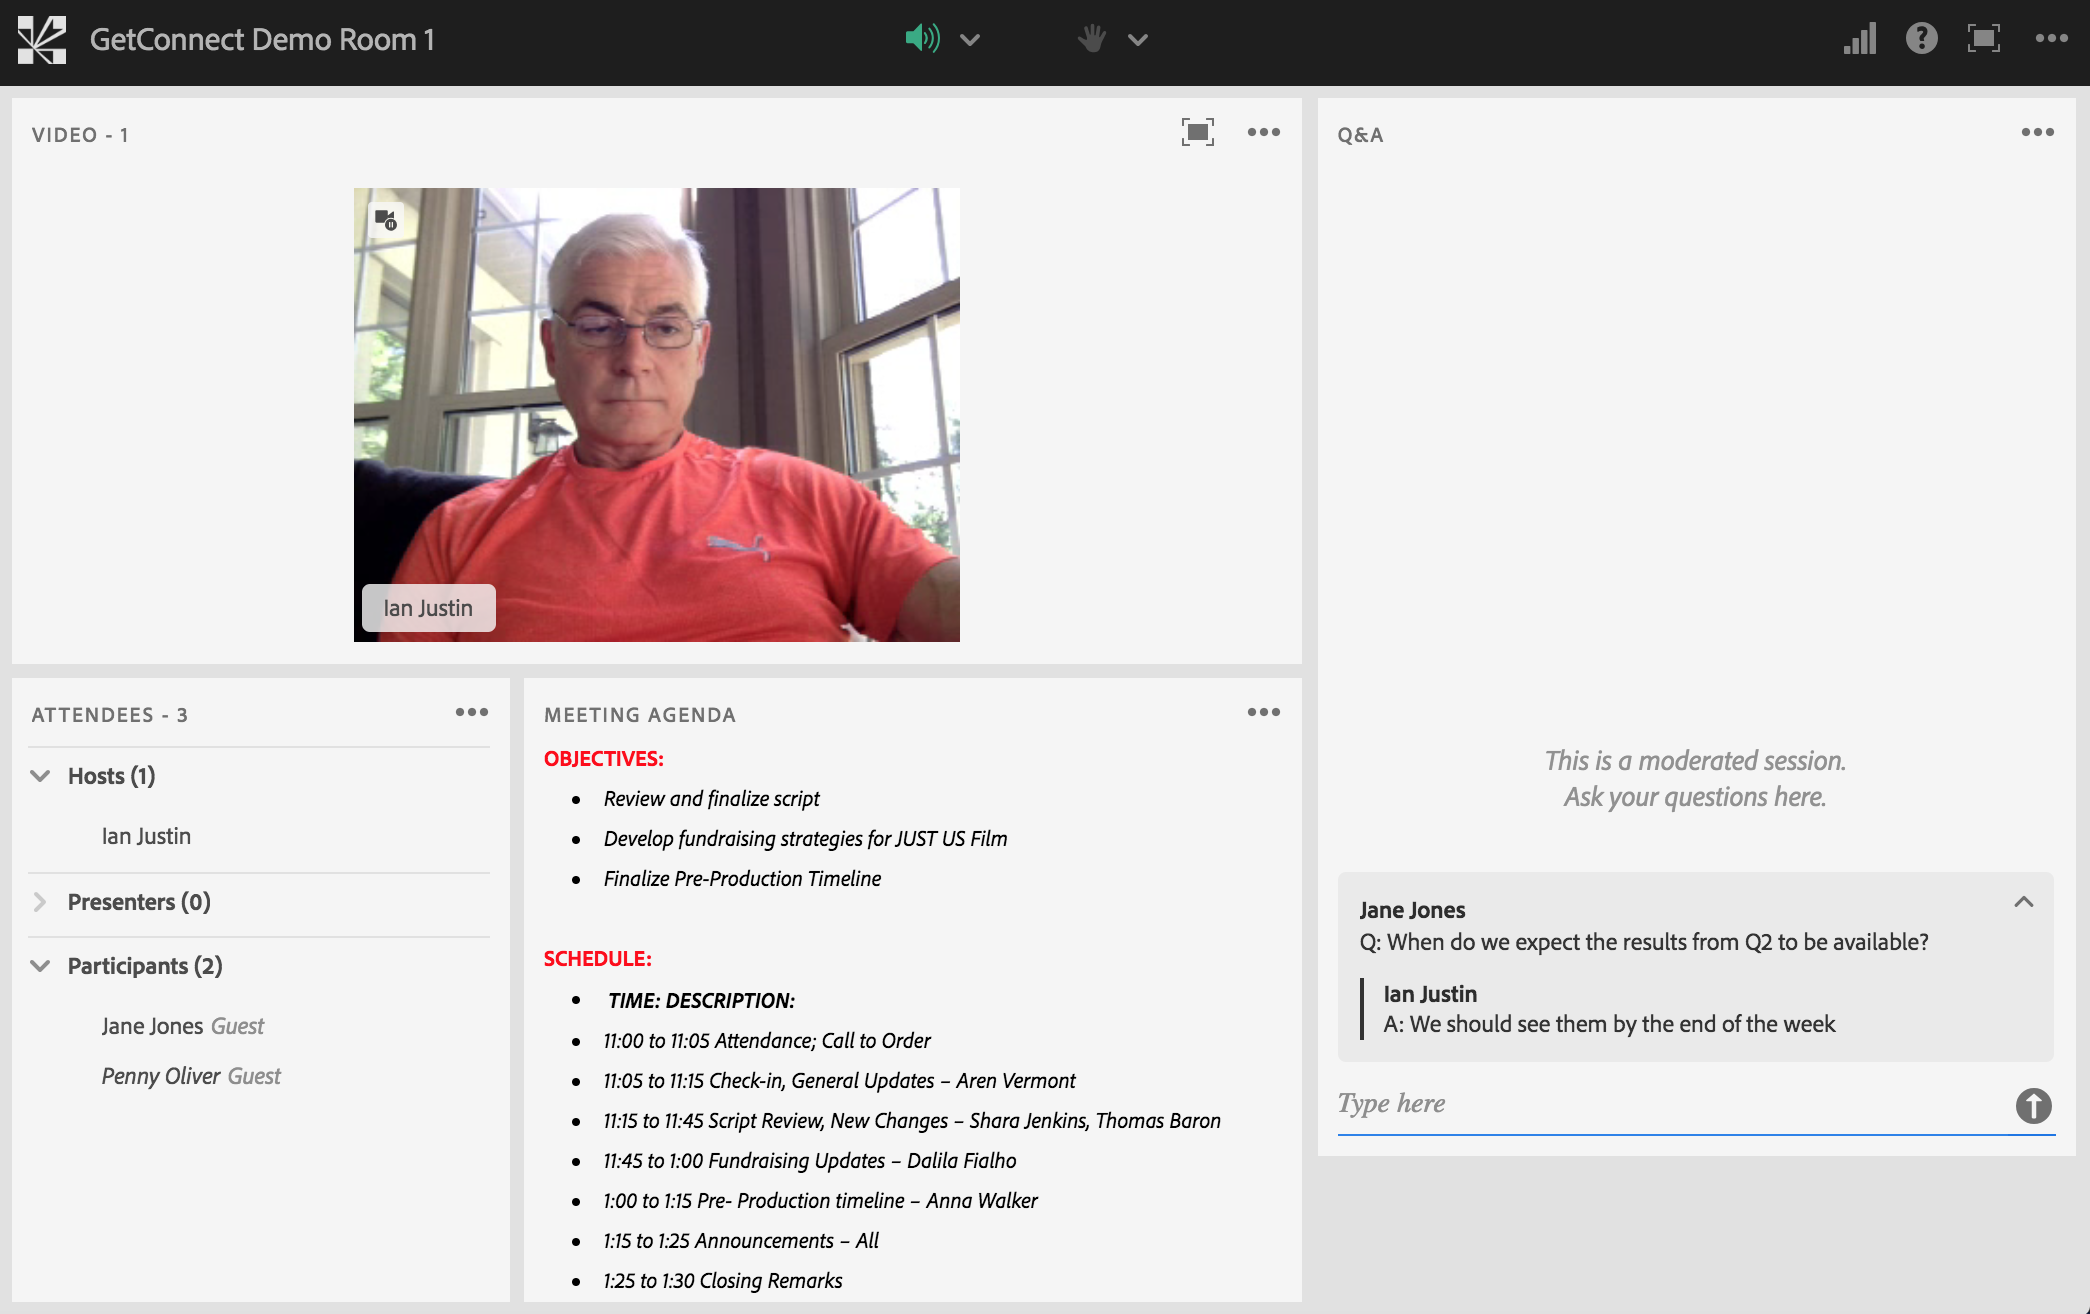
In this example I have moved to a layout where the Video Pod dominates the screen (as I am introducing the session and myself to the attendees). To the right I have included a well formatted agenda in a Notes Pod and I will walk through the agenda with the attendees. There is also a Chat Pod in the center of the screen to continue to encourage interactions by attendees.
Figure 23
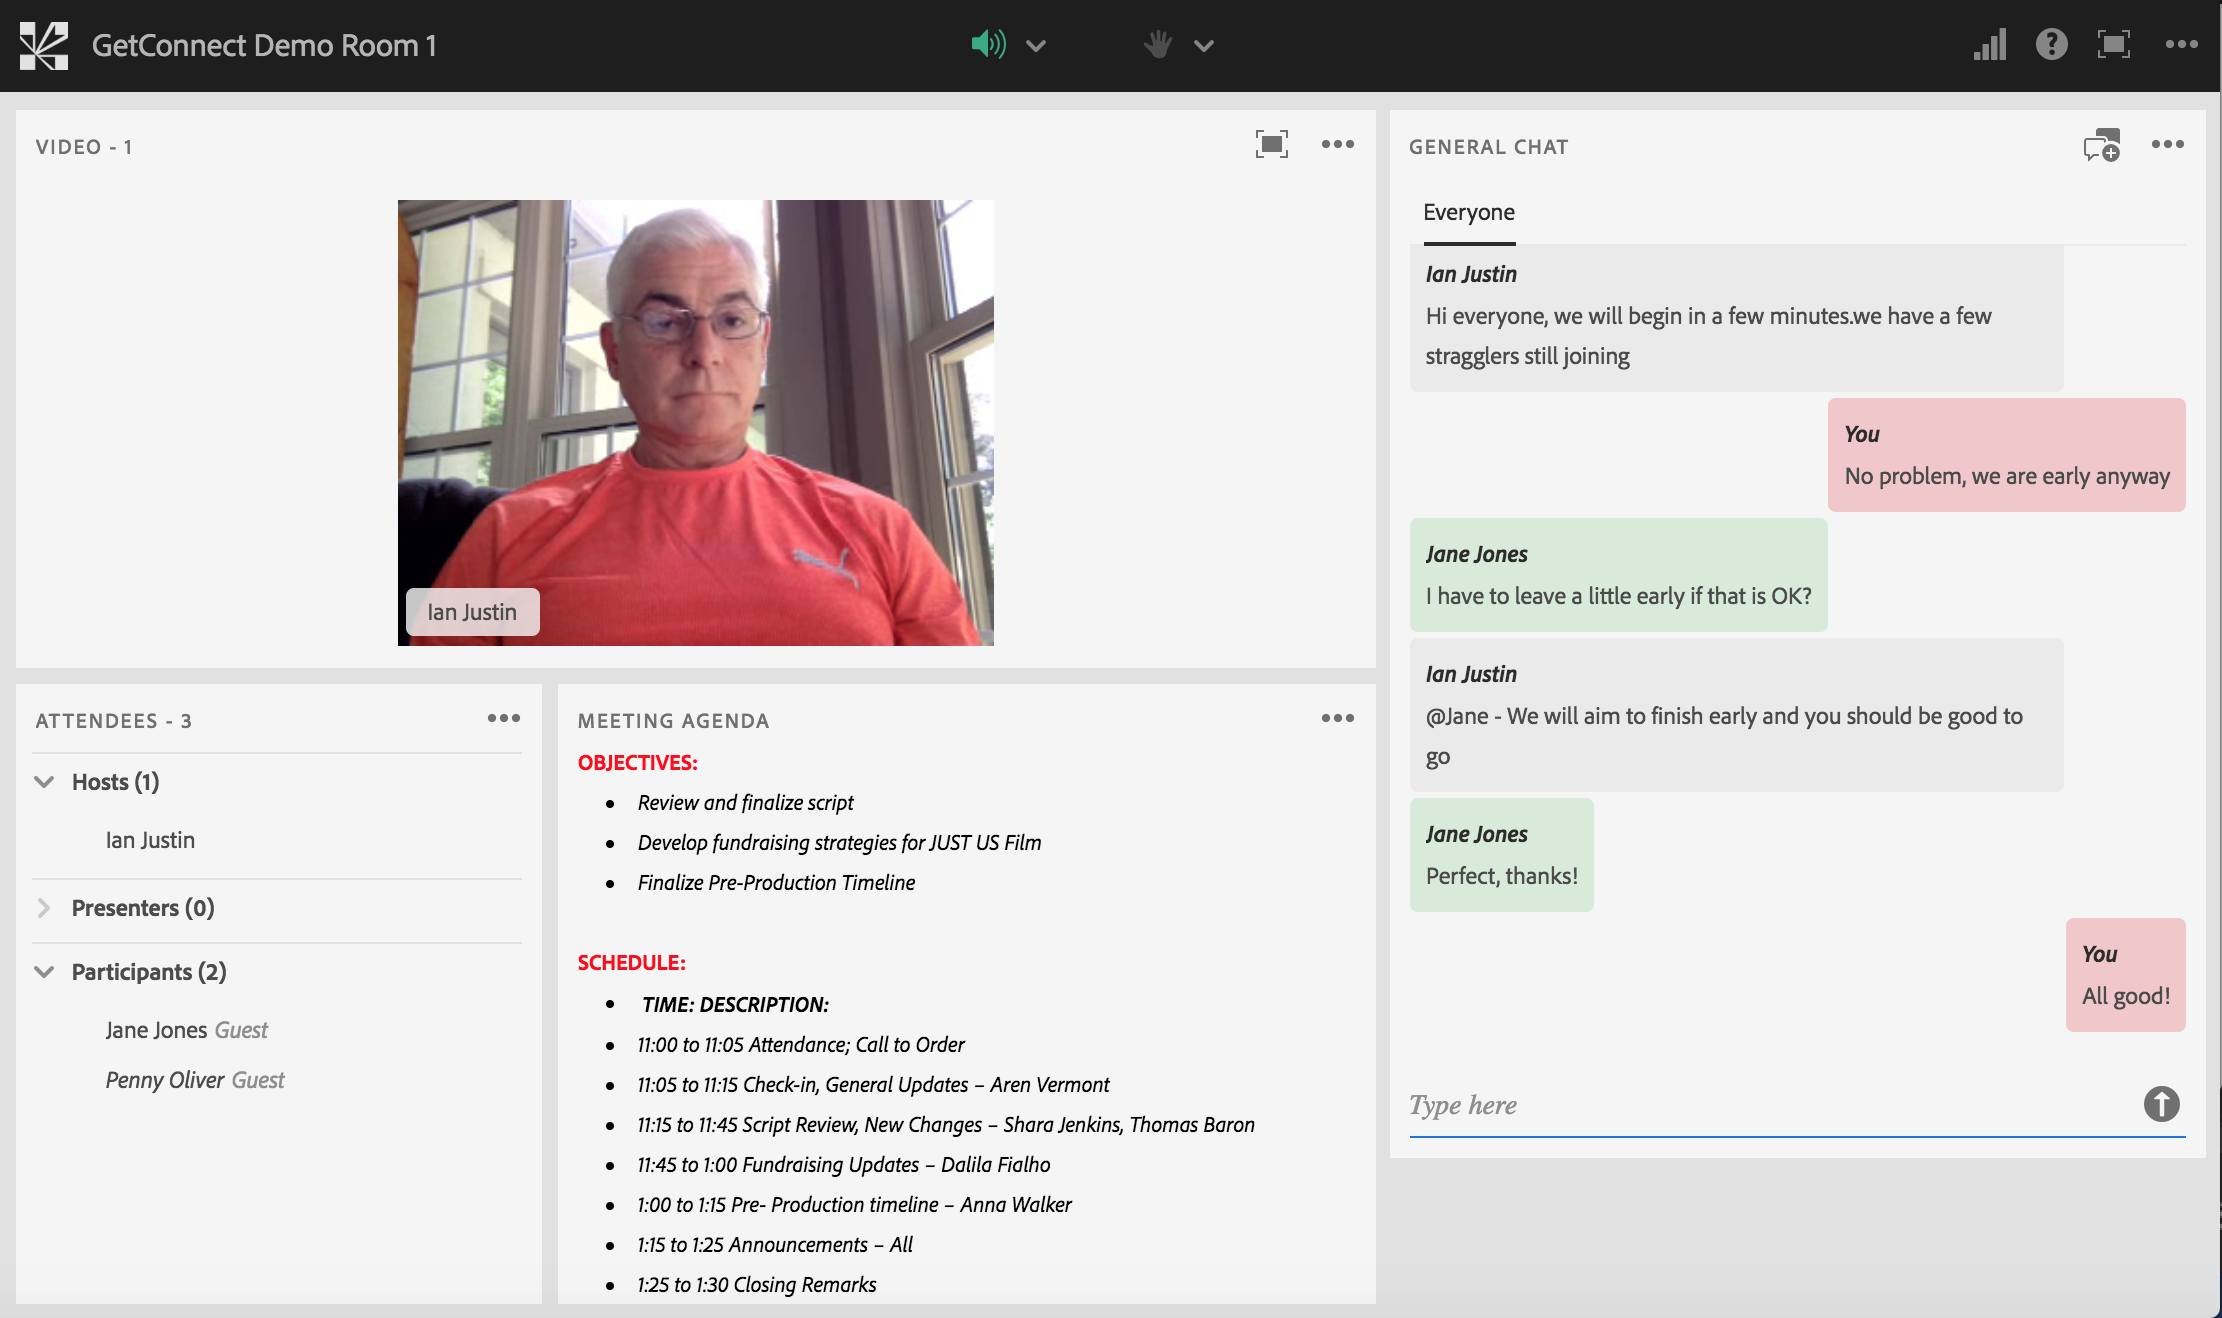
Discussion Layout
This is very similar to the ‘Agenda Layout’ but I swap the positions of the agenda in the Notes Pod and the Chat Pod (see figure 24). This may seem trivial, but I am again trying to keep the room dynamic and in this scenario I want to encourage the attendees to comment on the agenda or give suggestions…hence the Chat Pod take priority and real-estate. the rest of the pods stay in their place as I don’t want to disorientate the attendees…just keep their interest. BTW, the movement from layout to layout in the HTML5 client is very slick and fast…it can be quite compelling in a live session, rather like well-considered animations in a slide deck.
Figure 24
Screen Sharing Layout
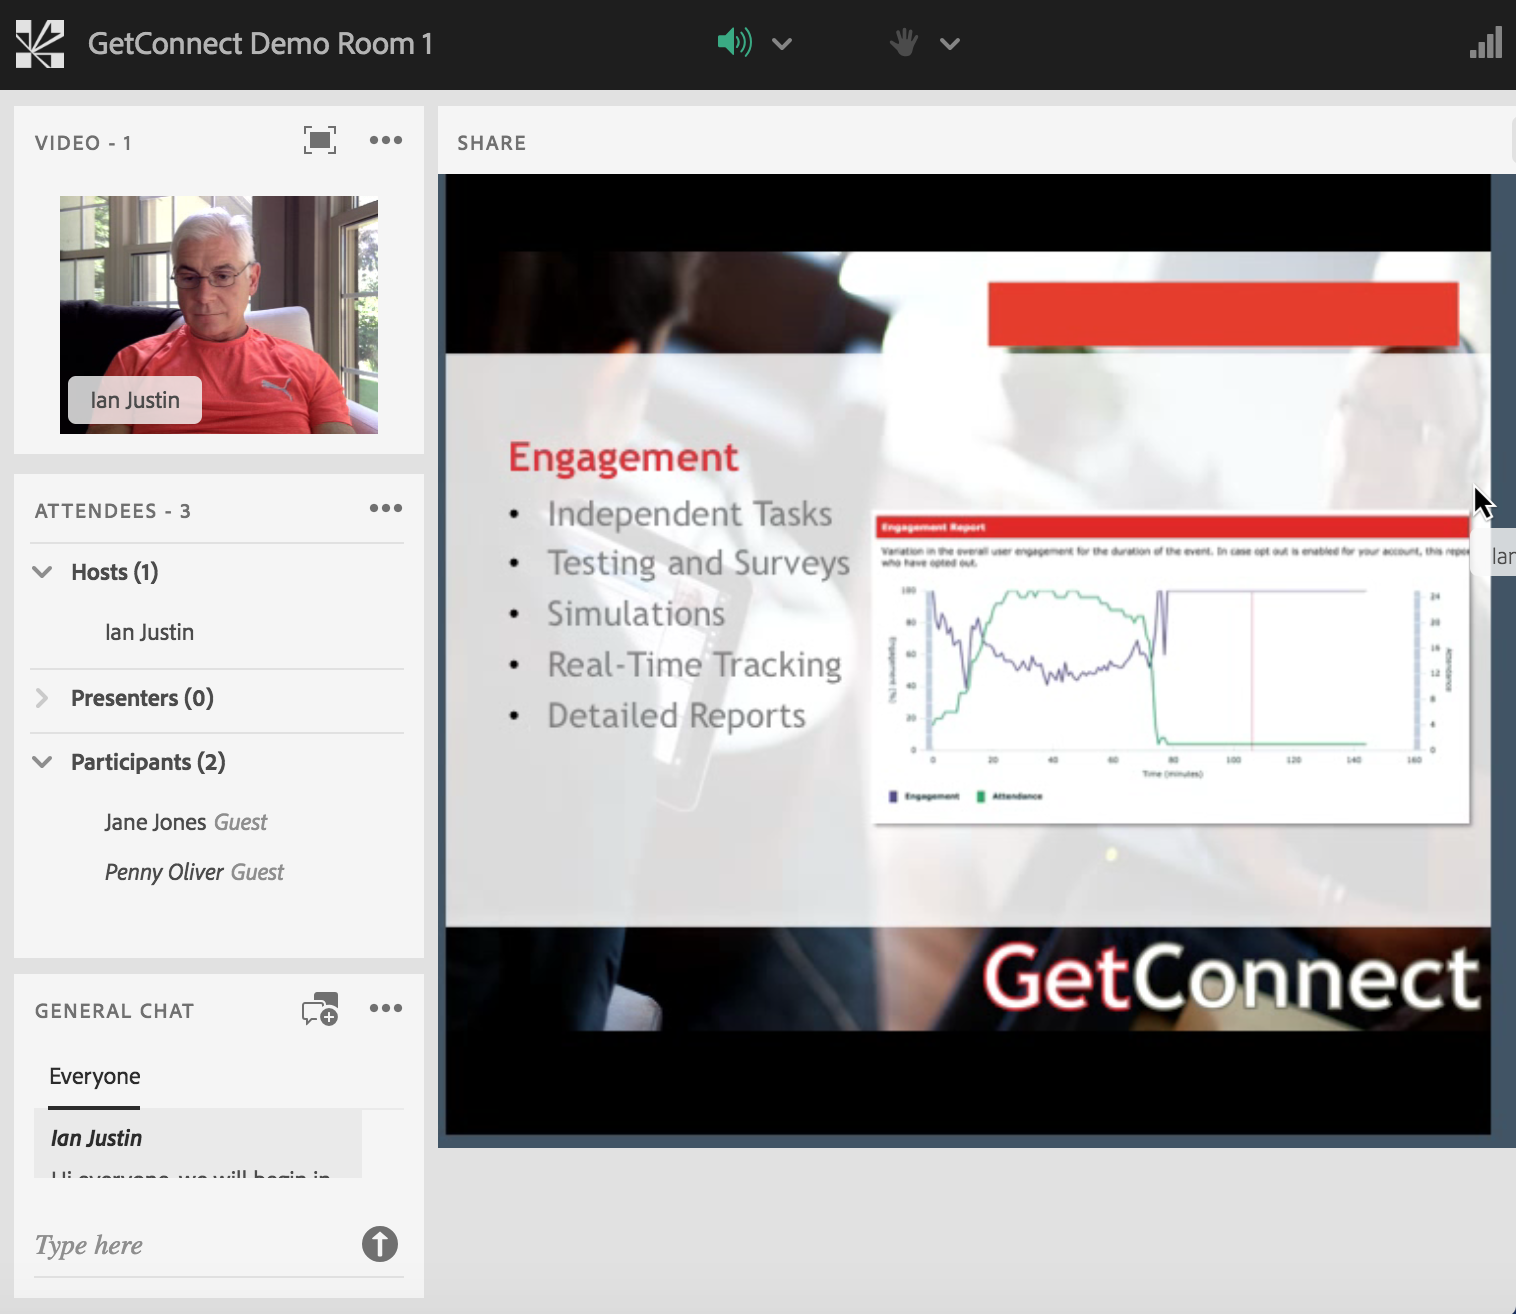
This is the regular sharing layout that is always used in Connect. The typical scenario in Connect would be that the PowerPoint is loaded into the room *but* as of the first iteration of the HTML5 client, this in not a supported workflow so the process is to share the PowerPoint from a Share Pod (likely in slideshow mode) from the desktop as a shared ‘window’ or ‘desktop’ (figure 26).
It is worth taking the time to test this within your infrastructure to see how well the screen-sharing performs. I found that the animations were surprisingly smooth in the HTML5 client from a screen-share. Take a little time to move the slide under ‘Meeting’>’Preferences’>’Screen Share’ and see what settings works well for you.
As there is no Whiteboard overlay in the HTML5 client, you would need to use the whiteboard tools built into PowerPoint, Keynote or whatever presentation tool you are using.
Figure 26
JPEG Layout
In this layout I have added JPEG images to Share Pods (figure 27) and made these independently able to toggle to full-screen by unchecking the ‘Force Presenter View’ option. As you can see in Figure 28, you can set up a number of these in the room and allow attendees to make them full-screen for close inspection independently (figure 28).
This might be a good way to allow text pages or images to be viewed by users somewhat independently (as the option to load PDF files directly into a room are not supported by the HTML5 client in the first version, this might be an interesting alternative).
Figure 27
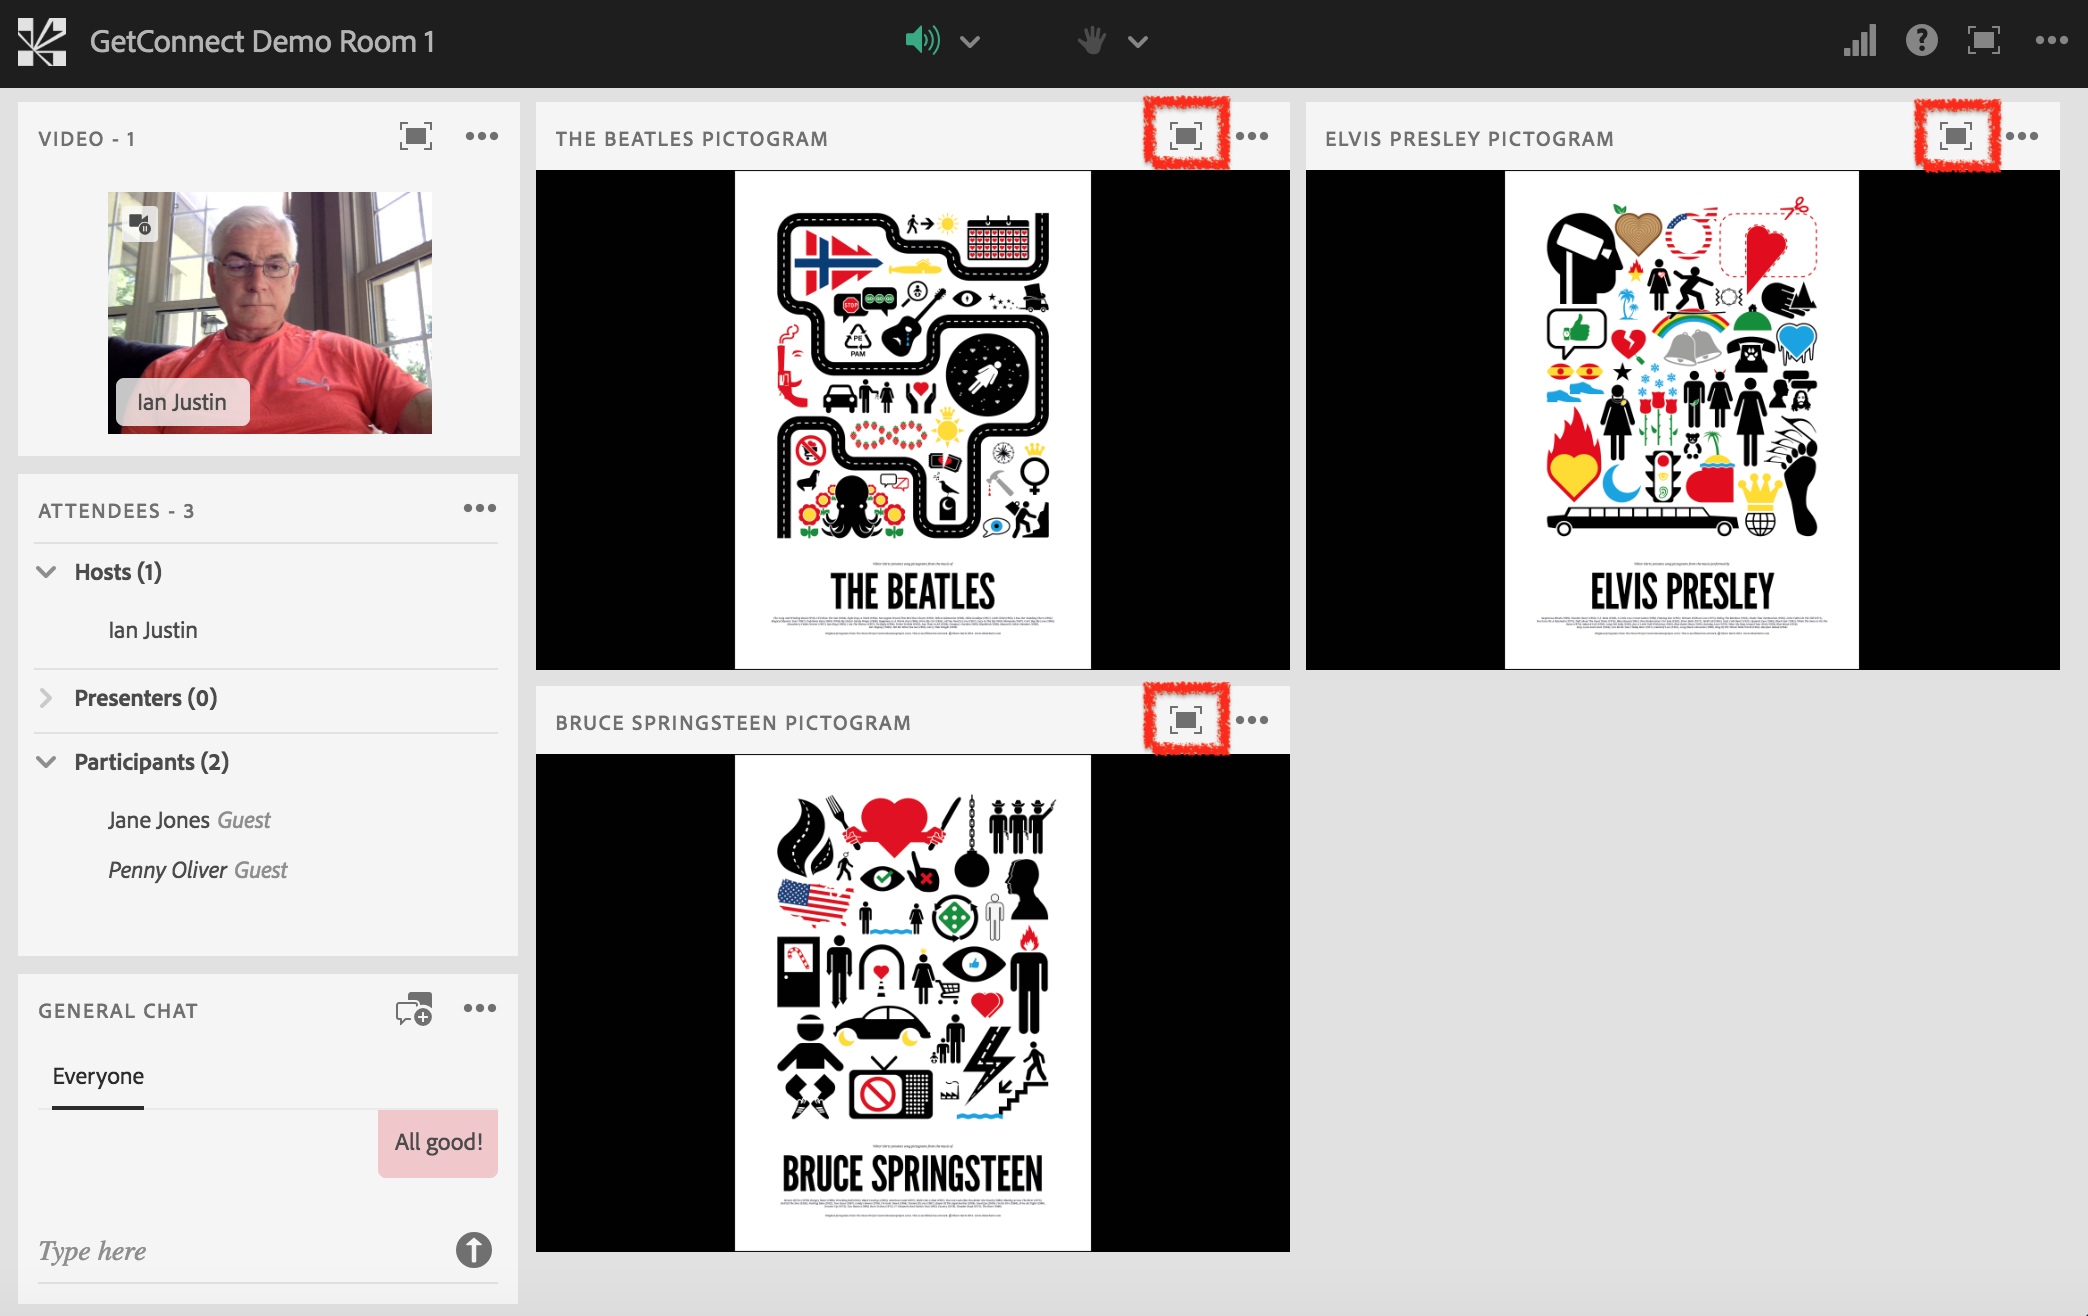
Figure 28

Moderated Q&A Layout
This is just a simple change to the ‘Discussion Layout’ where the Chat Pod is replaced with the Q&A Pod. This again changes the style of the interactions (particularly useful for larger groups) and I try to only change a single pod if possible and maintain the consistency of the Video and other pods so that the attendees are not disorientated or confused (figure 29).
Figure 29
Polls Layout
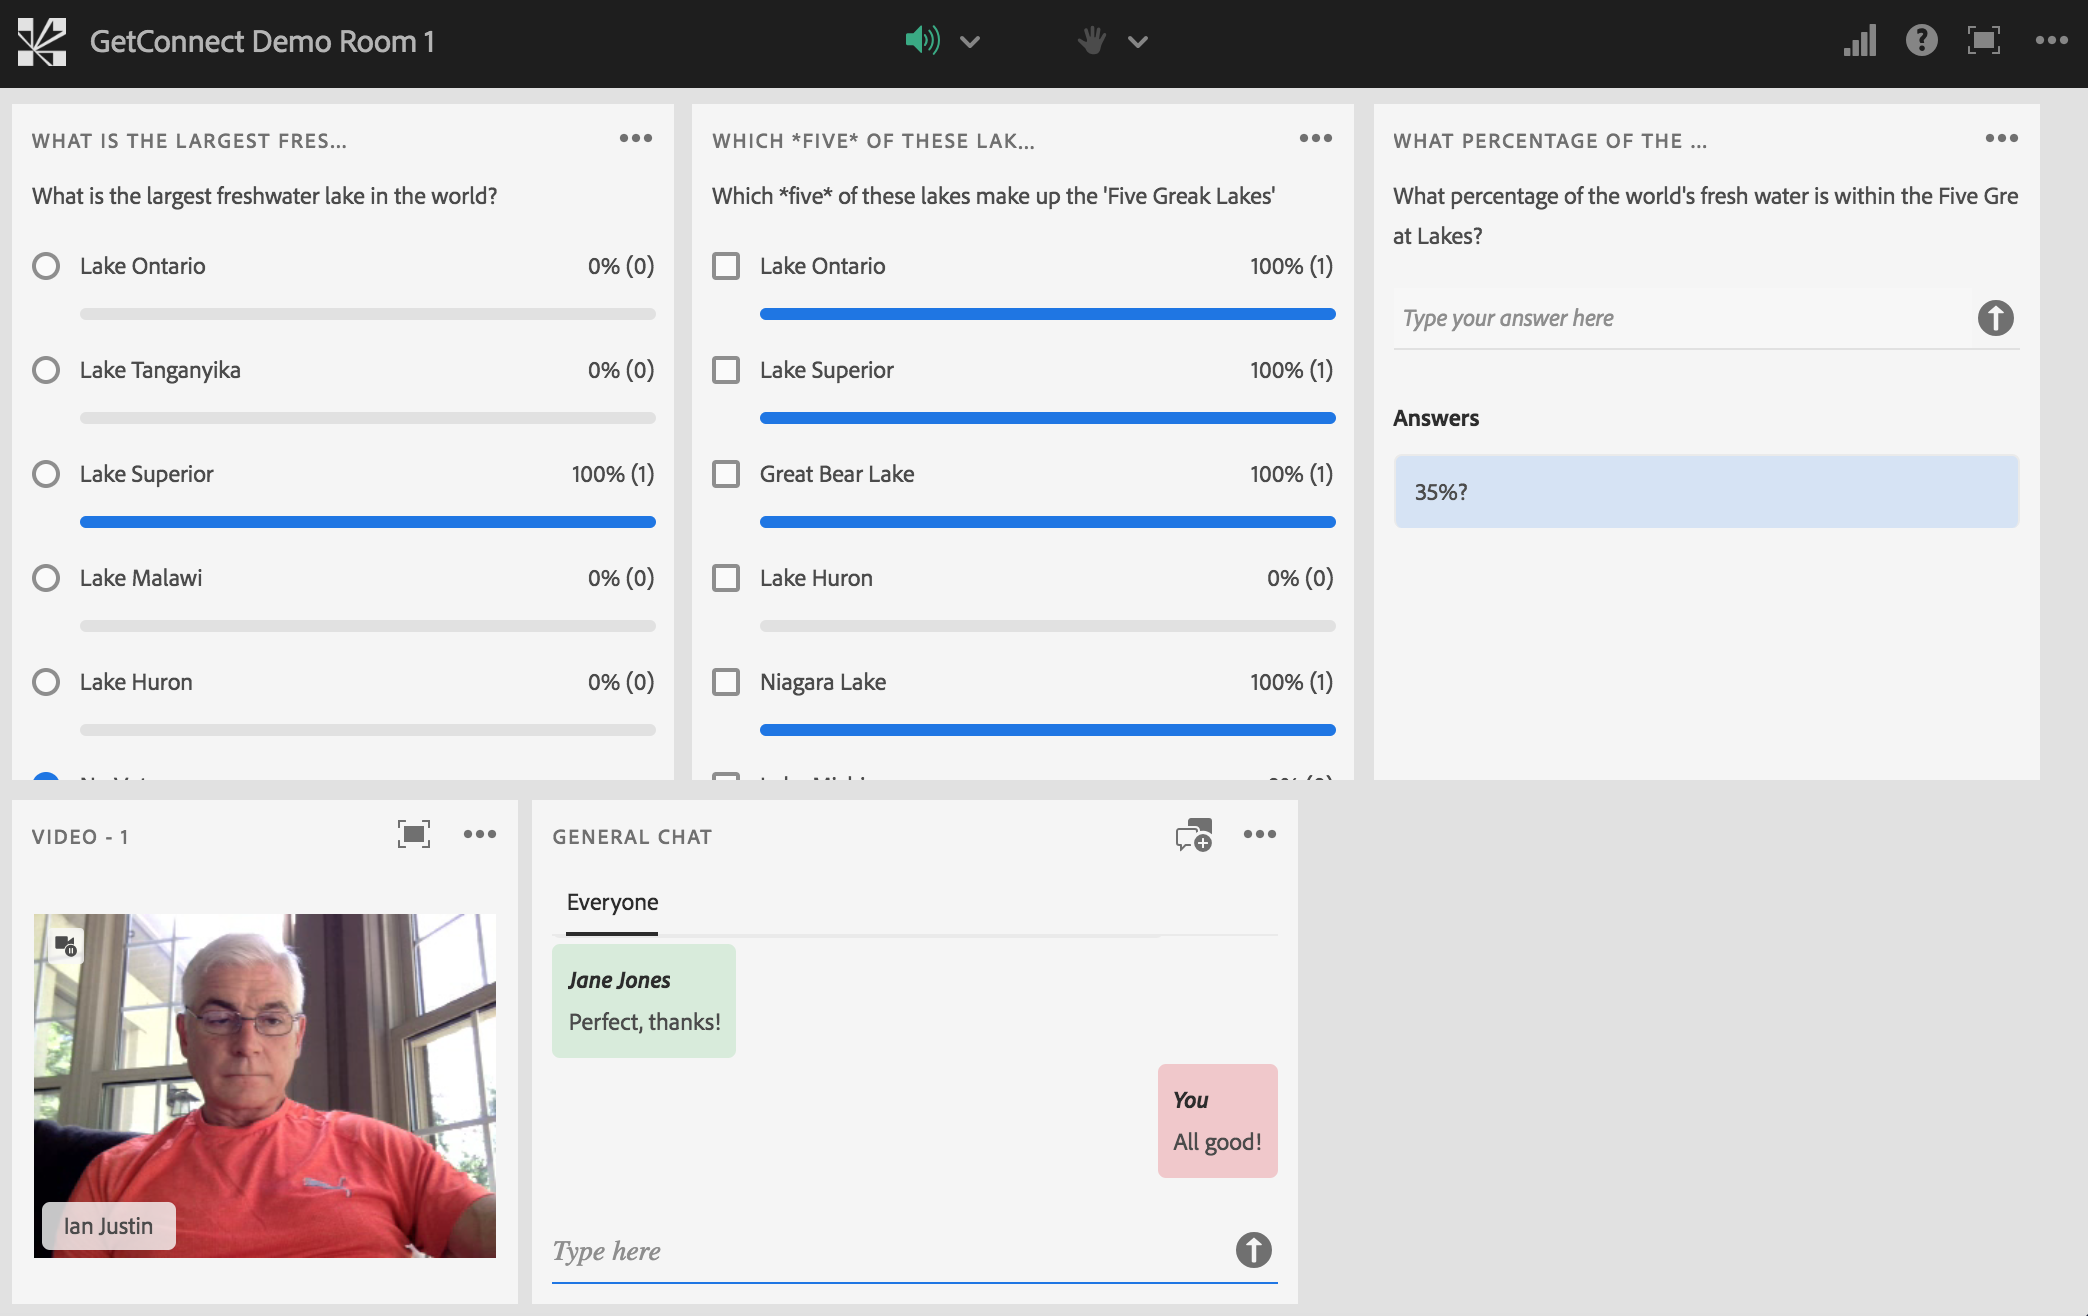
Of course you can pull up a Poll Pod anywhere and at any time in a session, but it is sometimes good to have them on a separate layout where you can control access in a more consistent manner.
In the example layout below in figure 30 I have three polls representing the three types of poll questions available in Connect. They work very well and they look very clean.
Note – Be aware that if you display the results of the polls, the pods can extend significantly vertically in the HTML5 client view. The attendees can always scroll, but take a look at the HTML5 client view to be sure you are not making it more difficult for them to see the answers etc.
Figure 30
Thank You Layout
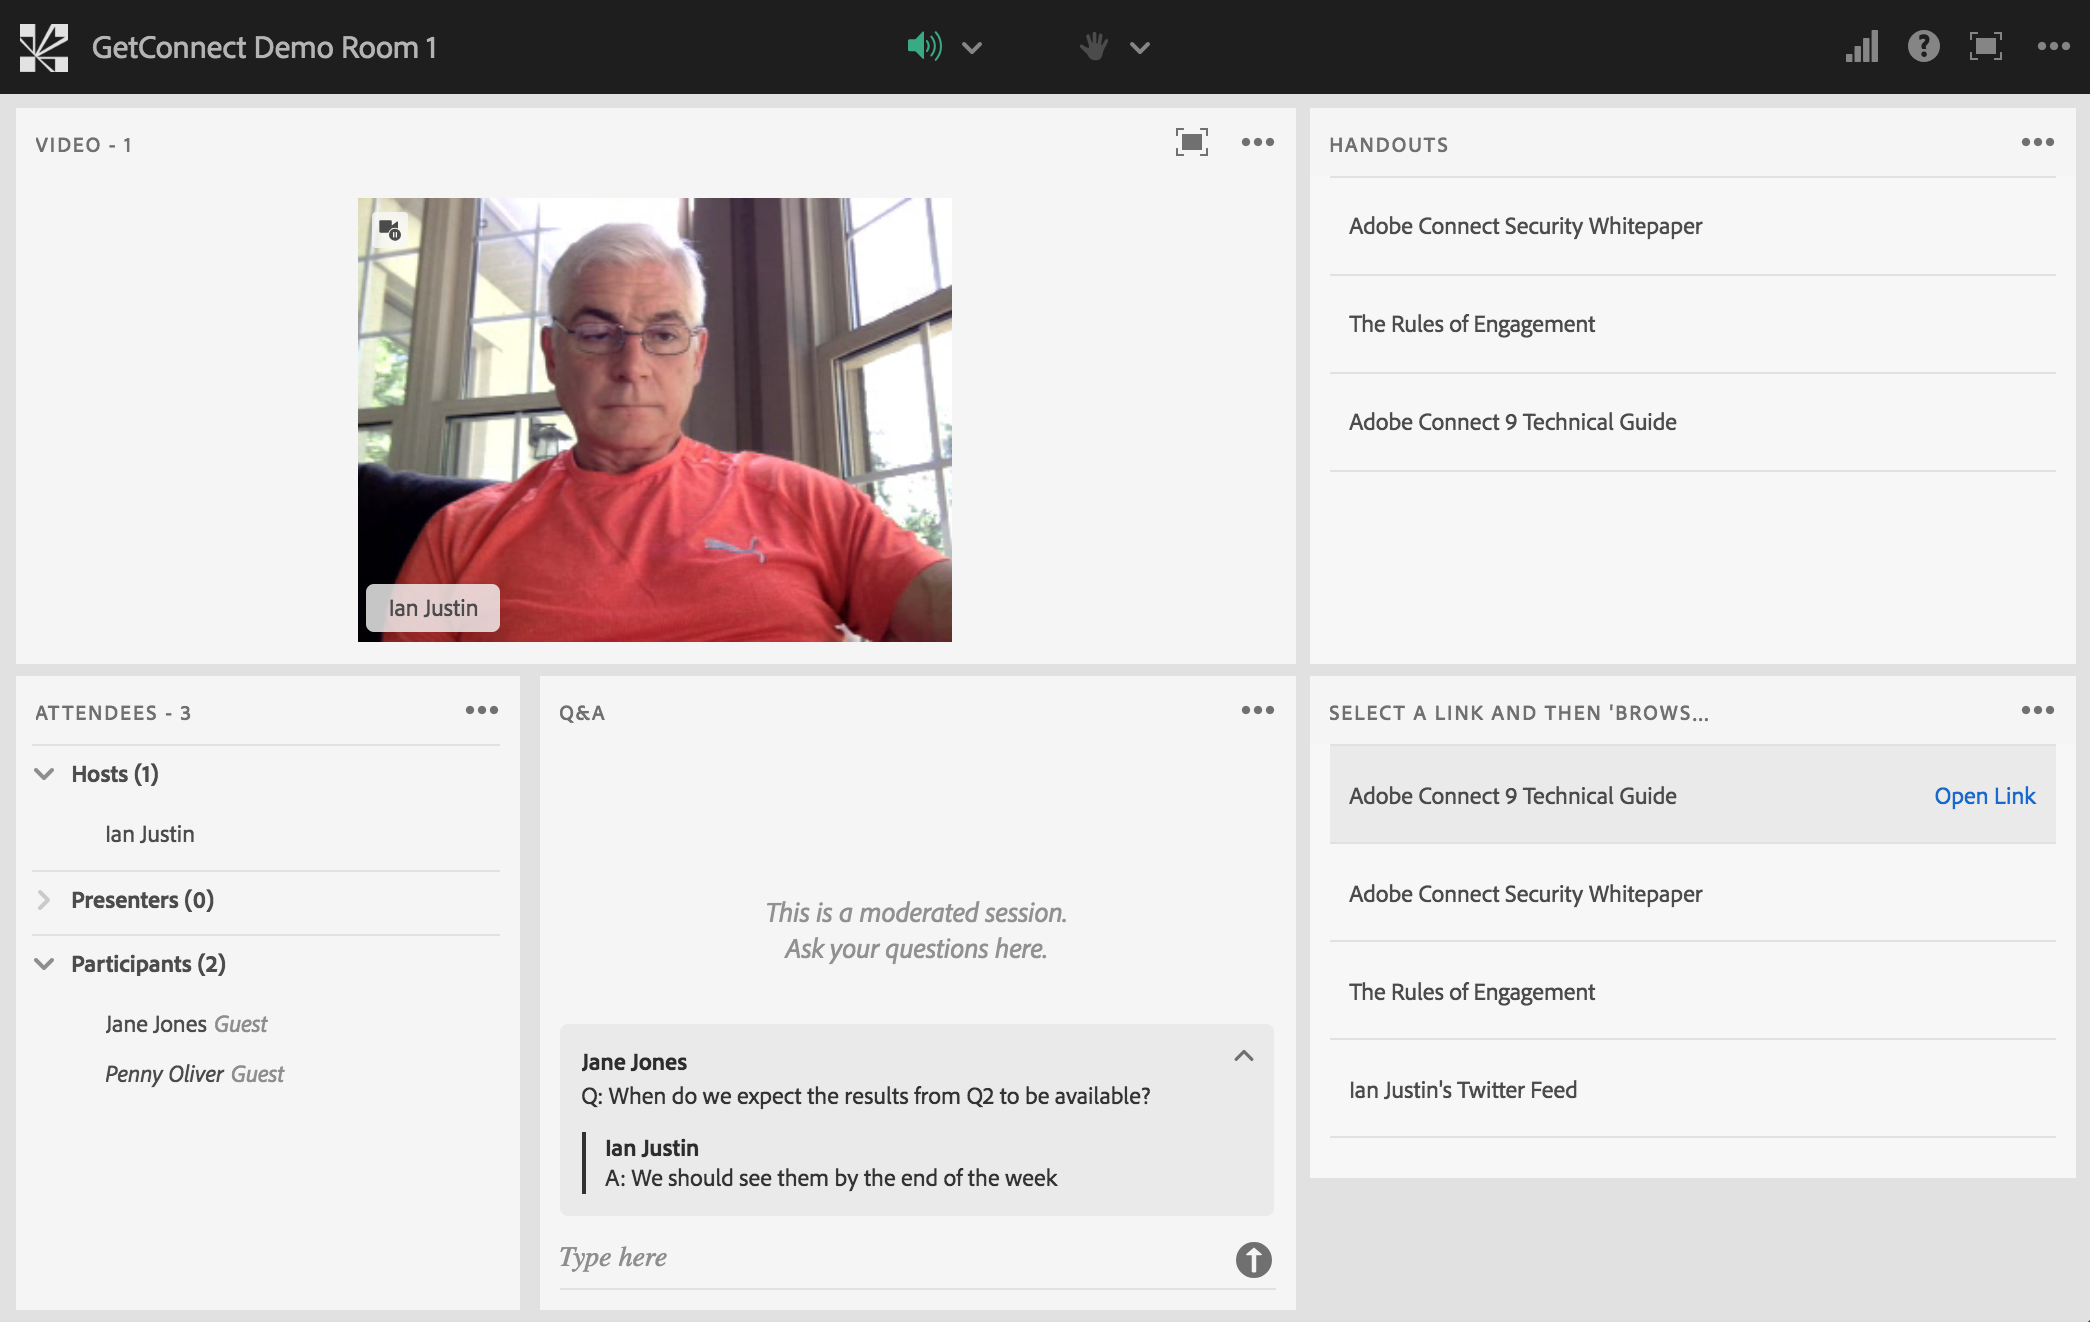
The final layout in these examples is the session-ending ‘Thank You’. This layout (figure 31) includes the usual consistent pods, but also the option for downloading files (the File Share Pod which I rename ‘Handouts’) and the option to launch web links on their computers from a pre-determined selection in the Web Links Pod.
Figure 31
Audio (Computer/VoIP & Phone Conferencing)
All of the regular phone conferencing, VoIP (computer) audio and Universal Voice (UV) options are working well in the HTML5 client. The interface is a little different in the HTML5 client, but it is a lot more user-friendly in my opinion.
VoIP/Computer Audio Only
There is a nice option to test/setup your microphone and speaker in the HTML5 client. It is similar to the test for the regular Connect clients in its use, but again very clean in the new interface. To test your ability to use audio in the room, click on the three dots to the very top-right of the room and select ‘Speaker/Microphone Setup’ (figure 32).
From the setup window you can select the ‘Speaker’ option and play a sound to confirm your speakers are working (figure 33). If you need to change the speaker/output then you can do that from your computer settings.
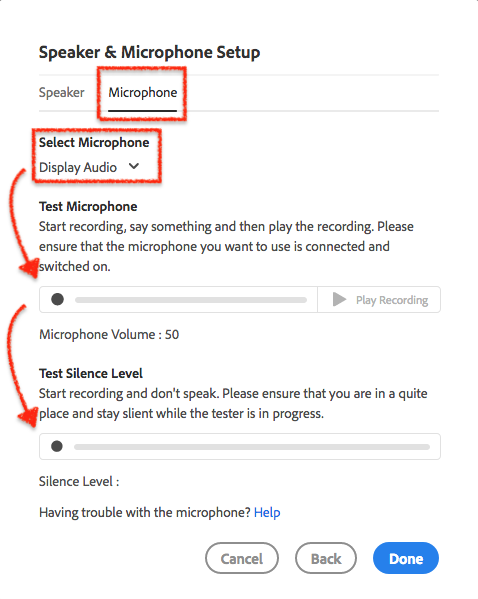
You can also select the ‘Microphone’ option and select the microphone you wish to use from the ‘Select Microphone’ drop-down list, then make a test recording and test the silence in your area (figure 34).
Figure 32
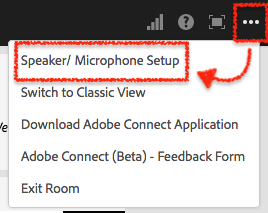
Figure 33
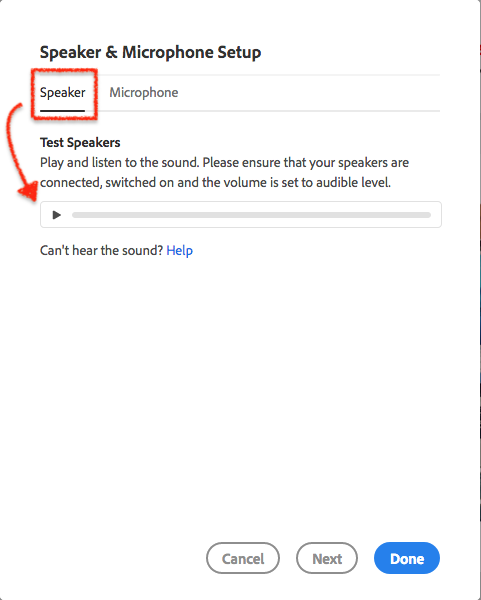
Figure 34
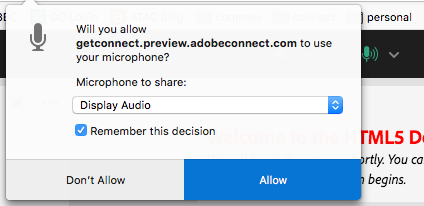
It is possible, depending on your setup, that you will receive a pop-up from your browser asking whether you want to allow Connect to have access to your microphone (similar to the example in figure 35 below). You will likely only see this once and if you want to be able to speak you should click to ‘Allow’ and ‘Remember’ to save you doing this every time.
Figure 35
The host of the room can configure and start audio from the Connect Desktop App. just as they would normally. If the host chooses computer audio only and to allow the attendees microphone rights then the attendee will see the pop-up shown in figure 36. The pop-up will disappear after a few seconds but it is a clear indication of the permission being granted to use the microphone. Attendees will see a similar message more selectively if you grant access on a person-by-person basis as a host.
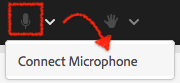
To connect your microphone you can either click on the microphone icon or the down-arrow beside the icon and select ‘Connect Microphone’ (figure 37).
Figure 36
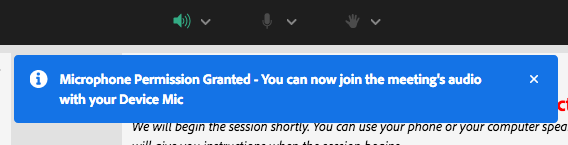
Figure 37
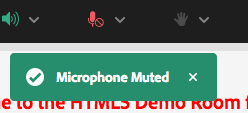
To mute or unmute your microphone you can click on the microphone icon. It will turn red when muted and green when unmuted and you will also see a pop-up confirming your selection (figure 38).
Figure 38
To disconnect your microphone completely, click on the small down-arrow to the right of the microphone and select ‘Disconnect Microphone’
You will also be able to see who is actually speaking from a subtle text message that will appear to the top-right of the meeting title bar.
Note – As with all VoIP sessions, it is recommended that the host only activates the microphones that are necessary at any one time, or be strict on ensuring attendees mute their microphones when they are not speaking. Otherwise there will be background noise and unnecessary use of bandwidth.
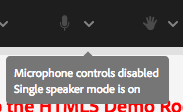
An alternative to muting all microphones is to use ‘Single Speaker Mode’ as a host. This ensures that only one person can speak at a time and this works well in the HTML5 client. If this is enabled and another attendee/presenter/host has the mic then the other attendees in the HTML5 client will see the message in figure 39 below.
Figure 39
Integrated Phone Conferencing and Broadcast Audio (through computer)
If the host configures the audio to allow attendee to join via the phone or to listen over the computer speakers, then Universal Voice (UV) will rebroadcast phone audio to the computer speakers. In this case the attendees will see a message as showing in figure 40 below. They can choose to dial into the phone conference or just listen using their computer.
Figure 40
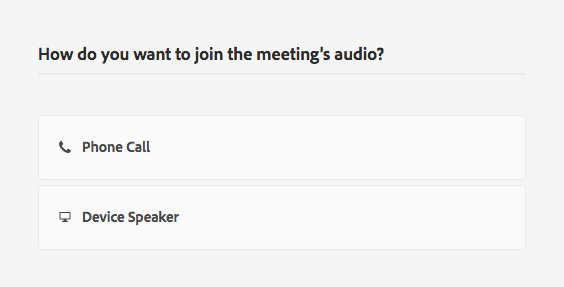
If the attendee chooses the option to join via the ‘Device Speaker’ then the audio will simply be played through their output device.
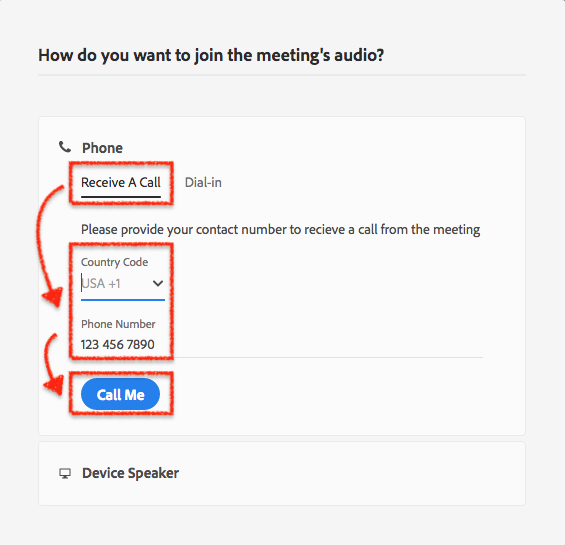
If the attendee chooses the ‘Phone Call’ option then they will have a couple of options (depending on what the host has chosen to offer). In figure 41 below you can see the option to join by ‘Receive A Call’. In this case the attendee would enter their direct dial information and then select ‘Call Me’ and the conference call/Connect room will call their phone.
Figure 41
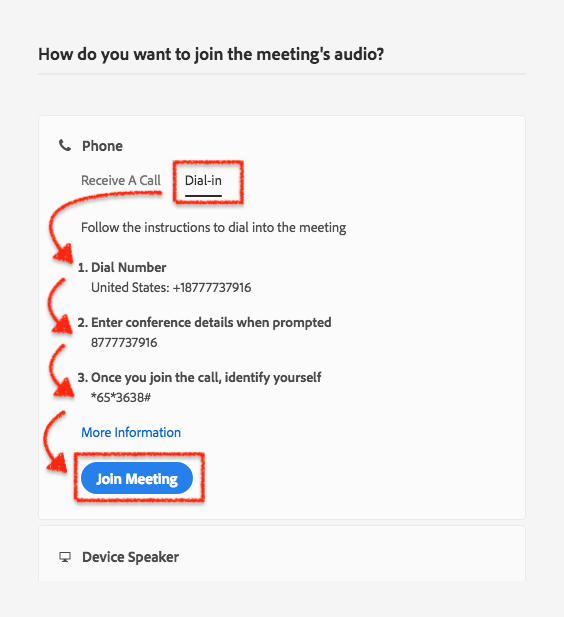
If the attendee chooses the ‘Dial-in’ option then they will follow the instructions as shown in figure 42 below to dial into the conference call and identify themselves.
Note – Not all hosts may choose to offer the ‘Dial-in’ option so this may not appear.
Note – If the conference call is not fully integrated into Connect then the attendees will only see the ‘Dial-in’ option, not the ‘Receive A Call’ option.
Figure 42
Integrated Phone Conferencing and Computer Audio (speakers and Microphones)
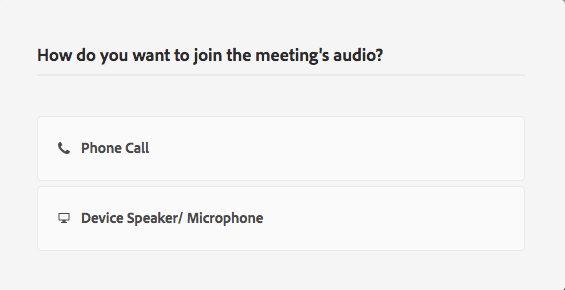
There is only one real change int his scenario. the attendees will see a slightly different pop-up when they have the option to join the audio for the room as you can see in Figure 43 below. Instead of the second option being ‘Device Speaker’ it is changed to ‘Device Speaker/Microphone’. If this option is selected then the attendee microphone will immediately be connected and they will see the pop-up confirmation.
Figure 43