Connect is an incredibly deep tool with very sophisticated functionality, but you do not need to know everything on day-one and you may just want to get started ASAP. This Blog Post (and the associated linked posts) are intended to get you up and using your Connect licenses in a hurry.
As you become more confident, you can start to add the deeper features and practices to your sessions.
Note on terminology – For the purposes of this Blog Post, the words ‘classroom’ and ‘meeting’ are interchangeable. A ‘Virtual Classroom’ is just a way of using a room to teach. Connect has incredibly powerful tools to engage learners in any of the licensing options, not just the Virtual Classroom Manager license.
Scope of this Blog Post
This post covers the Named Virtual Classroom Manager (NVCM) licenses and assumes you are the account Administrator. If you are not the account Administrator, go to step #3 as your NVCM license will have already been assigned to you by the account Administrator.
1 – Log into your account – Use your email and password from Adobe.
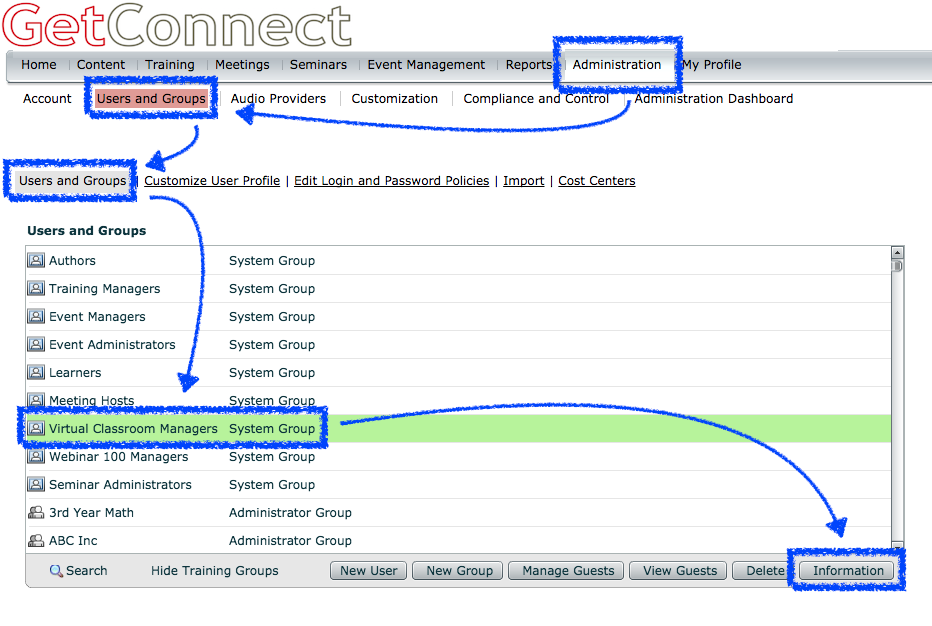
2 – Assign your NVCM license(s) – Go to the ‘Administration’ tab, then ‘Users and Groups’. Select the ‘Virtual Classroom Managers’ group and then click ‘Information’ (Figure 1). Note that the NVCM license has a 200 participant/learner capacity. Select your name from the list on the left, and then ‘Add’ to give yourself the rights to create and run Webinar Rooms.
Note on the number of people that can be in the ‘Webinar nnn Managers’ group – If you purchased 1 NWM license, you can have 1 person in that group, if you purchased 5 NWM licenses, you can have up to 5 people in that group.
Note on creating users – If you need to add more logins/users to your account and give them webinar room rights, please refer to the Blog Post here, section ‘C’.
Figure 1
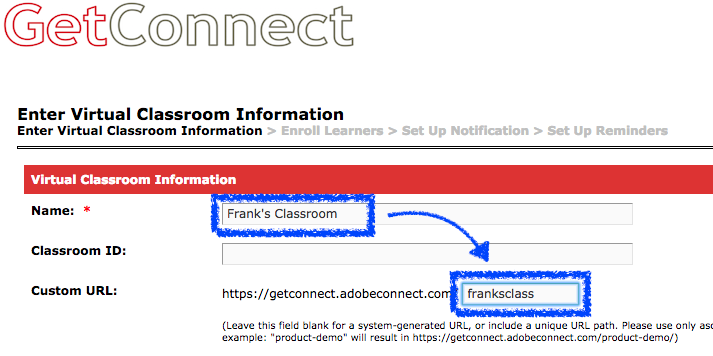
3- Build your first Virtual Classroom – Click on the ‘Training’ tab and select ‘My Training’. On the next screen click on the ‘New Virtual Classroom’ button (Figure 2). Complete the ‘Name’ field to identify your classroom. If you want a unique URL name for the room, enter it in the ‘Custom URL’ field (Figure 3).
Note on Custom URLs – You must enter a custom URL at this stage, you cannot add it later. Remember that a URL cannot have spaces etc. and you cannot use the same URL more than once.
Scroll to the bottom of the form and click ‘Finish’.
Figure 2
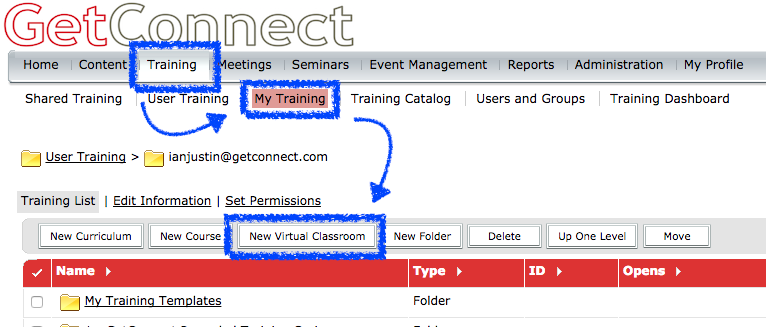
Figure 3
4 – Start your Virtual Classroom – On the next screen click ‘Enter Virtual Classroom’. How the room looks will depend on whether you have set up templates in your account, but here are the tools you will need to get going right away.
Note on the Layouts – On the right side of the room you will see thumbnails that represent the layouts in your room. These are the default layouts and if you click on the thumbnails you will see the typical structure of pods for ‘Sharing’, ‘Discussion’ and ‘Collaboration’ tasks.
‘Video’ Pod – Somewhere you will see a ‘Video’ pod with the prompt ‘Start My Webcam’. Click here and follow the prompts to start your camera.
‘Share’ Pod – Somewhere you will see a ‘Share’ pod. This is the workhorse for your room. Click on ‘Share My Screen’ and follow the prompts to share your desktop or applications. Click the arrow to the right of ‘Share My Screen’ and then ‘Share Document’, then click ‘Browse My Computer’ to find a PPT/PDF on your computer and load it into the ‘Share’ pod. You can then navigate through the slides. You also have the option to share a whiteboard here as well.
Note on ‘Sharing’ – If you are prompted to install the ‘Connect Meeting Add-in’ then follow the prompts to do so. You need the add-in to share your screen.
‘Chat’ Pod – Somewhere you will see a ‘Chat’ pod. Any conversations in this pod are shared across all of the attendees and leaders.
‘Notes’ Pod – Somewhere you will see a ‘Notes’ pod, this can best be compared to a flip-chart or an easel-chart. Make notes here for everyone to see (an agenda for example).
‘Attendee List’ Pod – Somewhere you will see an ‘Attendee List’ pod. From here you can drag-and-drop attendees to give them presenter rights and you can mouse-over their names to change permissions too.
‘Poll’ Pod – Somewhere you will see a ‘Poll’ pod. You can add a question in the first field and then answer options in the field below separated by the return/enter key (line by line). When you click ‘Open’ the poll will be available to your participants/learners.
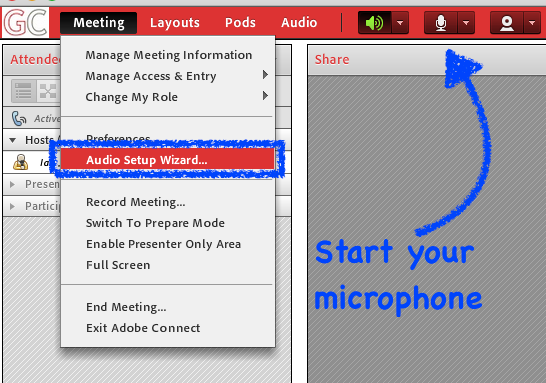
5 – Use your microphone – Ensure your microphone is configured correctly by clicking on the ‘Meeting’ menu and following the ‘Audio Setup Wizard’ Figure 4). Start your microphone by clicking on the microphone icon (Figure 4).
Figure 4
6 – Invite Participants – To invite others into your room, simply send them the URL and have them login using the ‘Guest’ field and follow the prompts.
More information – There are details and training and reference resources available to GetConnect clients on the ‘All Things Adobe Connect’ blog here:
Search – You can search for topics such as ‘powerpoint’ or ‘video’ to find tutorials.
Manuals – There are training manuals under the ‘Resources’ tab here.
Training – There is recorded training under the ‘Resources’ tab here.