I tend to get a lot of questions around how to convert video from other formats into something that Adobe Connect can use. Most users of Connect also want to know if there is a free tool that they can use to convert videos
There are a lot of ‘free’ tools out there, but many of them are just bait to upgrade to a full (paid) version, some of these are limited to only a short clip of video and some are quite simply undesirable malware
Adobe does have a video conversion tool (Flash Media Encoder) but this is a part of the larger products such as Premiere Pro or Creative Suite and are great if you have the tools already, but $800 is pretty pricy just for a conversion tool
I have been using a free tool called ‘Any Video Converter’ (AVC) for a while now if I am in a pinch and need to get a video into MP4 format, I have actually upgraded to the full version, but I have the free version on some computers and it works well
Any Video Converter is available for the PC and the Mac and to that end I have included instructions for both platforms below, ‘Figure #PC’ and ‘Figure #Mac’ will be the distinction in screenshots where appropriate
Important – Please note that you should ensure all of your virus protection and internet security software is up to date before installing any software. Although GetConnect has used the software solutions below without issue, we cannot guarantee that the software solutions are free of malicious programs or that they will work flawlessly in your infrastructure
Please perform due diligence on any software you download or use and follow your own company guidelines
Important note for Mobile devices – In my testing and my experience, some video formats that are acceptable in a Connect Meeting Room do not play on a mobile device using the Adobe Connect client. For more information on this please see the Blog Post here
First you need to download the applications, the links are below for Mac and PC free versions (Important – GetConnect is in no way affiliated or compensated for this product, the use of this tool is purely my experience and my opinion)
Any Video Converter Free for the PC
http://www.any-video-converter.com/products/for_video_free/
Any Video Converter Free for the Mac
http://www.any-video-converter.com/products/mac_video_converter_freeware/
(note that you will download this as an App from iTunes to your Mac)
I have also included the comparison of the free vs. paid versions in case you need to see the limitations
Version Comparison for the PC
http://www.any-video-converter.com/version-compare.php
Version Comparison for the Mac
http://www.any-video-converter.com/mac-version-compare.php
Important note on format – Initially I was converting video to FLV format in this article as that was the best option. Connect now handles MP4 video very well and that is the recommended format. The graphics in this article may still reflect FLV format but you should be converting to MP4…the process is otherwise identical.
For this tutorial I will use a 140 MB file in MP4 format (Wallace and Gromit, A Close Shave) so that this is a representative test. In this case, you could load the MP4 directly into a Share Pod. The process would be the same for other input formats
…and ‘yes’, I do personally own all of the Wallace and Gromit DVDs!
Open AVC and start by dragging your original movie into the main body of the tool, the file will be added to the queue and ready for conversion (Figure 1)
Figure 1PC

Figure 1Mac

The input formats that can be added to this tool are listed in the Help for the product, but pretty much any input format should work in my experience (avi, wmv, mov, mp4, 3g, divx etc.)
Now you need to set the output format for the conversion. You want to convert to MP4 and you can select that from the ‘Profile’ menus (See Figure 2)
Important Technical Note – You want to select an MP4 format, not the SWF format. An SWF file is a progressive download, meaning that the file loads into each viewers’ individual cache before playing (hence the little progress bar you sometimes see as a movie loads, the classic ‘Skip Intro’ we used to see a lot on websites). These SWF files will work in your Connect Meeting Room, but as they load into the cache of each browser independently, the movie will play at a different time on each computer…also of course, they will have to wait for it to load and there will be no player controls by default
When you use an MP4 format, you are using a common streaming video file format, this file only loads the next few seconds of video (essentially loading ‘just in time’). This video should be synched to within a split second on all of the participant computers
Figure 2PC

Figure 2Mac

Now the next part is a little less cut-and-dried. Wwhat settings should you use for the output? This really is not written in stone as it depends on the available bandwidth for your audience, the type of video (fast moving sports vs. a relative static talking-head for example).
You really need to try this for yourself, but here are my personal guidelines and some explanation as I see it
First my personal guidelines at-a-glance:
- Format – MP4
- Output File Size – no more than 100 MB
- Overall Bitrate (Data Rate) – no more than 500-700 kbps total (total of video *and* audio)
- Video Bitrate – no more than 400-600 kbps
- Audio Bitrate – no more than 64 kbps
- Resolution/Frame Size – no more than 640p (whatever the aspect ratio might be). 480p is often perfectly adequate.
- Video Framerate – 12 or 15 Frames Per Second (fps)
Warning, more detailed technical explanations below that you might find rather dull…
…beginning of detailed explanation…
Output File Size
This is something that is really less important with an MP4, the file size is almost irrelevant other than keeping it under 100 MB. There was always a limit of 100 MB for files uploaded to Connect, I seem to remember that this has been removed, but as a best practice, I still personally assume that the limitation is in place and keep my overall file size under 100 MB anyway. If it is a very long video, I personally make more than 1 file (part 1, part 2 etc.) and keep the file sizes down
Overall Streaming Bitrate (also known as Bandwidth or Data rate)
This is the key with an MP4 file, the amount of bandwidth required to stream the file to the end user. Streaming bandwidth really represents the capabilities of the end-user network and it is usually measured in Kilobits Per Second (kbps). In my experience, the overall data rate for an MP4 that can be viewed by the majority of connections is 400-500 kbps (remember that this represents the total of the video streaming rate *and* the audio streaming rate). In many cases it is possible to have a rate as low as 250 kbps and still see great quality. Remember that the lower the data rate, the easier it will be on people’s connections and the more people will be able to get a great experience
Video Bitrate
If you have too low a Video Bitrate then you will start to see pixillation in the end product, particularly if you have many movements. the best (and simplest) way to see what you need is to convert the video at a number of settings (you can do these all at the same time) and then see if you gain much by converting at a higher bitrate. Again, this is very subjective indeed. If you want to see the effect of too high a Video Bitrate then convert a video at 1000 kbps (1 mbps) and you will see that the connection and playback can be severely compromised
Audio Bitrate
This follows similar guidelines to the Video Bitrate, but in my experience there are minimal gains in quality with any setting over 64 kbps. As with the example above, try a few different settings and see what works for you. If you have professional quality audio in the original file, this setting might be something you need to increase for the conversion
Resolution and Frame Size
The simplest guideline for this is to maintain the original Frame Size *unless* it is over 640x resolution, in which case take it down to 640x (I am not including the second number, the ‘height’ of the video as your own original aspect ratio will determine that number if you maintain the original aspect ratio, and you invariably will). Video in Connect can be scaled with the Share Pod, so you can always blow it up in the Meeting Room
This resolution limit is not set in Connect, it is my best practice
Video Framerate (Frames per Second/fps)
In movies, the Framerate is 42 fps, you do not need 42 fps in Connect. The Framerate in Connect will be determined by the Framerate you use in the conversion. Most people cannot really discern anything higher than 15 fps in my experience. If the original movie has a Framerate of 12 fps, then stick with that, you will not gain anything by ‘up-converting’ to 15 fps other than adding to the overall file size
…end of detailed explanations
Applying the Conversion Settings
OK, so now to apply the settings above to our conversion
My original MP4 file is 320×240 and 25 fps, so that will already determine the output Frame Size for me, the rest of my settings will be as follows:
- Video Bitrate – 400 kbps
- Frame Size – 320×240
- Audio Bitrate – 64 kbps
- Video Framerate – 12 fps
For the PC you enter the settings on the right hand side of the interface. Click on any of the fields and enter the numbers you want or choose the setting from the pull-down menu (Figure 3PC). At this time it is also a great idea to set the location for the converted file, on the PC go to the ‘File’ menu and then to the ‘Set Output Folder’ option and select the folder on your PC where you would like to find the converted content. If you don’t do this would might be hunting around for a while to find your converted movie
Figure 3PC

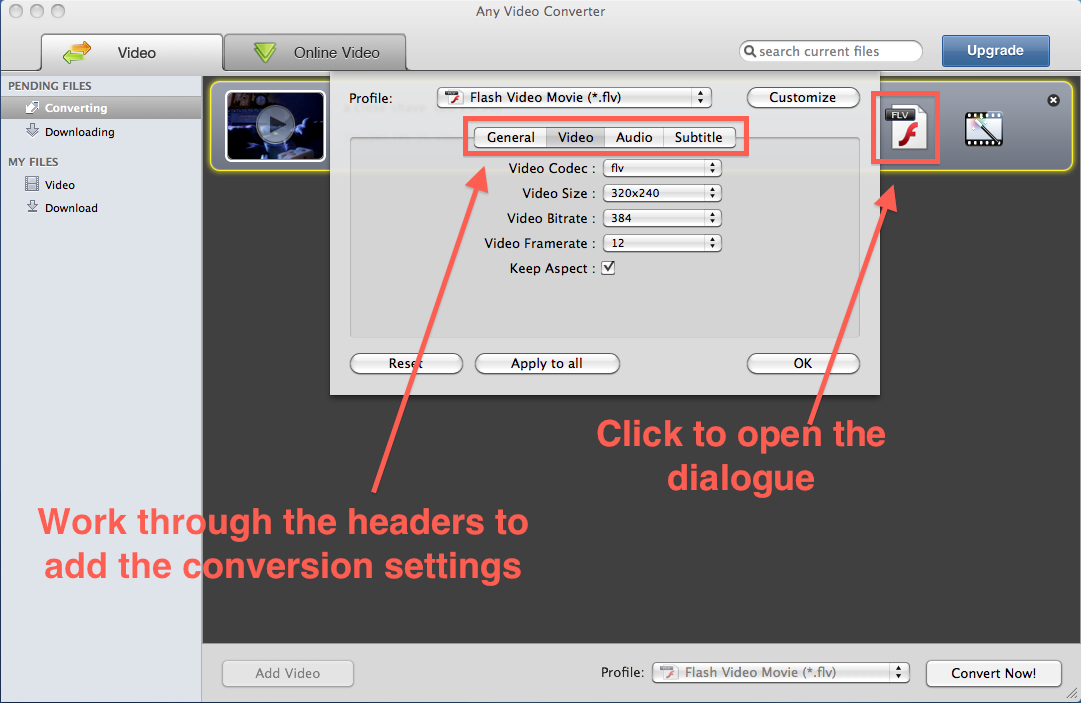
On the Mac it is a little different. First click on the ‘MP4’ logo on the input file and you will see a dialogue where you can enter the settings (See Figure 3Mac). On the Mac version some of the options enter your own numbers are limited to just a pull-down menu, just pick the closest option. The output folder setting in the Mac version happens from the ‘General’ tab in this dialogue box
Figure 3Mac
A good best practice is to include the settings you have used in the output filename, for example on the Mac I named the file ‘a close shave 320x24012fpsv384kbpsa64kbps‘, you should be able to decipher the convention I use, but the point is to track these or you will never know what works and what doesn’t work. On the PC version I change the name after the file has been converted
Finally click ‘Convert Now’ on either platform. For reference, I timed the conversions on the Mac and the PC and they both took around 6 minutes. The final output files sizes are on the PC 105 MB and on the Mac 102 MB. I also converted again at 256 kbps for the video and that file size was 74 MB
To load this into your Connect Meeting Room only, you can open your room and a new Share Pod. Drag the file from your desktop into the Share Pod and it will be uploaded to the room. If you prefer, you can select the arrow to the right of ‘Share My Screen’, then ‘Share Document’ and then select ‘Browse’ to find the file on your computer. If you have the file loaded into the ‘Content’ section of your Connect Server, then select ‘Shared Content’ or ‘My Content’ and navigate to the file from there (Figure 4)
To load the file into the ‘Content’ section, login to Connect Central (the web interface) and then the ‘Content’ tab and select ‘New Content’
The advantage of adding the file to the ‘Content’ section on the Connect Server is that you can allow yourself and others to load the video into any room in a matter of a few seconds. You can also just send the URL to people to view the MP4 outside of a Connect Meeting Room
As an example, I have included the converted files from our example below
A Close Shave 320×240 12fps video400kbps audio64kbps:
http://getconnect.adobeconnect.com/p45zi5aq55w/
A Close Shave 320×240 12fps video256kbps audio64kbps:
http://getconnect.adobeconnect.com/p2nr2wygy8z/
Figure 4

I hope this is a useful document for you. Please feel free to send any feedback or corrections on to me directly