With the advent of COVID-19 and the vert significant changes it has made to the way we communicate, the loading on local internet connectivity and the wider loading on servers is unprecedented.
This post is intended to give Connect presenter ad hosts some guidelines that can make the difference between a successful session and a disaster.
As far as I can, I have tried to address these best practices in the order of the best payback with the least effort first…or in other words, work down the list.
Overview
There is no set number for required bandwidth, number of cameras, quality of prerecorded video…it is all a function of your experience and that of your attendees. If you are not seeing issues than carry on as you are…if you are seeing performance and stability issues then consider the options listed below.
Bandwidth Awareness
Understanding the bandwidth you are taking, with anything in Connect is the key. If you click on the green bars to the top-right of your room you will see the bandwidth being set and received by your connection averaged over the last few seconds (10 seconds I think).
Make the habit to click on the green bars to the top-right of the room your default action if yo u see any issues at all. Look at the numbers and if you start seeing ‘mbits/s’ instead of ‘kbits/s’ then be aware why…know that big numbers here affect the experience for all of your users (mbits/s are bigger than kbits/s BTW).
As you look over the notes below, and maybe even test them in your Connect rooms, be aware that changing camera numbers and quality, microphone numbers and audio quality, the size of PowerPoint decks or PDF files directly affects the end-user experience.
PowerPoint Files
I have this at the top of the list as it is ever-present, it can significantly compromise performance and as it is relatively easy to fix.
How does PowerPoint work in Connect? – Actually, very efficiently. When you load a PowerPoint into a room Share Pod and view it in your room, it ‘quietly’ loads into the cache/browser of each attendee or presenter. This means that when you change slides, you are actually sending a signal to each attendee to simply move to animation #2, or to slide #3. This takes negligible bandwidth…but we can still have challenges and we can still make things more efficient in the current, challenging environment.
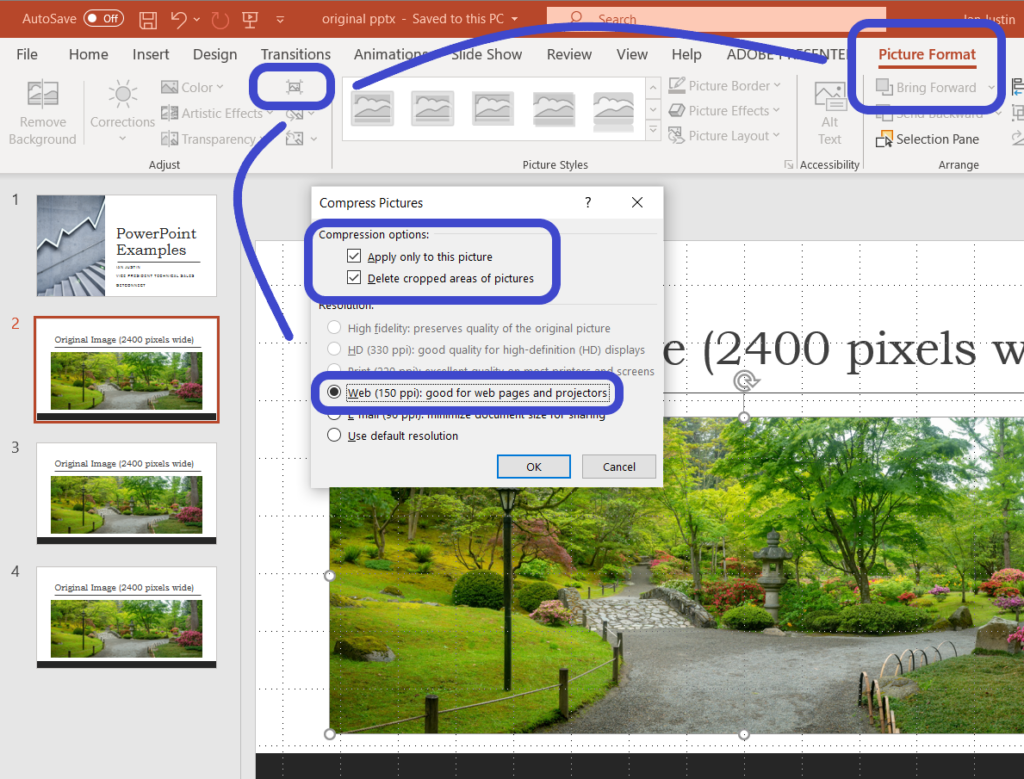
Compress your PowerPoint – When the branding and marketing teams send you ‘corporate’ images to use in your PowerPoint deck, they are typically massive…these teams are (quite rightly) ensuring that the highest quality graphics are used to represent the organization. I have seen slides with images where their true resolution is over 3000 or more pixels wide. Not only is that huge, it is also completely unnecessary. The image in the Connect room might only actually be displayed at 400 resolution…but the 3000 resolution image is still being loaded into cache
In PowerPoint there is an option to compress the images. Select the image on a slide and then the ‘Format Picture’ ribbon and ‘Compress Pictures’. From the next dialogue box you can select a lesser resolution, to remove cropped (unseen) sections of the image and to apply this to the whole presentation (figure 1 below).
In my experience this can reduce the size of a PowerPoint file by up to 8 times…and that is 8 times less data to load into cache. I have also very, very rarely seen this make a difference in quality that can be discerned in the Connect room to the naked eye.
Figure 1
Keep your PowerPoint in Cache – This is a little bit of an odd line, but let me explain. when you first open your room and move to your PowerPoint deck you will see the spinning Adobe Presenter icon that shows the slide deck is loading. If you leave the PowerPoint layout and move to another layout and then back again, you will see the ‘loading’ icon again.
This can be frustrating for the flow of your presentation, but it is also unnecessarily taxing your connections. The PowerPoint deck is being flushed from cache and then reloading into cache each time.
To keep your PowerPoint deck in cache, improve your presentation flow and your performance…follow these steps (see figure 2):
- Make a note of the pod name that contains your PowerPoint deck
- Move to another layout and from ‘Pods’>’Share’ select the PowerPoint pod
- Place it in the new layout and ‘hide’ it behind another pod (in the figure 2 example, I will ‘hide’ it behind the camera pod).
- Repeat this for any other frequently used layout (if you look at the layouts in figure 2 below you can see the small PowerPoint pod is hidden in each layout)
Now ,when you change to a new layout and back again you will see that the slide deck returns immediately with no loading, and you are not asking each attendee to reload the slide deck each tome either.
Figure 2

PDF Files
This is not unlike the approach you would take with a PowerPoint deck…be conscious that the PDF will also load into the individual cache of the attendees, this is how they can read the PDF independently, they are essentially manipulating a local copy of the PDF.
PDF files can also be huge and unnecessarily so. Consider lowering the quality settings hen you create a PDF to respect the connections of the attendees. There are also any tools available online that will allow you to compress an existing PDF file so consider this as a post-process if you feel your Connect performance and attendee experience might be compromised.
Cameras
If you want to use 20 or 30 cameras at the same time, use Zoom. that is what Zoom is intended to do and that is what it does very well. Connect is a deeply engaging and very sophisticated learning tool…it was never designed to function like Zoom.
That said, I always use multiple cameras in my sessions at some stage, but not constantly and I am always aware of the performance and the necessary quality to maintain the experience.
I often have the request to see 50 cameras at the same time so that ‘I can see the class and how they are reacting’.
Can you? Can you really?
With even 20 cameras they are the size of postage stamps at best and gauging reactions or the ‘temperature’ of the audience is tenuous at best when you are trying to read the subtleties of a smile that is essentially 7 pixels wide. If this is what you want then absolutely you should use Zoom with my support.
For my part, I will typically allow all of the cameras in the session to be turned on at the start of a class or session to let the attendees, learners etc. see one another and feel at least a little ‘virtually’ connected…it is also a great ice-breaker. Then, I remove their camera rights and begin my lesson or my session.
I am tracking their engagement by using the engagement tools in Connect, the individual engagement status indicators in the Attendee List Pod and the overall engagement in the ‘Engagement Dashboard’ in the Presenter Only Area (off-stage). This is encouraging me as a trainer to give my class something to do, a poll, a document to read and research, a reason to chat etc.
I do respect that some people want to just see a sea of tiled camera faces, but that is not the way Connect was designed to teach…activity drives engagement in Connect, not the act of being on camera.
Camera Quality and Bandwidth – when I do use cameras, or even a single camera, I am always keeping and eye on the ‘necessary quality’. What does ‘necessary quality’ mean?
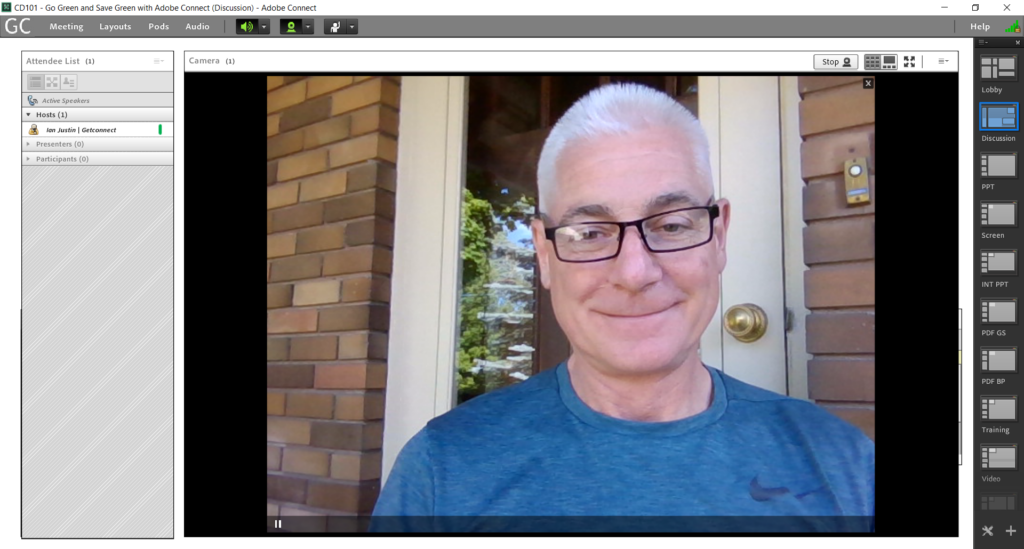
Well if I am leading the session and simply speaking, I will set my camera quality to a higher level from the ‘Meeting’>’Preferences’>’Video’ dialogue box. In figure 3 you can see that I have set the quality of the camera feed to one ‘notch’ below the HD setting so this camera is set to 480p resolution and a maximum of 20 frames per second (FPS). The camera is larger in the example layout shown in figure 4 and the quality is necessary for you to see the delicate strands of my COVID-19 haircut!
If you were to click on the green bars to the top-right of the room you would see that I am sending between 1.75 and 2.0 mbits/s…which is quite a lot for most connections…but probably fine.
Figure 3

Figure 4
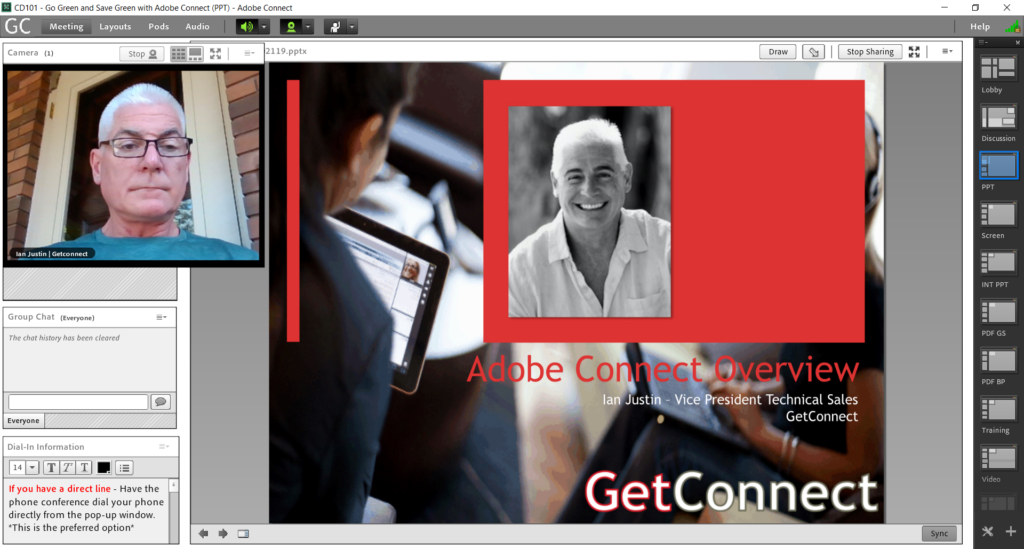
But what if I move to a new layout and my camera is small and I am now presenting a PowerPoint deck. Well I don’t need the same resolution so I change this dynamically in the session by habit when I move to the new layout…in the example below I have taken the resolution down by 2 ‘notches (figure 5) so my camera is at 240p resolution and up to 8 fps. You can see my camera in context in figure 6.
It looks fine…but the bandwidth taken has gone down to around 200 to 250 kbits/s, a factor of maybe 8-10 times less bandwidth for almost no discernible change in the quality of the experience for the attendees.
Figure 5
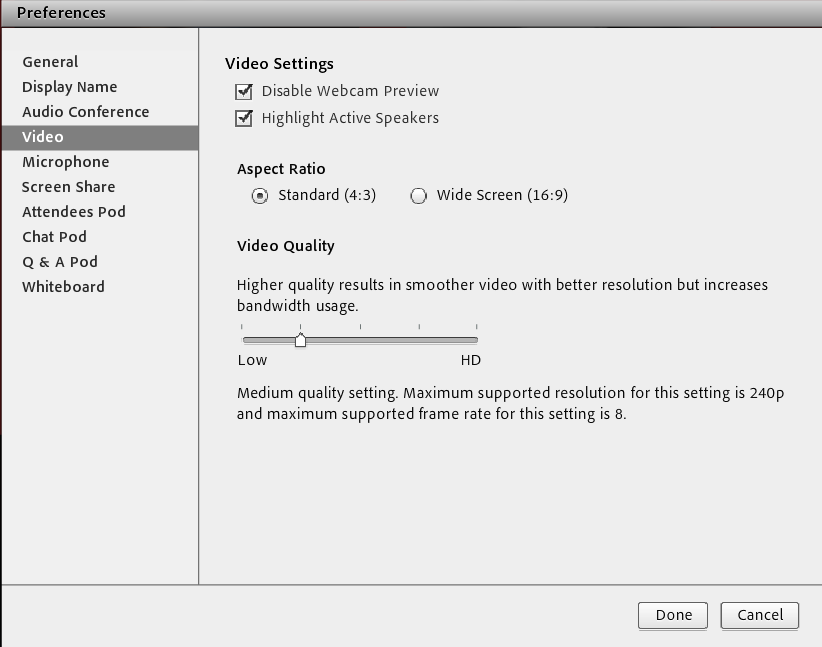
Figure 6
Multiple Cameras – Connect cameras will take essentially a linear approach to increasing or decreasing bandwidth taken. If you have 10 cameras at 1.5 mbits/s each then the bandwidth taken will be 15 mbits/s and that may be way too much for most connections. Lower the quality when you move to multiple cameras (as shown above) and you can keep the quality of the experience and keep the bandwidth to say 1 mbit/s and respect the end-user connections.
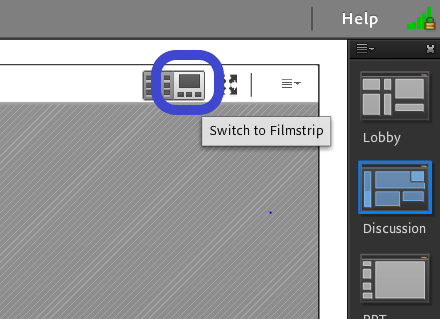
Filmstrip View – If you do switch to ‘filmstrip View’ in the camera pod (figure 7), you are significantly mitigating bandwidth issues as the only camera in the higher resolution is the camera in ‘focus’ and on-stage…the rest of the cameras are active, but at a lower resolution.
Figure 7
Camera Bandwidth Awareness – Cameras are maybe the biggest bandwidth ‘hog’ in Connect. If you see issues with performance, this is the first place to look and the easiest fix…just lower the quality of the cameras or turn some of them off. One camera and a good experience should outweigh 20 cameras and an awful experience.
Microphones
Again, this is pretty easily related to the examples above in the cameras section. I have had clients ask me why turning on 100 microphones at the same time causes issues and my answer is ‘why aren’t you using Zoom if you want to allow 100 microphones at the same time?’. Zoom is designed to a different use-case than Connect.
My question is also, ‘Are you opening 100 microphones so that a student can interrupt you or should out with a question?’. Irrespective of your online tools, this is not a great practice…even in a classroom.
I am as miserly with microphones as I am with cameras…I allow them when necessary. If a student raises their hand and I ‘allow’ the question, their microphone rights are automatically granted…as the raised hands appear in order in Connect, I allow questions and mic access in the same order.
Preparation – I always suggest that attendees prepare for the session using the meeting test link and I always ask that if possible they use a headset or ear-buds etc. It is just simply that I see less issues with echo, typing noises and background when a headset or dedicated setup is used for audio.
Pre-Recorded Video (MP4)
MP4 videos are being used more and more in sessions as learning and communication moves online. In a classroom you would drop a DVD into the slot and push play.
When you are online there are some serious considerations related to bandwidth and the necessary experience for your end-users, especially when they are joining from home and with potentially compromised internet connections. In the ideal world it all just works, but to ensure the best chance of success you should consider these best practices when using MP4 content in Connect rooms:
Note – More detailed explanations on the conversion process can be found at my blog post here
- Format – MP4
- Output File Size – no more than 100 MB
- Overall Bitrate (Data Rate) – no more than 500-700 kbps total (total of video *and* audio)
- Video Bitrate – no more than 400-600 kbps
- Audio Bitrate – no more than 64 kbps
- Resolution/Frame Size – no more than 640p (whatever the aspect ratio might be). 480p is often perfectly adequate.
- Video Framerate – 12 or 15 Frames Per Second (fps)
Depending on the type of video, you might choose to tweak these settings to lower the frame-rate and increase the quality of the audio (a podium speech for example), or increase the frame-rate at the expense of the audio (a sports video for example). Just aim to keep the overall throughput/data rate in the range that will give a good experience.
The most common issue I see is that the video have been encoded at a huge screen-size such a 1920 resolution. This is unnecessary with Connect as it does a great job of scaling the content so try to make it a smaller resolution and keep the experience positive for your viewers.
Yes, it is a balancing act.
Recordings
Remember that recordings in Connect are essentially a ‘reconstruction’of the initial session, so bandwidth best practices you have in the live session will transfer to the recording as well.
If your PowerPoint deck is unnecessarily large in the live session and delayed in loading, it will be the same in the recording. Same with cameras and voice and videos…so keep the above points in mind when building for the recording as well.
HTML Recording Viewer – Be conscious that the no-download HTML Recording Viewer is easier to use (just view the recording in the browser), but it is not as efficient or robust as viewing the recording with the Desktop App. I include a message (below) with my recordings to be sure the viewers have options if the experience is not as desired:
“Note – if you see any performance issues when you open this recording in the browser, please close the window and reopen the recording, this time choose to open this in the Connect Desktop App.“
Infrastructure and Security
One of the fundamental challenges for any communication tool is to navigate through the IT and security infrastructure within an organization. There are strategic changes that can be made to allow Connect to ‘play nicely’ with the corporate systems, some are within the control of the individual and some are going to be at a higher level for the organization and a strategic converstion.
Some of my thoughts on initial considerations are below.
VPN – I mention this early as it is so often the challenge for users when they have a dreadful experience…and as it is often not something that can (or should) be compromised.
A VPN (Virtual Private Network) is intended to give users working from home a secure way to connect with the corporate tools and data. By definition, it is intended to funnel traffic through a secure ‘pipe’. When using a VPN, it is very possible that Adobe Connect is not seen as a desirable or ‘blessed’ tool…
…there are IT conversations that can be had to whitelist the Adobe Connect domain or whitelist the IP addresses of the specific server clusters, allow split-tunneling where the Connect traffic can be seen as ‘safe’and allowed to bypass the VPN, but assuming this cannot be done immediately, consider a couple of options for your attendees, presenters and hosts:
- Turn off VPN – If this is an option, then we remove this from the process and Connect should be able to play nicely with your setup. This is not an option of course if your IT team forbids it or if you need to be accessing company sites, tools and content for your session and that requires VPN.
- Set Connect to use SSL – This is a quick fix that can provide very good results immediately. Connect communicates through port 1935 using the RTMP protocol by default. A VPN may see this as undesirable and unsafe and redirect Connect to use port 80 and RTMPT. This is ‘tunneling’ and it is inherently slow and a big hit to performance and stability. Your Connect Account administrator can tell Connect to use port 443 and RTMPS which means that Connect is using SSL for live communications. A VPN may very well view port 443 and SSL as far more desirable and allow Connect to communicate relatively unhindered through your VPN. I have never seen this cause an issue, only good things.
Note – To make this change as an Administrator across your whole Connect account, go to ‘Administration’>’Account’>’More Settings’and select Requires SSL Connection (RTMPS)” and ‘Save’.
‘Windows’ into Your Connect Room
My analogy for the various ways to access your Connect rooms sees the room as a persistent place for your content and your best practices, there are various ‘windows’ that can be used to look into the room and participate in the session.
The summary of these ‘windows’ as of writing and their affect on bandwidth and performance is below:
- Connect Desktop App. – The Desktop App. is currently the most reliable and robust option for accessing Connect rooms. Although it requires a download, it does not require admin rights and it should be installed in a matter of a few seconds. Once installed the attendee, presenter or host has rights to everything in Connect if promoted to the right level.
- Connect 10.6 HTML Client (browser) – The current HTML (browser) client requires no download or installation but it is less stable and has less error-correction than the desktop app. This current iteration is designed for attendees/participant, not presenters or hosts.
- Connect 10.8 HTML Client (browser) – The next version of the HTML client has been released to the on-premise or managed services deployments of Adobe Connect, but it will not be deployed to the hosted/cloud versions of Connect until late-Summer. This version has more stability than the 10.6 client and the features to allow full presenter and host capabilities *with the exception of screen sharing*
- Connect Mobile – This app. is designed to allow iOS of Android users to attend and lead sessions. There is also the the option to attend using the browser and the HTML clients listed above from mobile devices now. This app. does not allow the same degree of caching for PowerPoint and PDF files etc. and this ca compromise performance
- Flash Player – As this is being ‘End-of-Lifed’ at the end of 2020 it is not relevant to this discussion.
Summary
To reiterate, there is no set requirement for Connect bandwidth. There is absolutely finite bandwidth available at the end-user side…so rather than consider ‘what bandwidth do I need’, you may want to consider ‘how much bandwidth should I take’.
Keep an eye on the bandwidth monitor, and the experience of your attendees…use only what you need and what you think the end-user connections can tolerate and don’t be lazy with your content.
Preparation and diligence based on the thoughts above can make the difference between a great session and a disaster.