With the end-of-life for Flash Player announced as the end of 2020, the Adobe Connect team has been gradually replacing the web interface for Adobe Connect with HTML5 components (this is not referring the HTML5 room client, that is a separate discussion).
This new HTML5 interface is being phased across the Connect Central management site (the web administration pages) and it has already been used to replace Flash Player in the ‘Home’ tab and in the ‘My Audio Profiles’ section. The intent of the phased approach being to first replace the components that are accessed by regular users and then the administration side of Connect (the logic being that an Administrator is more likely to have the permissions to use Flash Player so that is later in the process).
This also means that the administrators and users in Connect can manage their participants, phone profiles etc. from a mobile device as Flash Player is no longer required:
The above said, with Connect 9.8.1 there is now a significant section of the Connect Central interface moved over to HTML5. This blog post covers the use of the new HTML5 components. The HTML5 interfaces are as follows as of Connect 9.8.1:
- The ‘Home’ tab
- The ‘My Audio Profiles’ section under the ‘My Profile’ tab
- The ‘My Audio Providers’ section under the ‘My Profile’ tab
- The ‘Edit Participants’ section under any meeting room or seminar room
- The ‘Manage Enrolees’ section under any virtual classroom
- The ‘Participant Management’ section under a Connect Event registration
- The ‘Audio Providers’ section under the ‘Administration’ tab
- The ‘Users and Groups’ section under the ‘Administration’ tab
Sections in the Connect administration interface that are not converted to HTML5 as of writing this post (July 11th 2018) that I can see:
- The ‘Reports’ tab
- The ‘Customization’ section under the ‘Administration’ tab
- The user view of the ‘Curriculum’ in the ‘Training’ tab
- The interface to manage ‘Cost Centers’
- The ‘Administration Dashboard’ under the ‘Administration’ tab
- The ‘Event Dashboard’ section under the ‘Event Management’ tab
- The ‘Training Dashboard’ section under the ‘Training’ tab
The functionality within these interfaces is outlined below.
General/Common Navigation Guidelines in the HTML5 interfaces
Sorting – Click on the title of any column to sort based on that field (Figure 1)
Figure 1
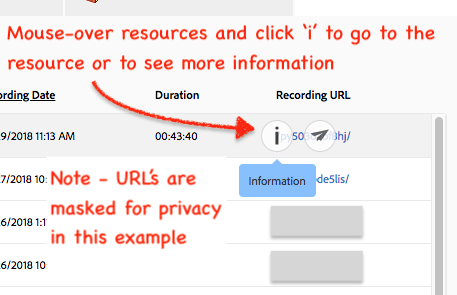
Information – Click on the ‘i’ to find more information on any resource (Figure 2)
Figure 2
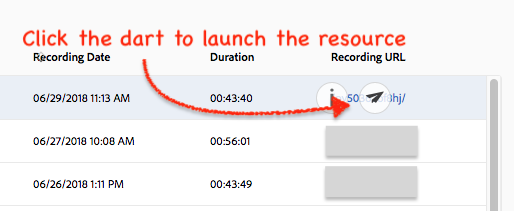
Launch/view – Click on the dart icon to launch or view a resource (Figure 3)
Figure 3
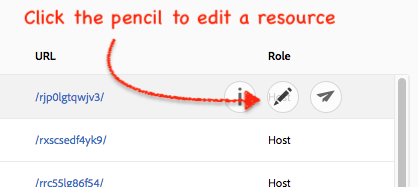
Edit – Click on the pencil to edit a resource (Figure 4)
Figure 4
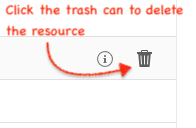
Delete – Click on the trash can to delete a resource (Figure 5). Note that if you delete a user you will also have the option to ‘Delete and De-identify’ in accordance with the new GDPR compliance.
Figure 5
Toggle Switches – Click on the toggle switches to filter as described (Figure 6)
Figure 6

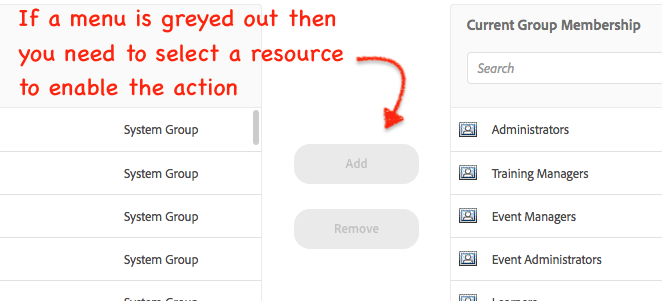
Dependent Items – If an item is greyed out then you need to make a selection to activate the option. Select a user to add to a group for example (Figure 7)
Figure 7
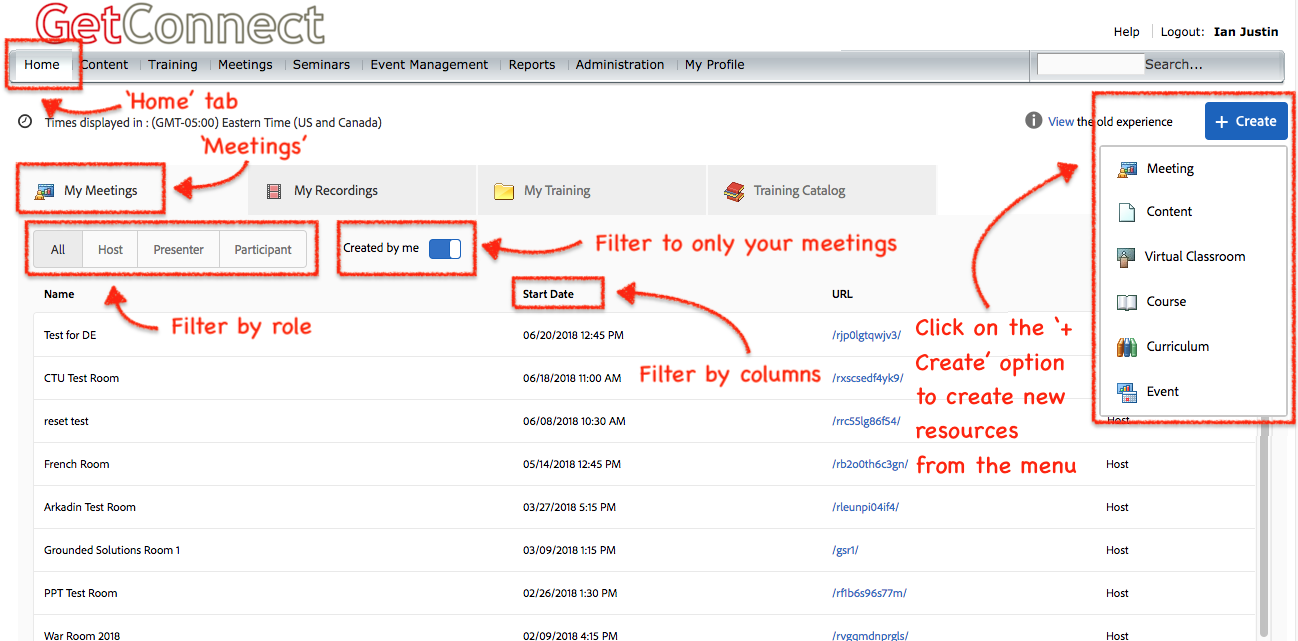
1 – The ‘Home’ tab
There is a lot happening in the ‘Home’ tab, it is essentially a dashboard for users to see their meetings and more. The HTML5 interface adds significant functionality to this page. In figure 8 you can see the options related to the ‘Meetings’ tab. Most regular users will be able to manage their rooms and much more from here.
Remember that the common navigation principles above are also available here so you can mouse-over the room and see information or launch the resource.
Figure 8
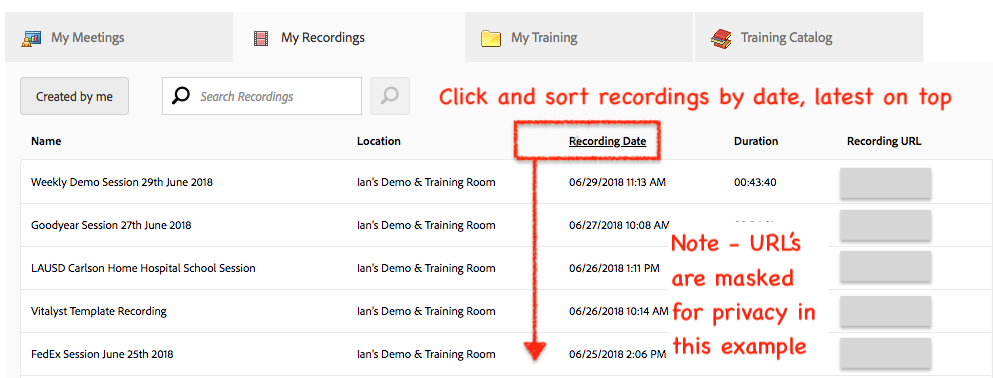
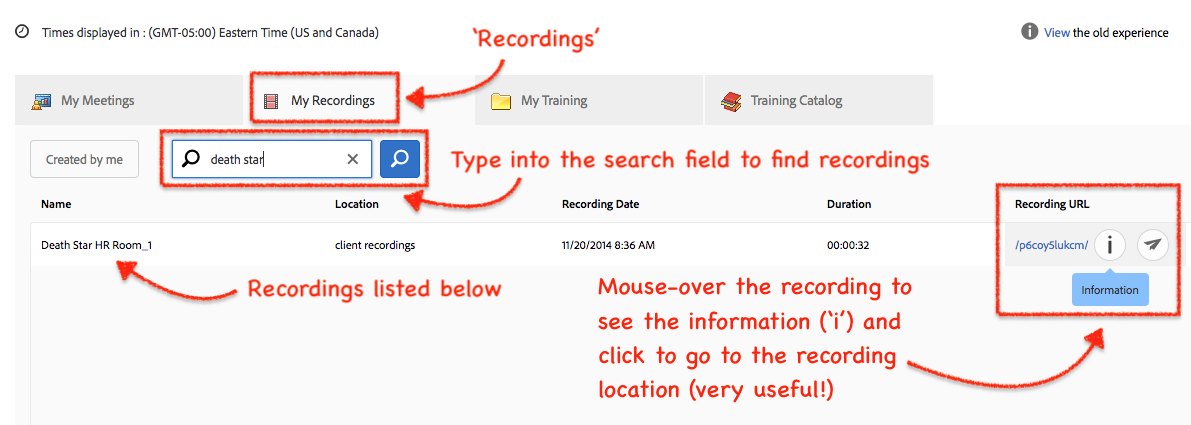
The ‘Recordings’ section in the ‘Home’ tab offers functionality that was previously difficult to find (figure 9). You can search for a recording by name and then use the ‘i’ to go to the location to edit or change permissions on the recording (for example).
Figure 9
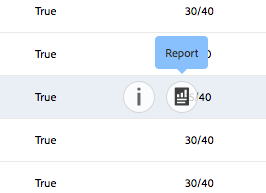
The ‘Training…’ sections are similar to the options above, but be aware that there is a ‘Reports’ icon when you mouse over a course (figure 10).
Figure 10
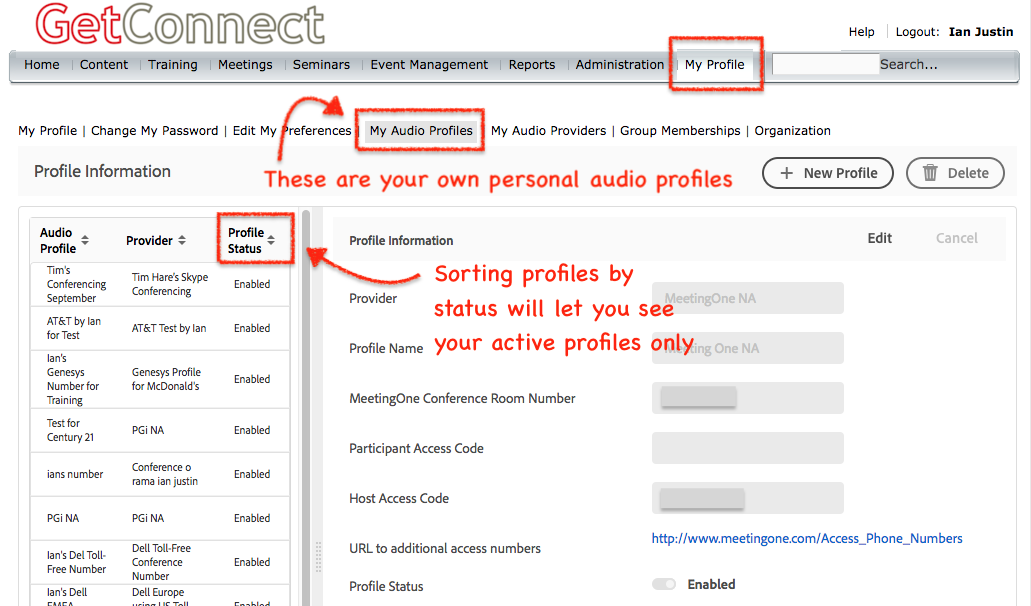
2 – The ‘My Audio Profiles’ section under the ‘My Profile’ tab’
This section has not really changed from the Flash Player implementation, other than this being far more accessible for regular users who do not have the rights to use Flash Player. The interface is pretty self-explanatory (figure 11).
Figure 11
3 – The ‘My Audio Providers’ section under the ‘My Profile’ tab
It is worth noting that the ‘My Audio Providers’ is not something a regular user would require. This option allows users to configure any toll-free number that is not a part of the account…it essentially allows a user to ‘teach’ Connect to call into a number. Most regular users will use the ‘My Audio Profiles’ option to add numbers to a pre-configured provider.
That said, this interface has also been converted to HTML5 as a priority and the functionality is the same as in the previous Flash Player interface.
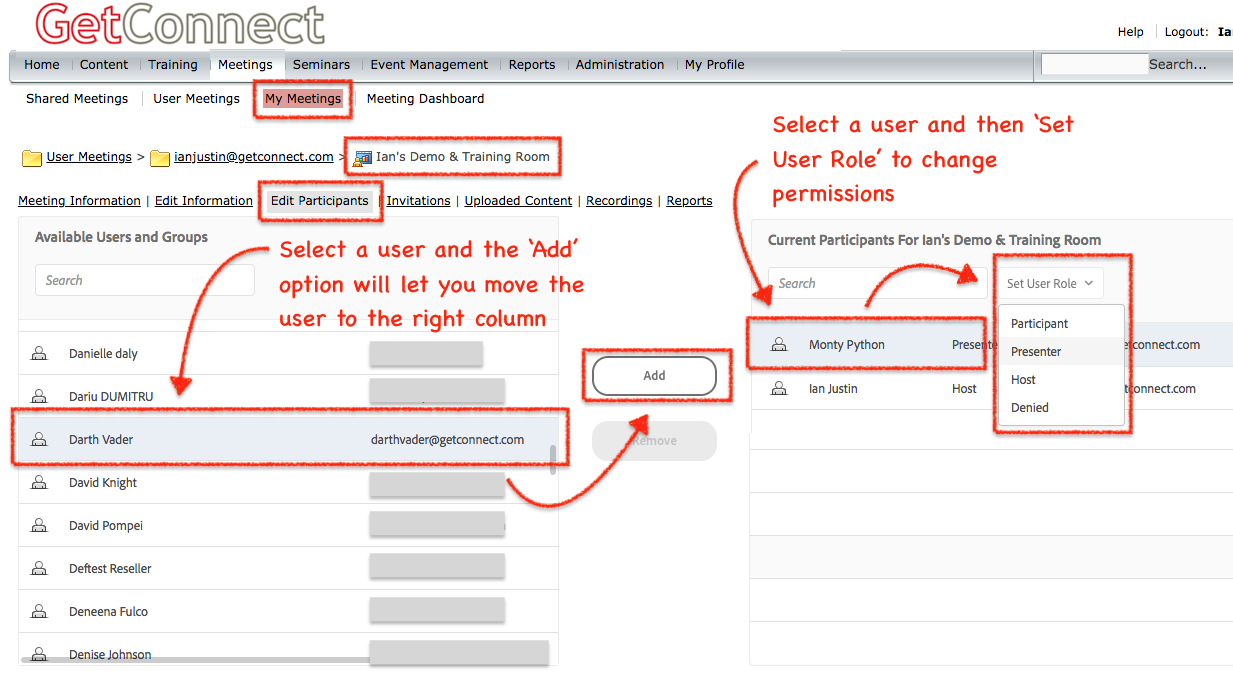
4 – The ‘Edit Participants’ section under any meeting room or seminar room
This interface is pretty much a like-for like replacement of the Flash Player interface again as you can see in figure 12 below. The subtle difference is that the ‘Search’ and ‘Set User Role’ options are at the top of the screen for consistency. As before, move users between the left and right side lists to give or remove permissions for the room. Select the user and change their role in the right-side list.
Figure 12
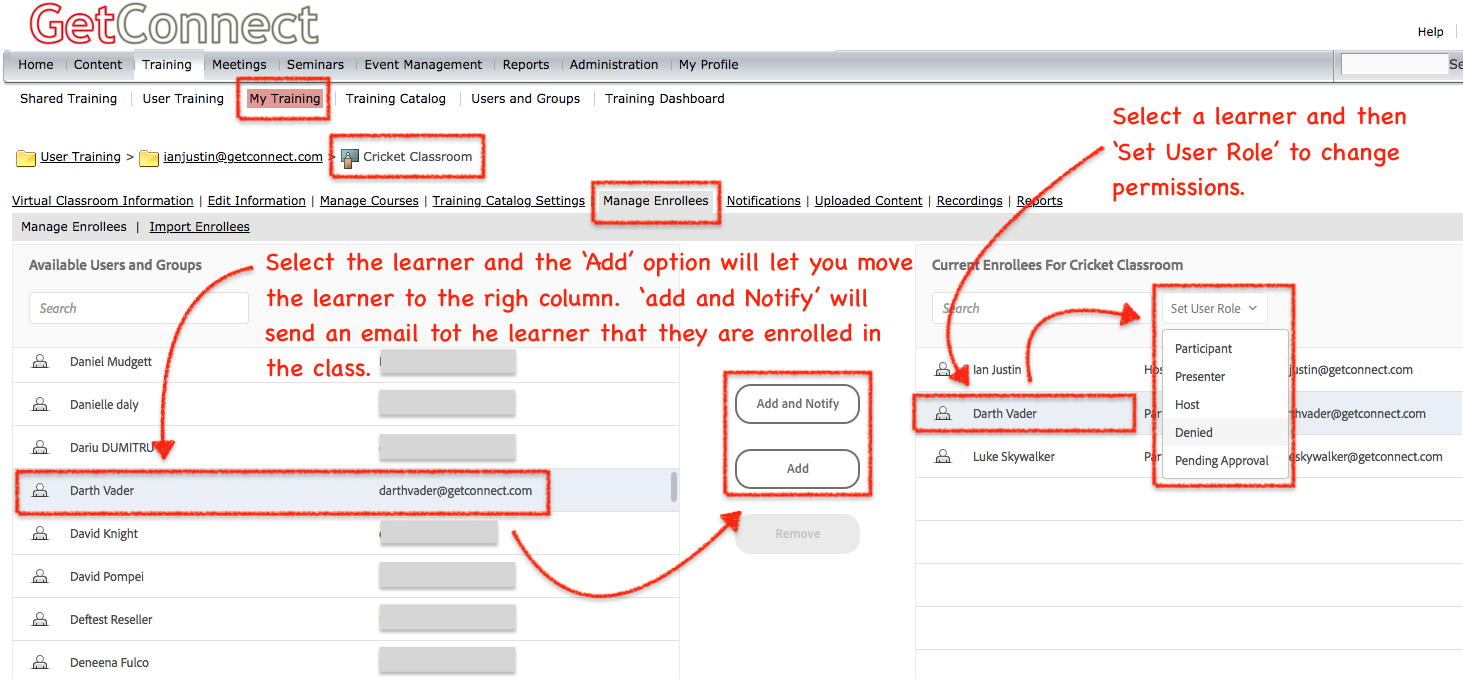
5 – The ‘Manage Enrolees’ section under any virtual classroom
The ‘Manage Enrolees’ option in the ‘Training’>’Virtual Classroom’ section is very similar to the interface above with the exception that you can add the learners to the virtual classroom and also notify them by email that they are enrolled in a class at the same time. See figure 13.
Figure 13
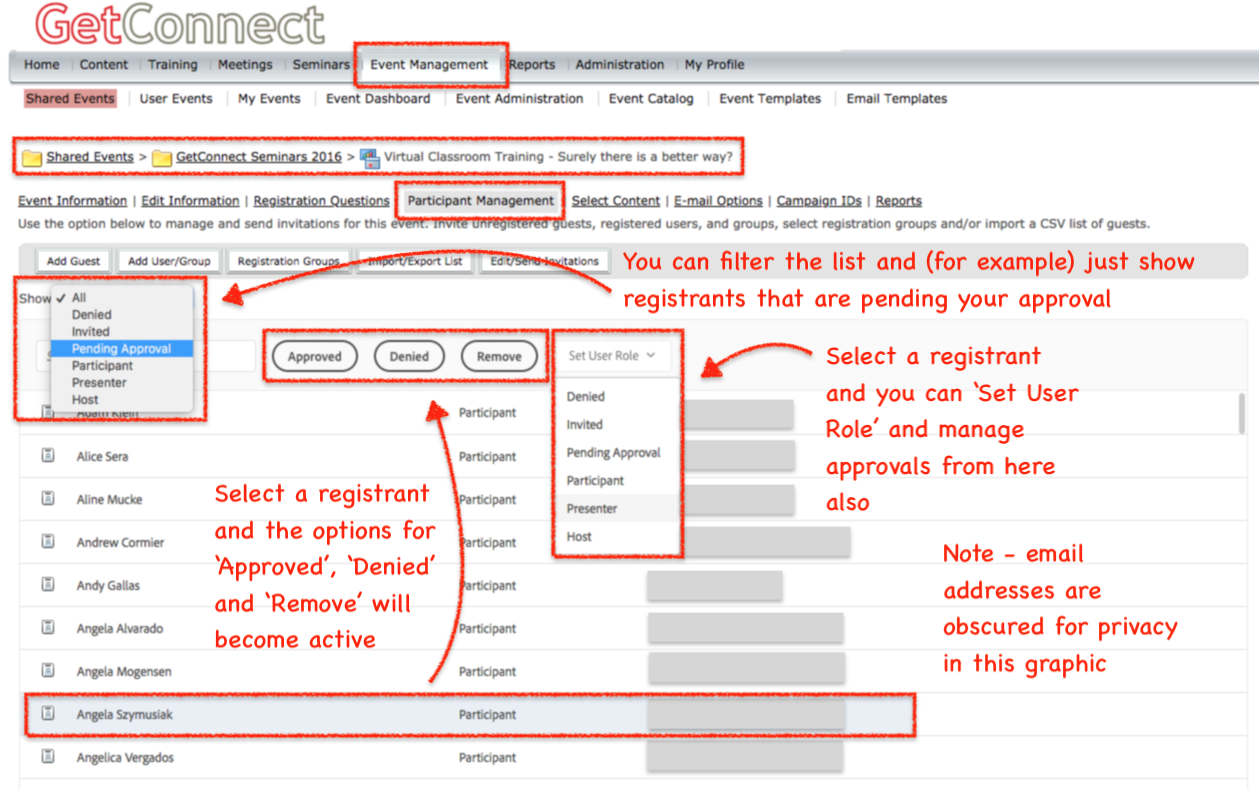
6 – The ‘Participant Management’ section under a Connect Event registration
The ‘Participant Management’ section under ‘Connect Events’ has been moved to HTML5 as well. This section allows you to manage the approvals and roles of registrants and presenters for your sessions that use Connect Events for registration. The interface is pretty self-explanatory but it is outlines in figure 14 below.
One section that people often miss is the option to the left that allows you to ‘Show’ the list (filter by) types of registrant. Filtering by ‘Pending Approval’ for example is a far more simple way to manage approvals for your session.
Figure 14
7 – The ‘Audio Providers’ section under the ‘Administration’ tab
This is a large segment of HTML5 replacing the Flash Player interface and a relatively complex set of tools. the initial listing can be sorted by clicking on the column headers and selecting a provider gives you the option to edit the provider information (See figure 15).
In the case of the ’embedded’ ‘Integrated Telephony Adapter’ providers, it is just a case of using the ‘Disabled/Enabled’ toggle switch to make the profile available to account users, the users would then add their own personal conferencing information.
Figure 15
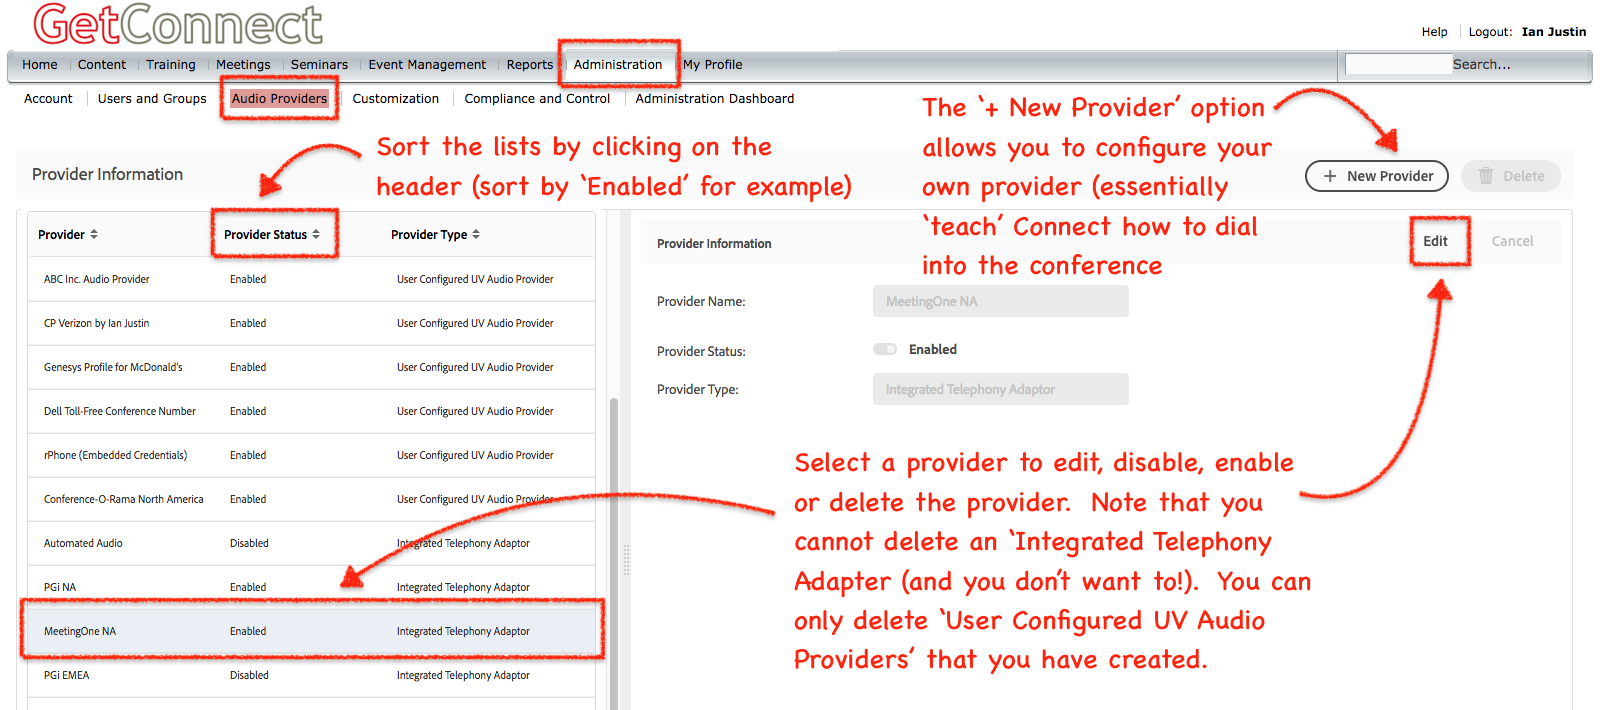
In the case of ‘User Configured UV Audio Providers’, these are created by the Administrator to ‘teach’ Connect how to dial into a conference from the room when the provider is not already configured and embedded in your Connect account. To configure a provider yourself you select the ‘+ New Provider’ option you see in figure 15 above.
The new provider fields are outlined in figure 16 below and the interface is again very consistent with the pull-down menus and toggles used elsewhere in the new Connect HTML5 look.
Note that when you add a step, the ‘Defined By Host’ options are a toggle (Figure 17). When you set a field as ‘Defined By Host’ in the ‘Key/Number’ column, the meeting room host has the ability to use your pre-created dialling steps, but add their own personal conferencing information.
Figure 16
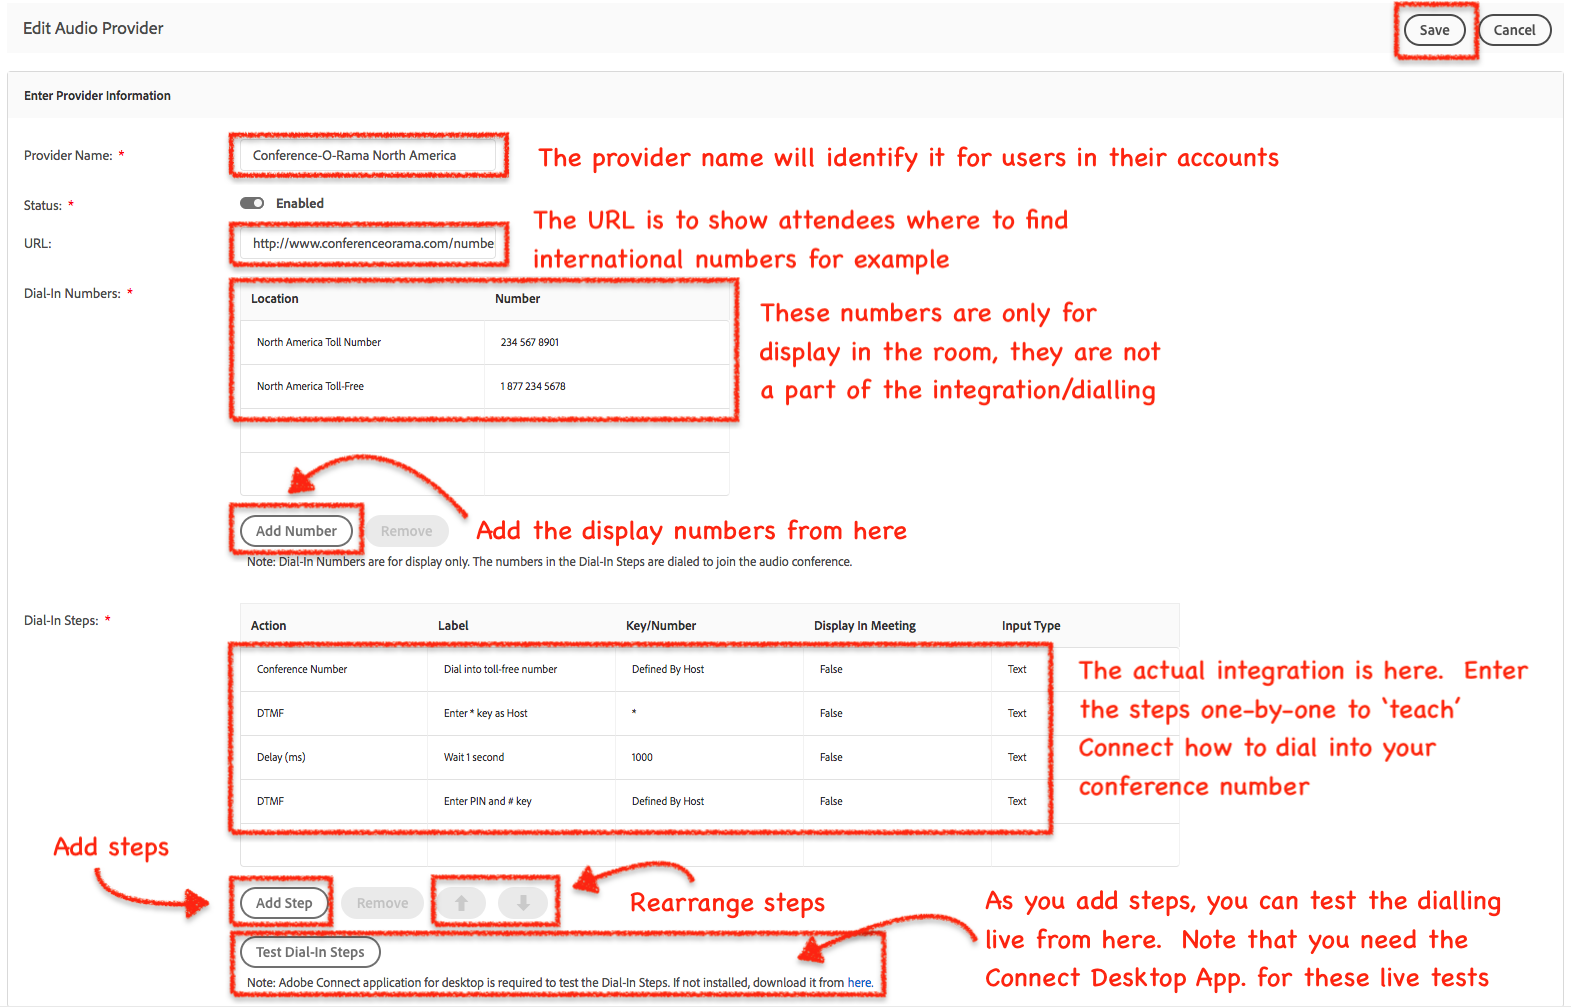
Figure 17

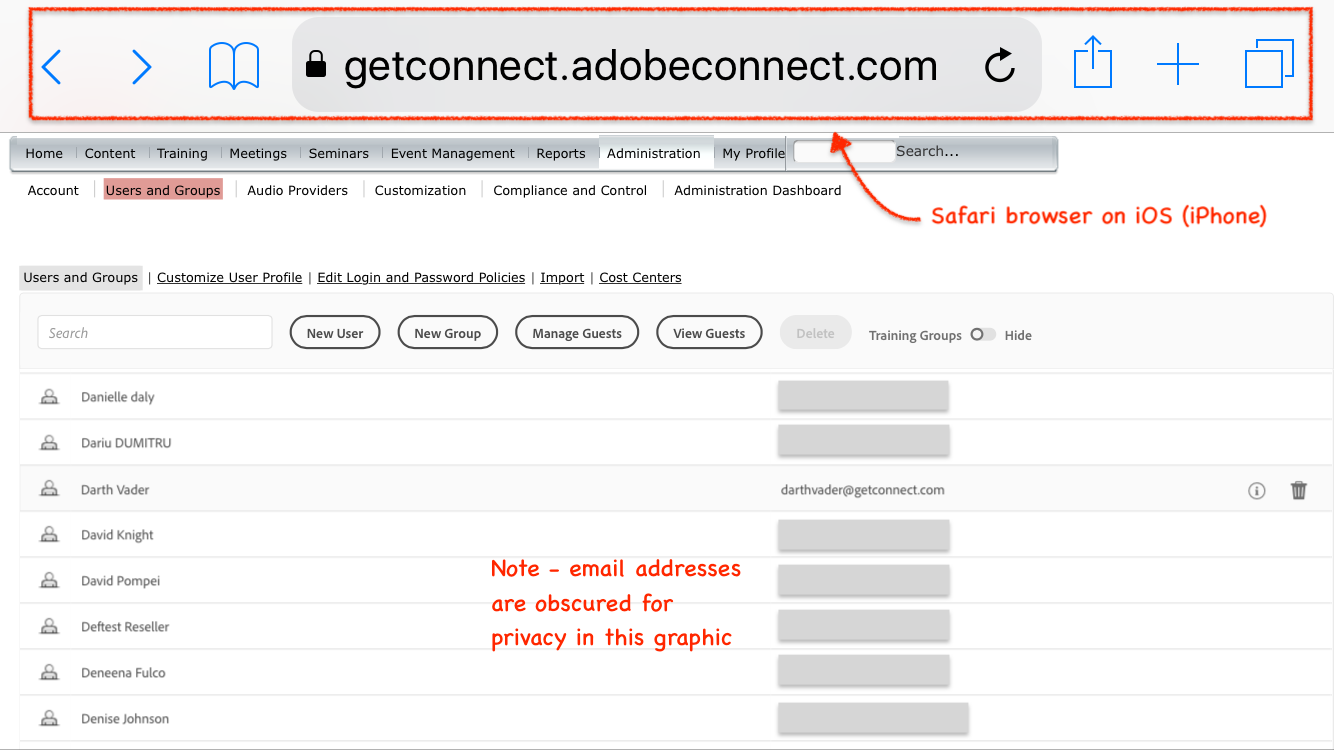
8 – The ‘Users and Groups’ section under the ‘Administration’ tab
This is a big change and very welcome. Requiring Flash Player to manage users can be a show stopper for some administrators and it is a common, almost daily task. Very useful that this task can now be carried out form a mobile device in an emergency.
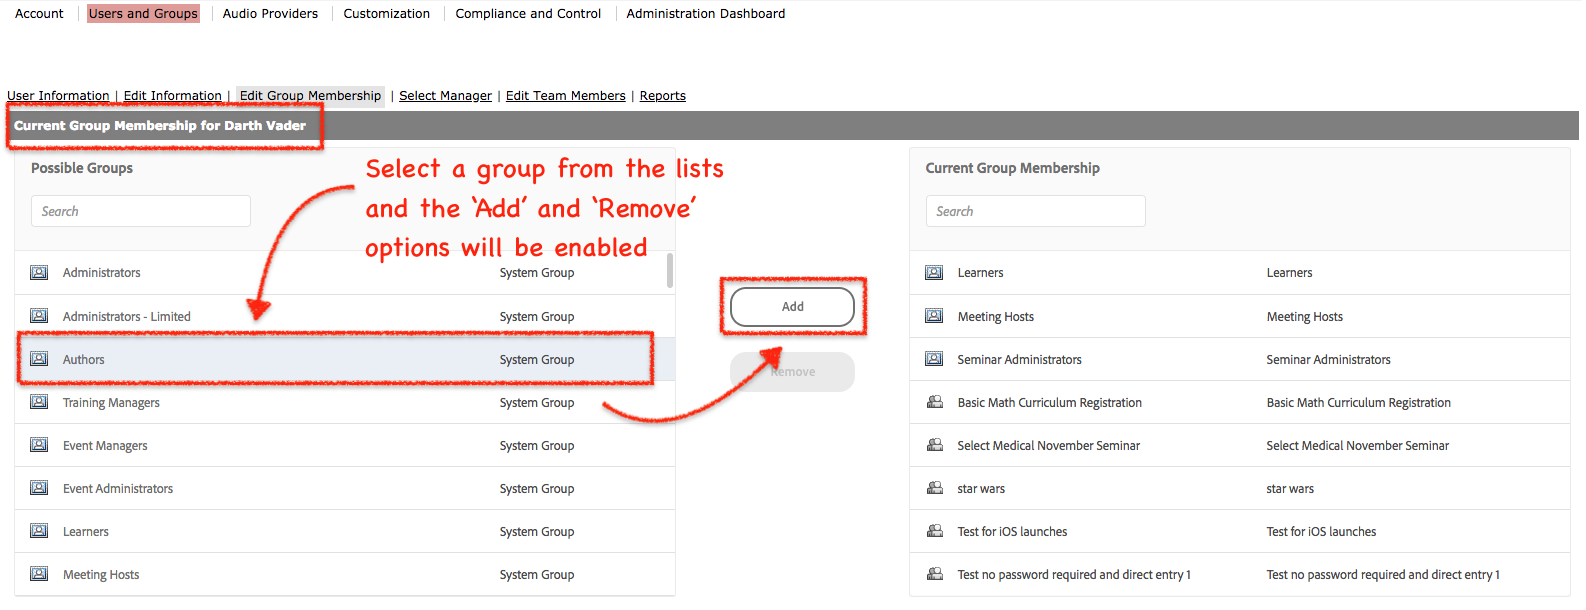
You can see the overview of the interface functionality in figure 18 below. The most common task will very likely be to mouse-over a user/group and click the ‘i’ option to edit user information and group membership/permissions (figure 19). Note that with groups, you can see the list of group members by clicking on the name of the group.
Figure 18
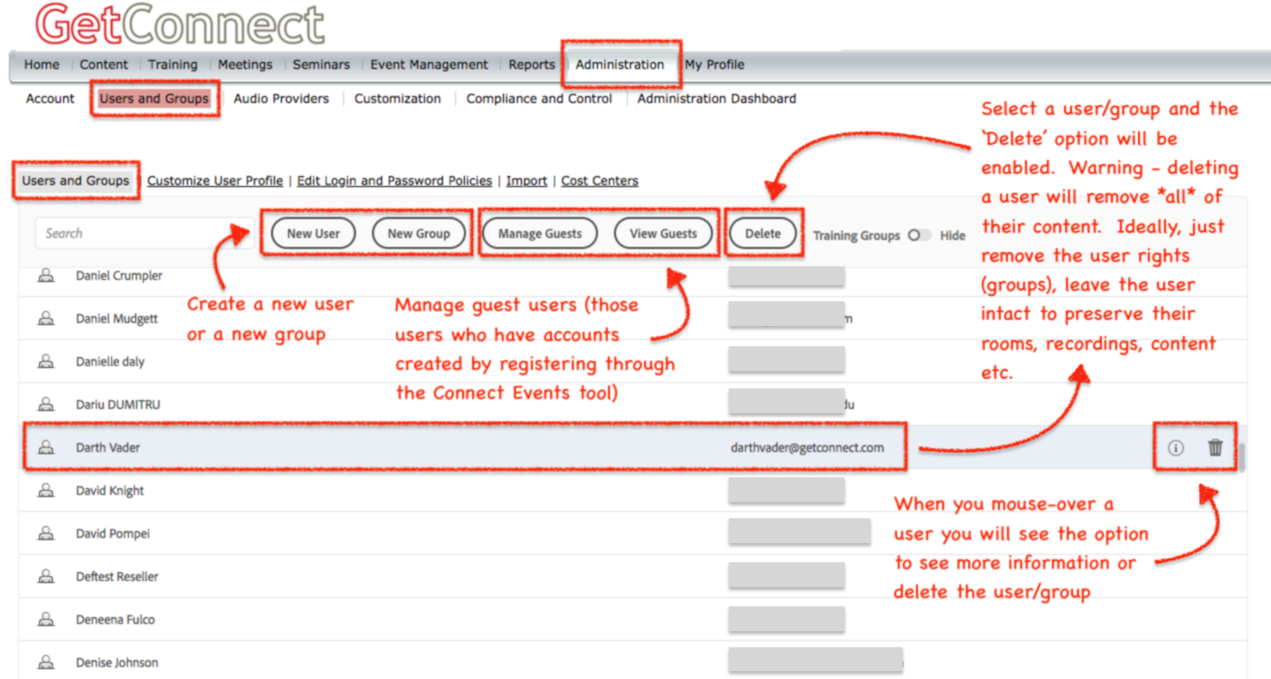
Figure 19
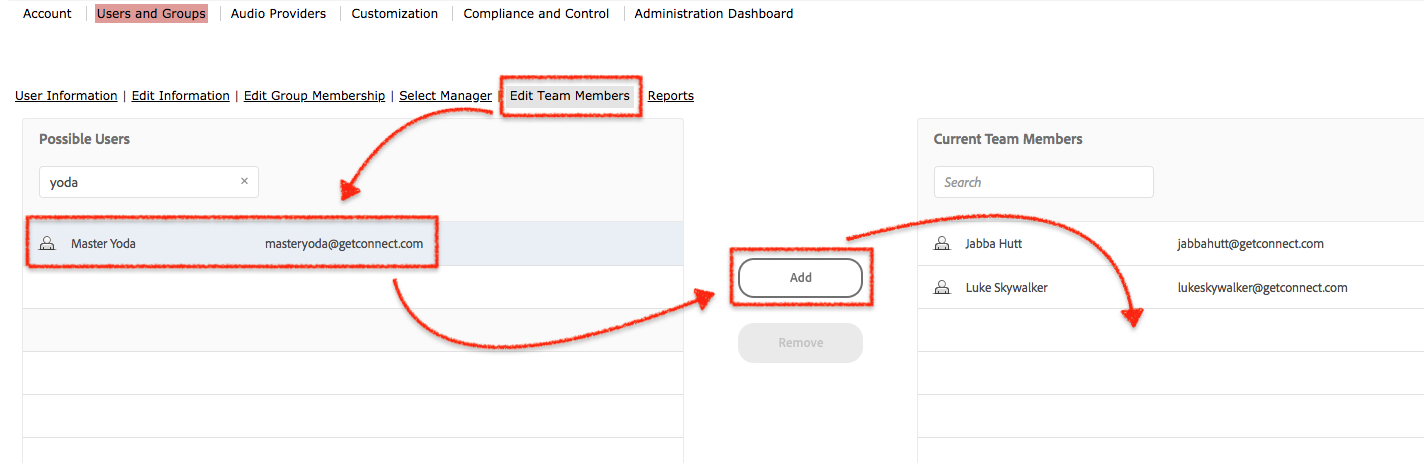
The interface to assign managers to team members and team members to managers (used primarily for Connect Training reports and to see what meetings were attended etc.) has been moved to HTML5 as per figure 20 below. You can find these reports under the ‘Reports’ tab and see the small ‘Manager Reports’ text to the top-right of the window.
Figure 20