Not everyone is aware that you can take a PowerPoint deck into your Connect room and sophisticated animations and hyperlinks (interactive buttons) will work very well.
In this Blog Post I walk through some of the techniques you can use to make your regular PowerPoint files both engaging and interactive in your meeting rooms and in your recordings.
Note on animations and ‘good taste’ – Please don’t judge me on the animations I use here, this is intended to show what can be done…what you actually do with your animations is entirely up to you and your conscience…
“:-)
Supporting Recording
As the interactive features in the room can also be used in a recording, I have created the recording below (10 minutes) so that you can view this first, experience some of the techniques and then come back to this blog post and see how they were created.
PowerPoint Examples GetConnect IJ – https://getconnect.adobeconnect.com/p0ounpbr6u0k/
During the recording I discuss some of the techniques and you can follow along and pause the recording to try the interactions yourself. The sections below discuss the PowerPoint techniques in more detail.
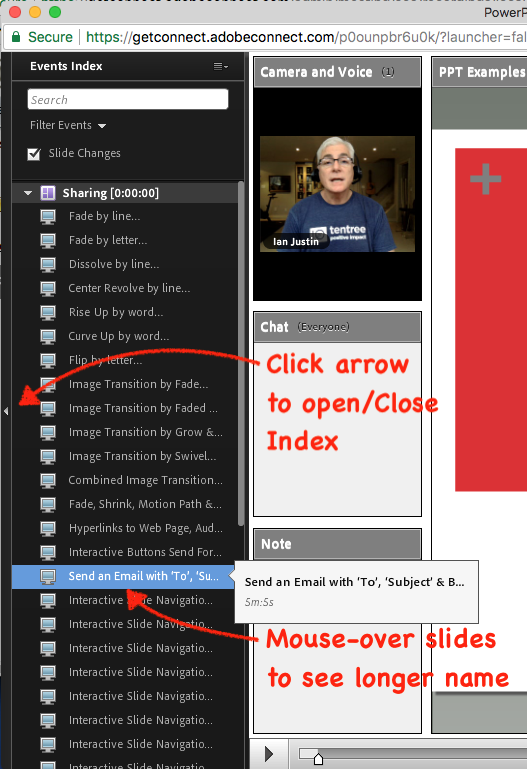
You can move to specific sections in the recording using the index to the left of the recording. Each slide is listed there. Open/close the index by clicking the small arrow (Figure 1 below).
Figure 1
Original PowerPoint File for Download – If you would like to download the original PowerPoint file and work on it yourself to see how things have been done, you can download it from the link below.
PowerPoint Initial Settings
There are no specific settings required in PowerPoint for this blog post. Be sure to test the fonts you are using to be sure they will translate into the Connect Server before you go too far. If your font does not exist on the Connect Server then Connect will likely substitute Arial or a similar font. Adobe Connect cannot use a font it does not ‘own’.
Process
Personally, I create the PowerPoint and load it into a test Connect room frequently to be sure things are working as intended. If the font is not on the Connect Server and you wait until you have created 50 slides before you test in Connect then it is likely all of your spacing will be wrecked and you have a lot of fixing.
I load the PowerPoint into the Share Pod regularly and just check that things are working as intended.
I use a test room and then delete the room when I am done as it might have many versions of my test deck.
Animation line-by-line
The initial ‘line-by-line animations in the presentation are pretty straightforward. As I wanted to be able to time the animations with my speech they are set to initiate ‘On-Click’. In order to maintain the cadence of the speech I edited the ‘Duration’ of the animations accordingly. Clearly a simple fade will take a different time to execute than a build letter-by-letter so play with the timing to match your needs.
‘Less is more’ – If you are going to use animations and effects, be conscious that they should support and reinforce your content, the animations should not be a distraction from your content or essentially exhausting for your audience.
Note on timing – I have never had success with starting an animation ‘set’ automatically when the slide is initiated. I start the animations ‘On Click’ and not automatically. Once your first animation has been initiated the rest should behave correctly if you use ‘With Previous’ and ‘After Previous’…but this will not work for the first animation in the set.
Animation of Images
The next segment in the PowerPoint deck relates to examples of animating images/graphics. As noted above, the simplest animation is the common fade and that is very easy on the viewer.
Also as noted above, be conscious of the timing of the fades and other animations as a ‘swivel’ animation that is too fast is quite distressing and rather pointless. The frame rate of fast animations will also potentially translate poorly into the Connect room and again they will be wasted.
Complex animations that enter or emphasize relatively slowly can be used to add a little tension and anticipation to a presentation, but if this is the norm in a presentation then again it becomes at best tiring, and at worst irritating.
Combining Animations – You can use combinations of animations very effectively, for example having an image fade into a slide and then using ‘After Previous’ have the animation move to a new place on the slide (kindof like ‘filing’ the image). You can see an example of this in the examples, in my case I fade in an image ‘On Click’ (‘Entrance’), then spin the image (‘Emphasis’, to prove a point. not because it is a great idea!) and then use the ‘Sink’ (‘Exit’) animation.
The most complex (‘sophisticated’?) animation set in this example PowerPoint uses ‘Fade’, ‘Shrink’, a ‘Wipe’ and the much feared ‘Motion Path’ together on a single slide. You can see the makeup of the animations in Figure 2 below.
I have always had great success using the ‘Motion Path’ animation in Connect. In the example below, the initial ‘Fade’ is ‘On Click’, then the ‘Shrink’ is ‘After Previous’. As I wanted to speak before the next phase of animations I set the motion path to happen ‘On Click’ and the ‘Wipe From Left’ of the word ‘Jabberwocky’ is set to happen ‘With Previous’ (the ‘Motion Path’). I played with the timing of the ‘Jabberwocky’ ‘Wipe’ and the ‘Motion Path’ animation to ensure it ‘revealed’ with the motion path. Then finally the image uses a ‘Fade’ ‘On Click’ ‘After Previous’ to disappear.
Remember that this is not intended to show great presentation best practices, it is intended to show the mechanics that are possible in Connect using simply PowerPoint.
Figure 2

Hyperlinks to External Pages
In the next segments we look at options to link to external pages outside of the PowerPoint deck in Connect.
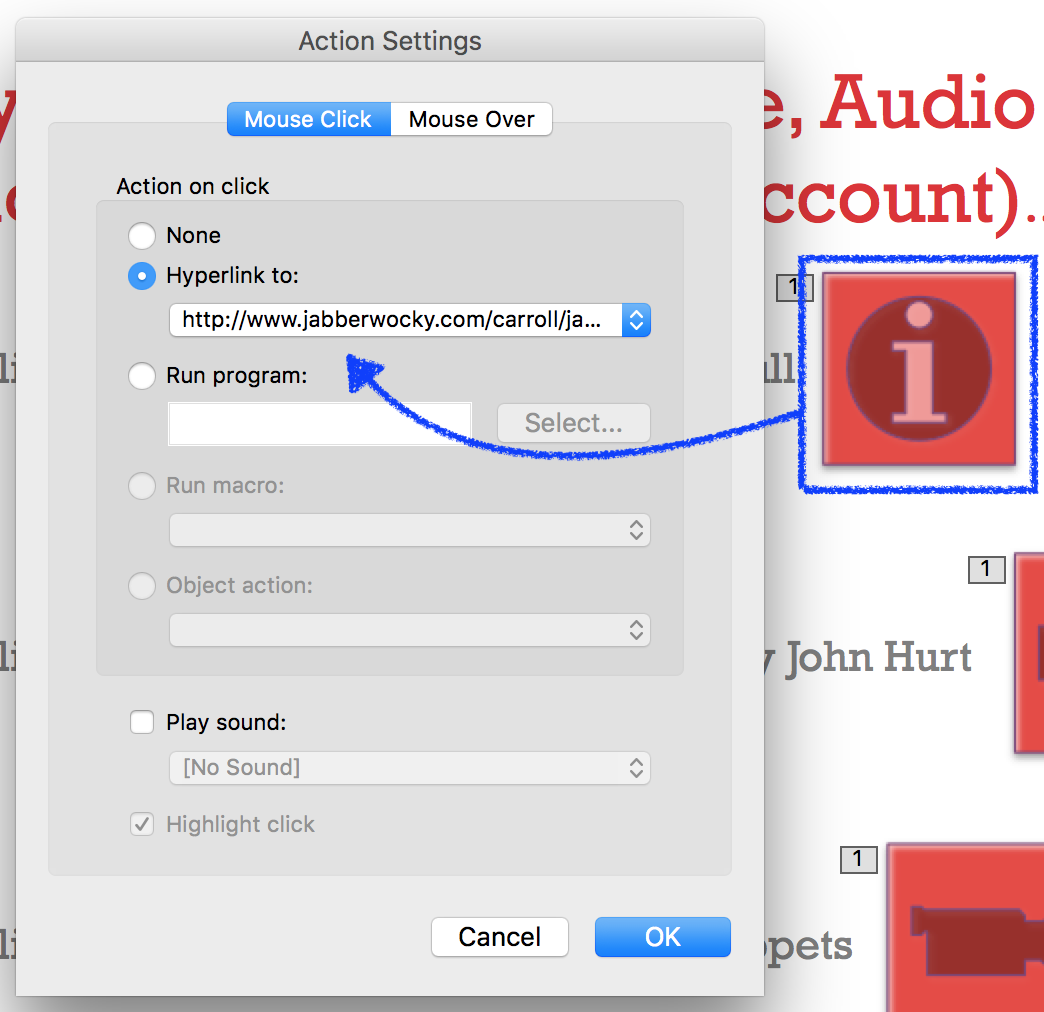
Link to an external Web Page – First go to ‘Insert’ in Powerpoint and select the ‘Action Buttons set. From there I tend to select the ‘i’ button to link for ‘more information’. You will then have the option to add ‘Action Settings’ and in this case I selected ‘Hyperlink to:’ and added the link to the web page as shown in Figure 3 below.
Figure 3
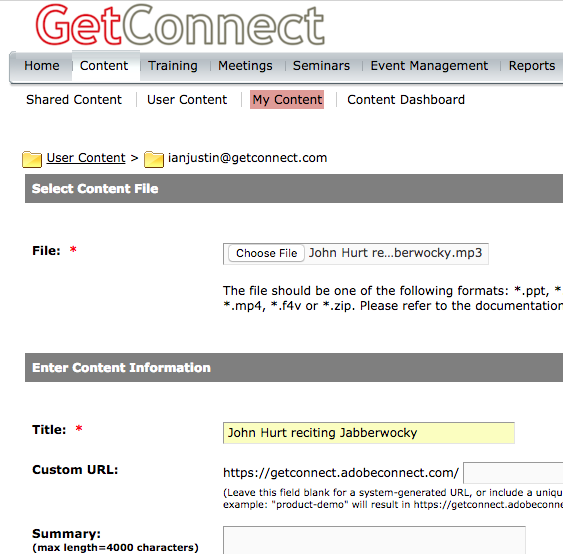
Link to an external Audio File – First we need to put the MP3 audio file on the Connect account (assuming you want to keep this all within Connect). Go to the ‘Content’ tab in Connect and navigate to the appropriate folder/area in your account. Select ‘New Content’ and on the next page you can browse for your file and give it a name and then ‘Save’ (Figure 4).
You will see the URL for the content and you will need to copy that for the ‘Action Button’. Depending on where you loaded the content and the permissions you have set for your account, you might want to click ‘Set Permissions’ and ‘Allow Public Viewing’ if you do not want the user to enter a login and password.
Figure 4
Now insert an ‘Action Button’ as you did in the previous example, I choose to use the ‘speaker’ icon for audio. As before you can use the ‘Hyperlink to:’ option, but this time paste the link to the audio content on your Connect Account into the field (Figure 5).
Figure 5

Link to an external Video File – You will need the video in the format MP4 and you would load the content to the Connect Account ‘Content’ tab in the same way as you did above with the MP3 audio file.
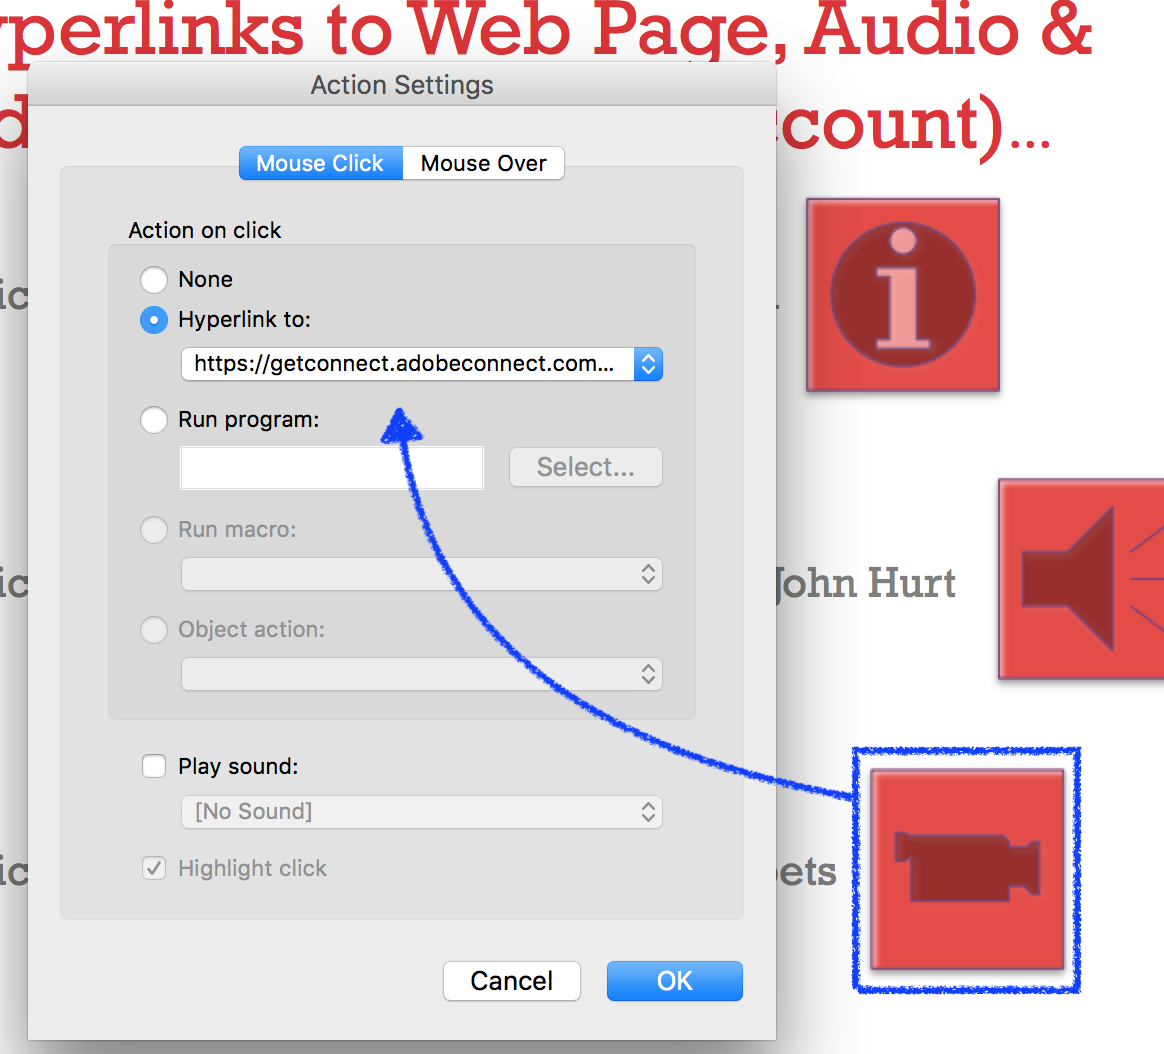
Insert an ‘Action Button’ and for video I use the ‘camera’ option. Again the ‘Hyperlink to:’ option is used and is will link to the URL for the MP4 you loaded onto your Connect Account (Figure 6).
Note – You could of course link directly to a YouTube page (for example), but be aware that some organizations ‘ban’ YouTube from their internal network and also be aware that the link will be subject to the advertising and other recommendations for videos on YouTube.
Figure 6
Send a Formatted Email
There are a couple of ways to do this, one simpler and a little more limited, one more complex but more options. We cover both of these below.
Note – Only the more sophisticated/harder option is shown in the recording, but the function is the same.
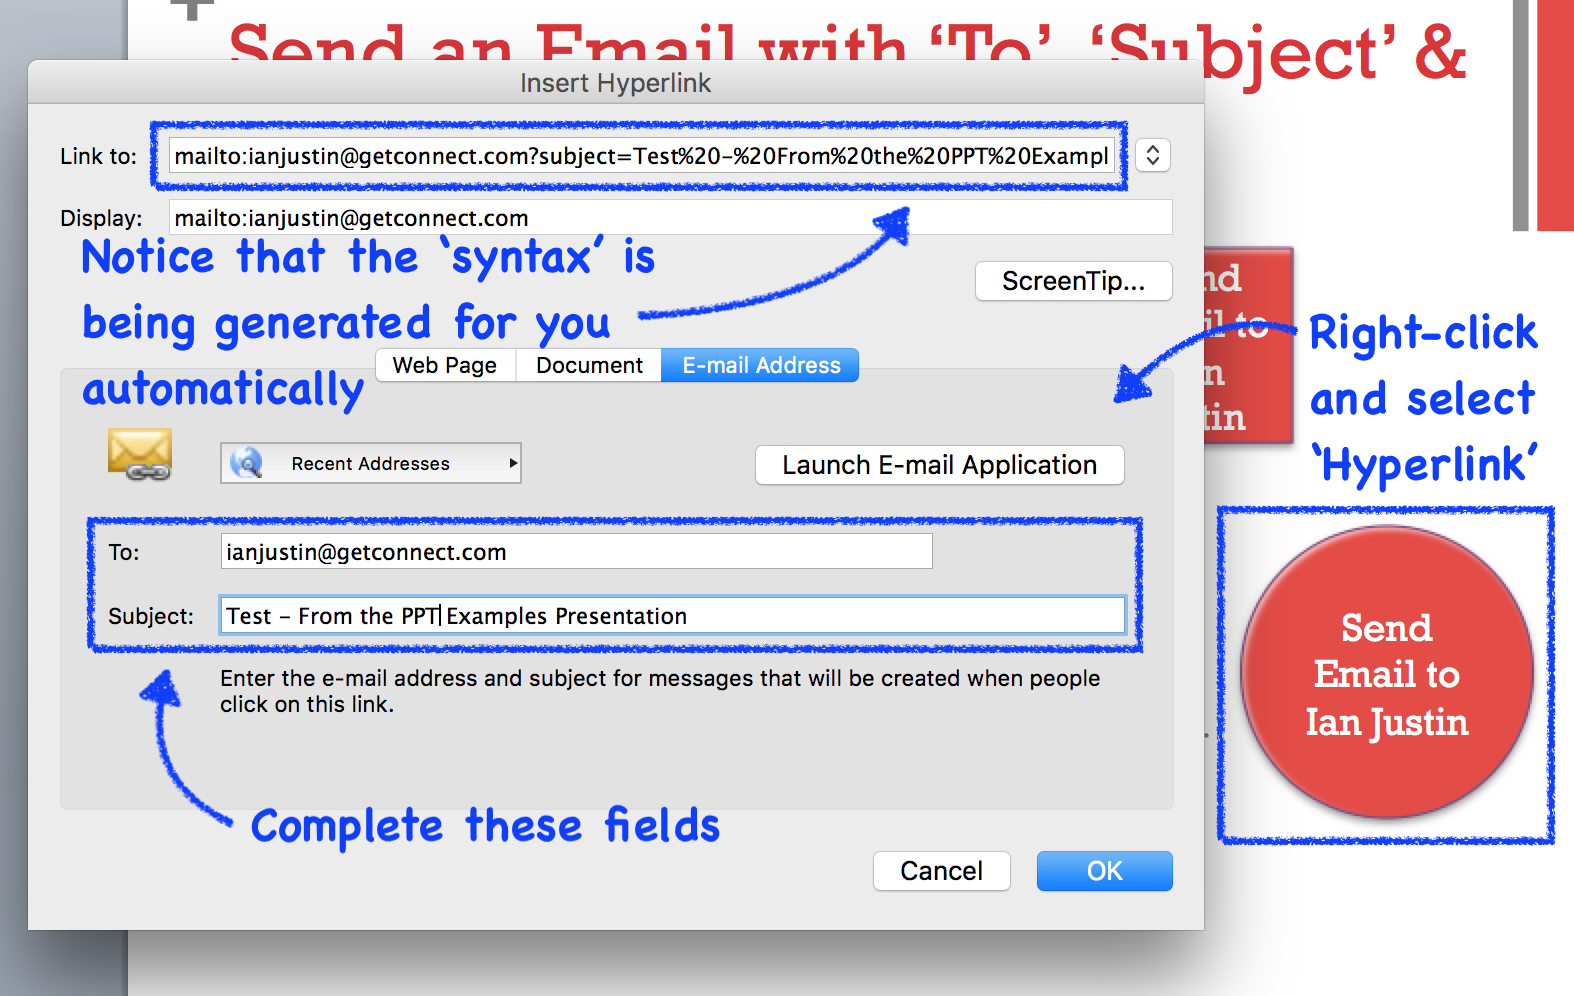
(Easier) Use a Regular ‘Shape’ – In this case do not insert an ‘Action Button’, simply insert a regular shape such as an ‘Oval’. Edit the text on the shape to give instruction if desired and then right-click and select ‘Hyperlink’ (not ‘Action Settings’).
Select the ‘E-mail Address’ option and enter the intended recipient into the ‘E-mail address’ or ‘To:’ field. Similarly, enter the subject of your email into the ‘Subject:’ field and click ‘OK’ (Figure 7). You are ready to go and clicking this ‘shape’ will launch the default email client and populate the recipient email and the subject fields.
Technical Note – On the Mac version of Powerpoint the ‘syntax’ (word order) is generated live, to see this on the Windows version of PowerPoint, click ‘OK’ and then right-click’ and select ‘Hyperlink again to see the dialogue. You do not need to understand this for the simple version we are using here, but it is helpful for the more sophisticated option discussed below.
Figure 7
(Harder) Use an ‘Action Button’ – Why would you want to use the ‘harder’ option? Well you might want to have consistency in your look-and-feel and use an ‘Action Button’? You might want to also populate the body of the email with some text?
Essentially you will write the ‘syntax’ manually and the guide (as I use it) is below.
Caveat – I am definitely not technical, this is just my ‘dissection’ of what works for me.
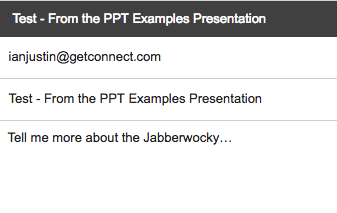
The example shown in the recording sends an email to ‘[email protected]’ with the subject line ‘: Test – From the PPT Examples Presentation’ and the body text ‘Tell me more about the Jabberwocky…’.
The syntax to do this as a single link/URL is as follows:
mailto:[email protected]?subject=Test%20-%20From%20the%20PPT%20Examples%20Presentation&body=Tell%20me%20more%20about%20the%20Jabberwocky…
If you paste this text into a browser (or click here for the same effect) you will see it working and launching your default email client and formatting the email (Figure 8).
Figure 8
So how does this work? Well the first thing to know is that you can copy the text below and just add your words. I have changed the colour of the actual syntax you require to red, you edit the green parts:
mailto:emailaddress?subject=subject%20line&body=body%20text
The tricky part is that wherever there is a space in your text you will need to add ‘%20’ (you can see this in the earlier working example as well). It is a little cumbersome at first, but once you get the knack of it the process takes a minute at most because you can use the text above and just add your content.
Text Editors – I use a simple text editor such as ‘Notepad’ on Windows or ‘TextEdit’ on the Mac…these do not make auto-corrections as Word will and that can be frustrating. I keep a document with the text in there ready to edit.
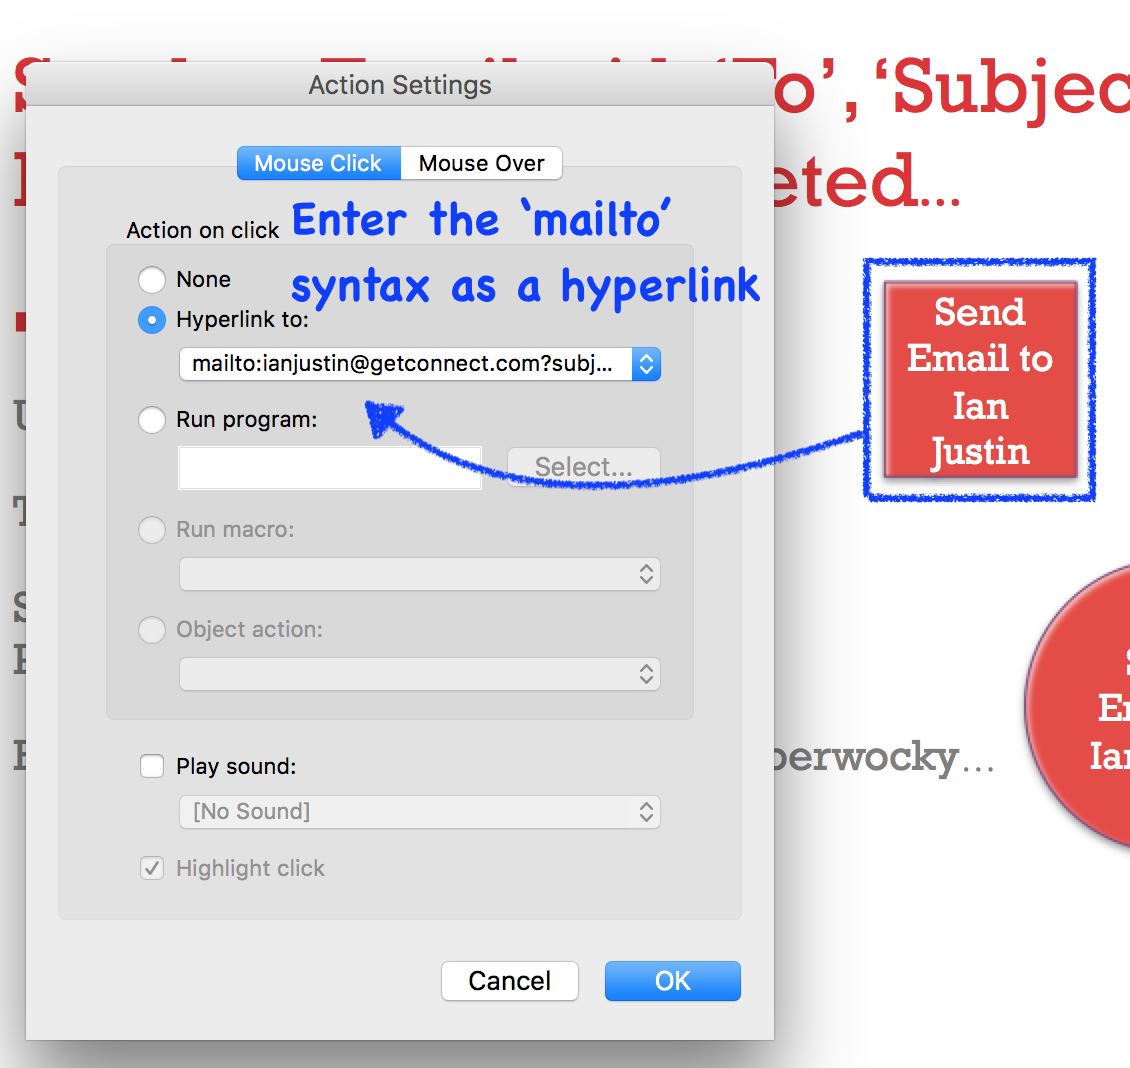
Once you have the URL/link you can copy it and then on the ‘Action Button’ you right-click and select ‘Action Settings’. Just paste the link into the ‘Hyperlink to:’ field and you are set (Figure 9).
Figure 9
Interactive Slide Navigation
The next examples all use a similar technique to get different interactive effects. We are not going to link to external sites, applications or web pages, we are going to link to other slides in the PowerPoint deck.
This can take a little bit of organization initially, but I will explain the process I use below for each of the 3 examples in the recording as the idea is the same.
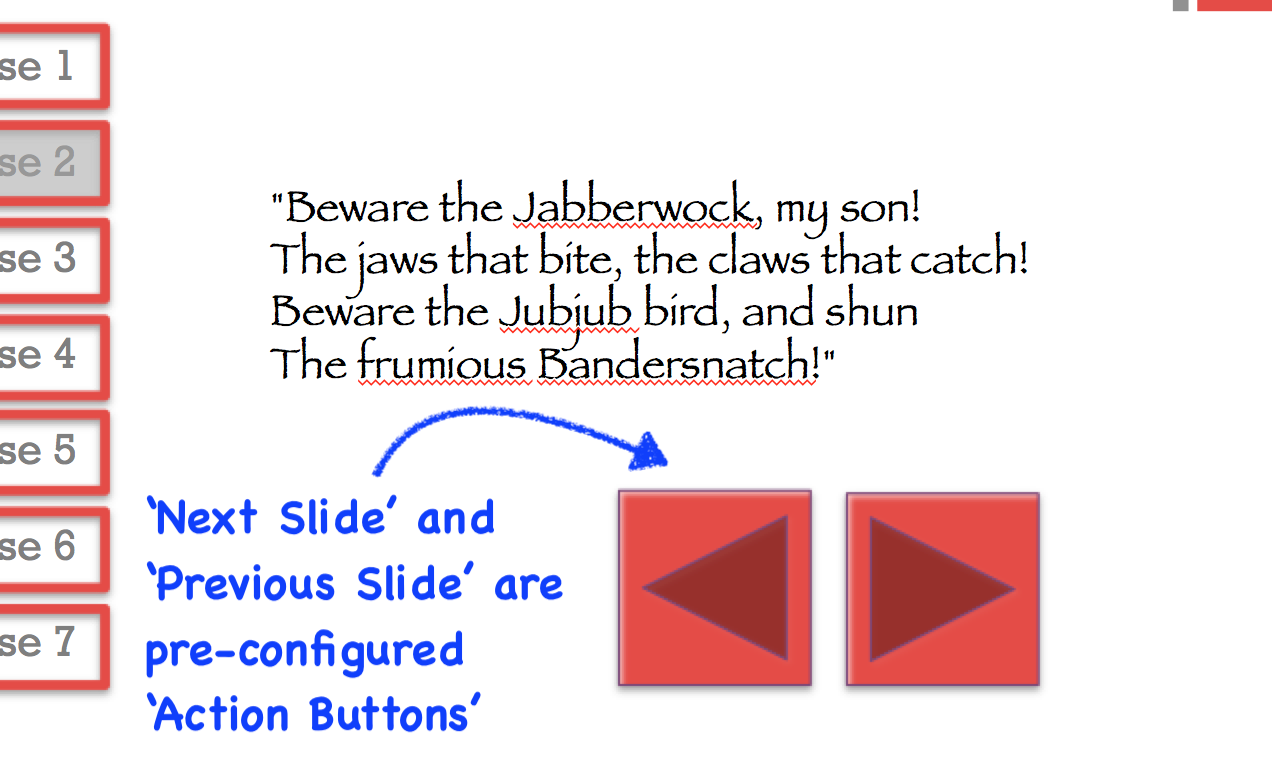
Interactive Navigation to Verses – In this example, we can click on any of the ‘Verse’ icons on the left side to move to that verse. The process is as follows (see also Figure 10):
- Create 7 slides, each with 1 verse from the poem (Tip: Put the name of the verse or the slide in the title so that you can select it more easily in the navigation setup).
- On the *first slide only*, create enough navigation icons or shapes for each slides/verse. In my case they are on the left side of the slide. I chose to use text and then add a box over the top for the hyperlinks.
- In each box/icon, right-click and select ‘Action Settings’ and this time select ‘Slide…’ and then select the slide you want to link over to, ‘Verse 1’ box/shape to ‘Verse 1 slide’ etc. (Figure 11).
- When you have created all of the links, select the whole set of icons/shapes and copy them, paste them onto each other slide to duplicate the navigation easily.
- In my case I then also go to each slide and highlight the current slide name (with shading) to help the navigation. I think this looks a lot more professional personally.
- Additionally, you can also include ‘Action Buttons’ for ‘Next Slide’ and/or ‘Previous Slide’. You can see this in Figure 11. These are pre-configured ‘Action Buttons’ that are already set to perform the appropriate actions.
As with any of the examples here, test them in PowerPoint by moving to ‘Slideshow’ mode or loading them into your Connect ‘Share Pod’.
Figure 10
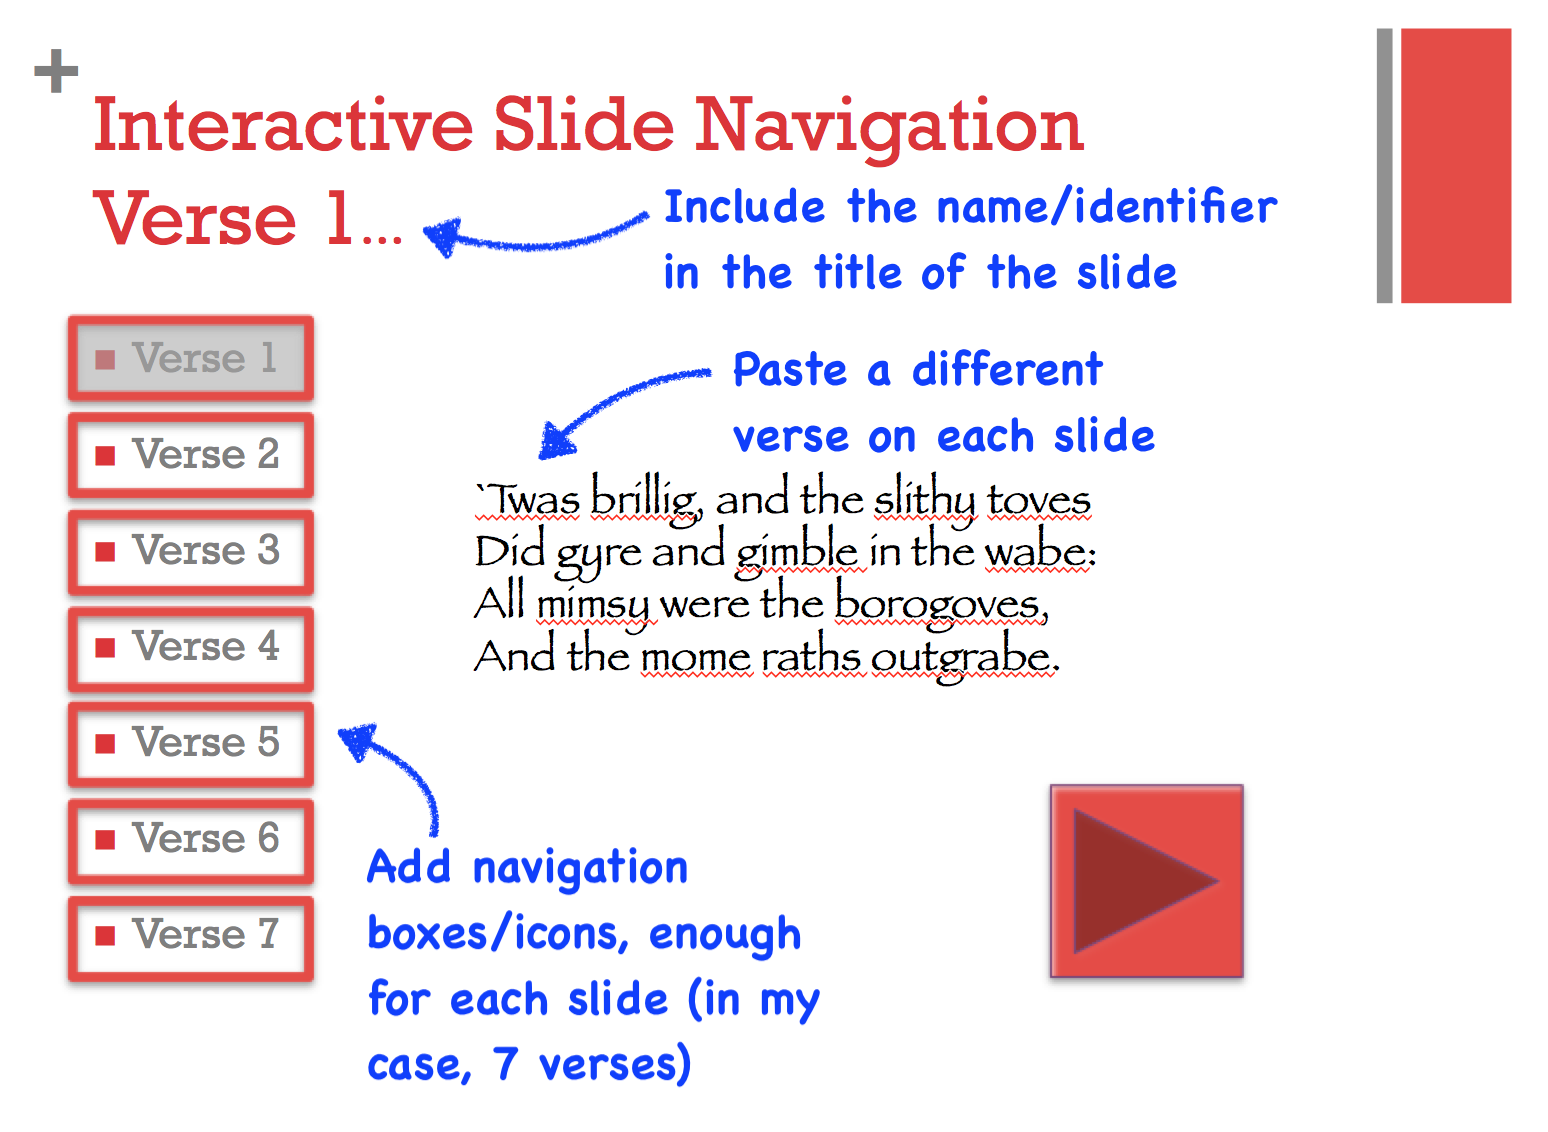
Figure 11
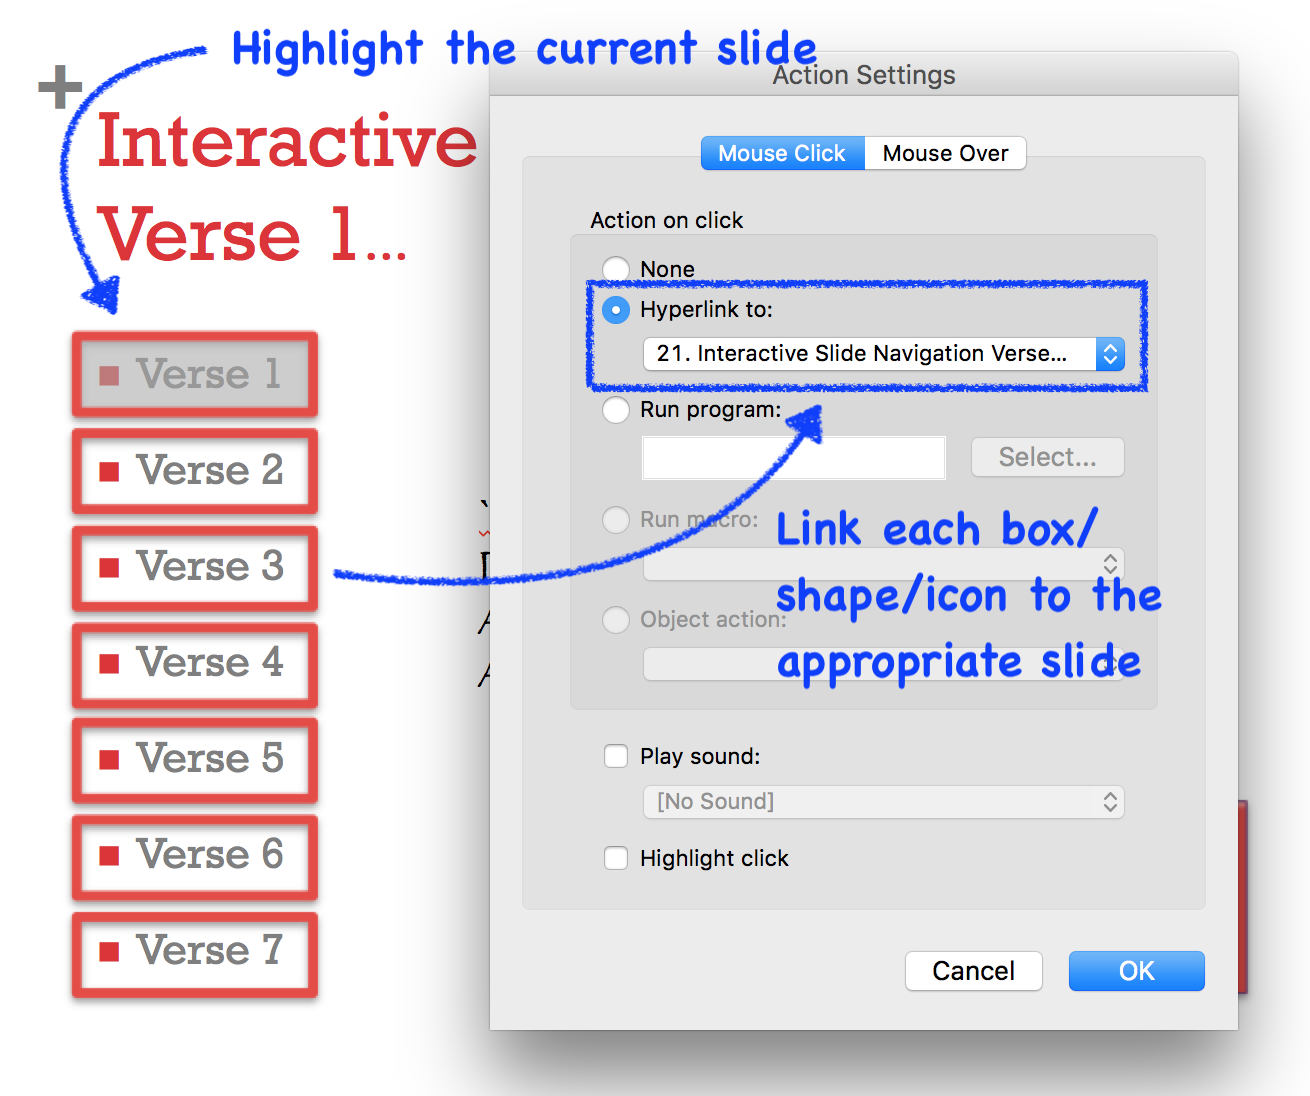
Figure 12
Interactive Quiz & Exploration – This is created in a similar manner to the example above, but in this case clicking on the ‘shapes’ (buttons) will reveal the answer to a question.
The process for this interactive game or activity is below:
- As this example has 4 Q&A boxes, you need to create 5 slides (one for each answer and the ‘Home’ slide). The ‘home’ slide can be seen in Figure 13 below.
- Add 4 shapes (‘buttons’) to the home slide, pick a colour for the ‘non-pressed’ buttons, I have chosen grey.
- Add a question to each button on the home slide by using right-click and select ‘Action Settings’ and link the button to the appropriate ‘answer’ slide. Add the question to the title of the answer slide to make it easier to find in the navigation setup.
- Copy the 4 buttons on the main slide and paste them onto the 4 answer slides.
- Go to the first ‘answer’ side and change the text on the appropriate button to reflect ‘pushed’ (in my case I chose red). now change the text of the appropriate button to reflect the answer (Figure 14). Repeat this step for the next 3 slides.
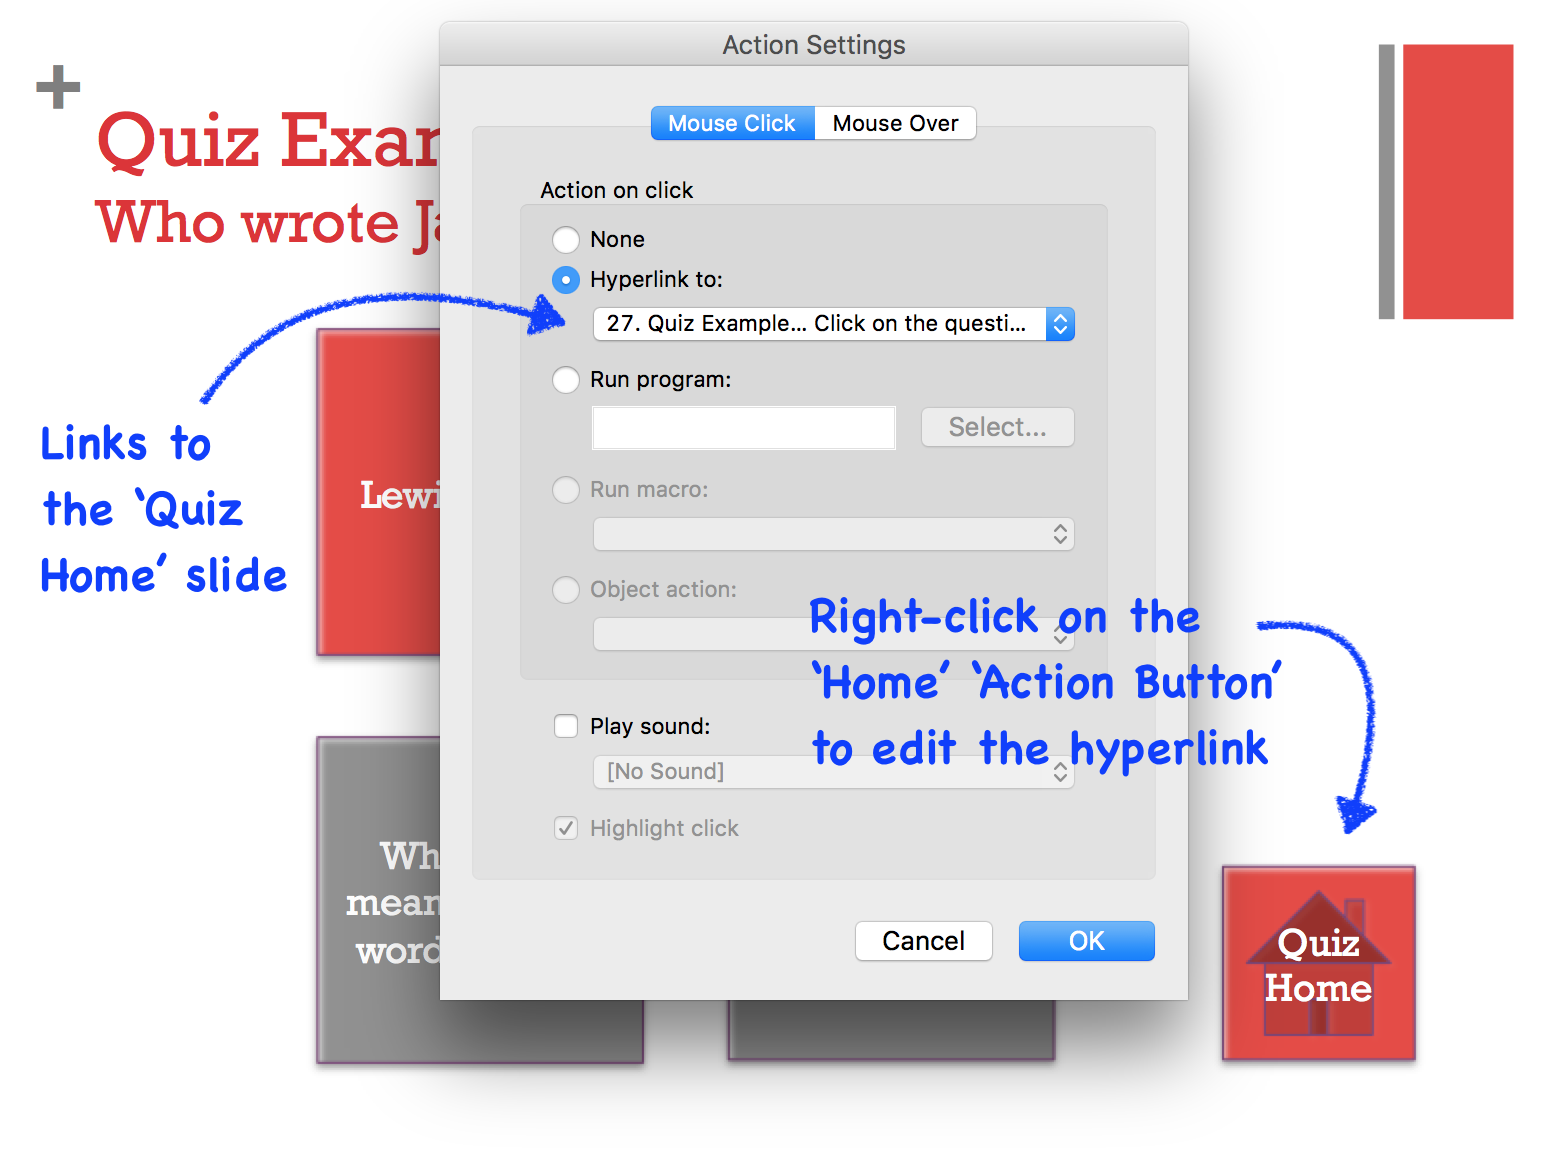
- You may want to add a ‘Quiz Home’ button to get people back to the start of the quiz. You can add an ‘Action Button’ (I like the ‘house/home’ icon for this) and hyperlink this back to the ‘Quiz Home’ slide (Figure 15).
Now you can let learners find their way through the quiz and the answers by clicking on the boxes in turn or moving back home each time before the next question.
Figure 13
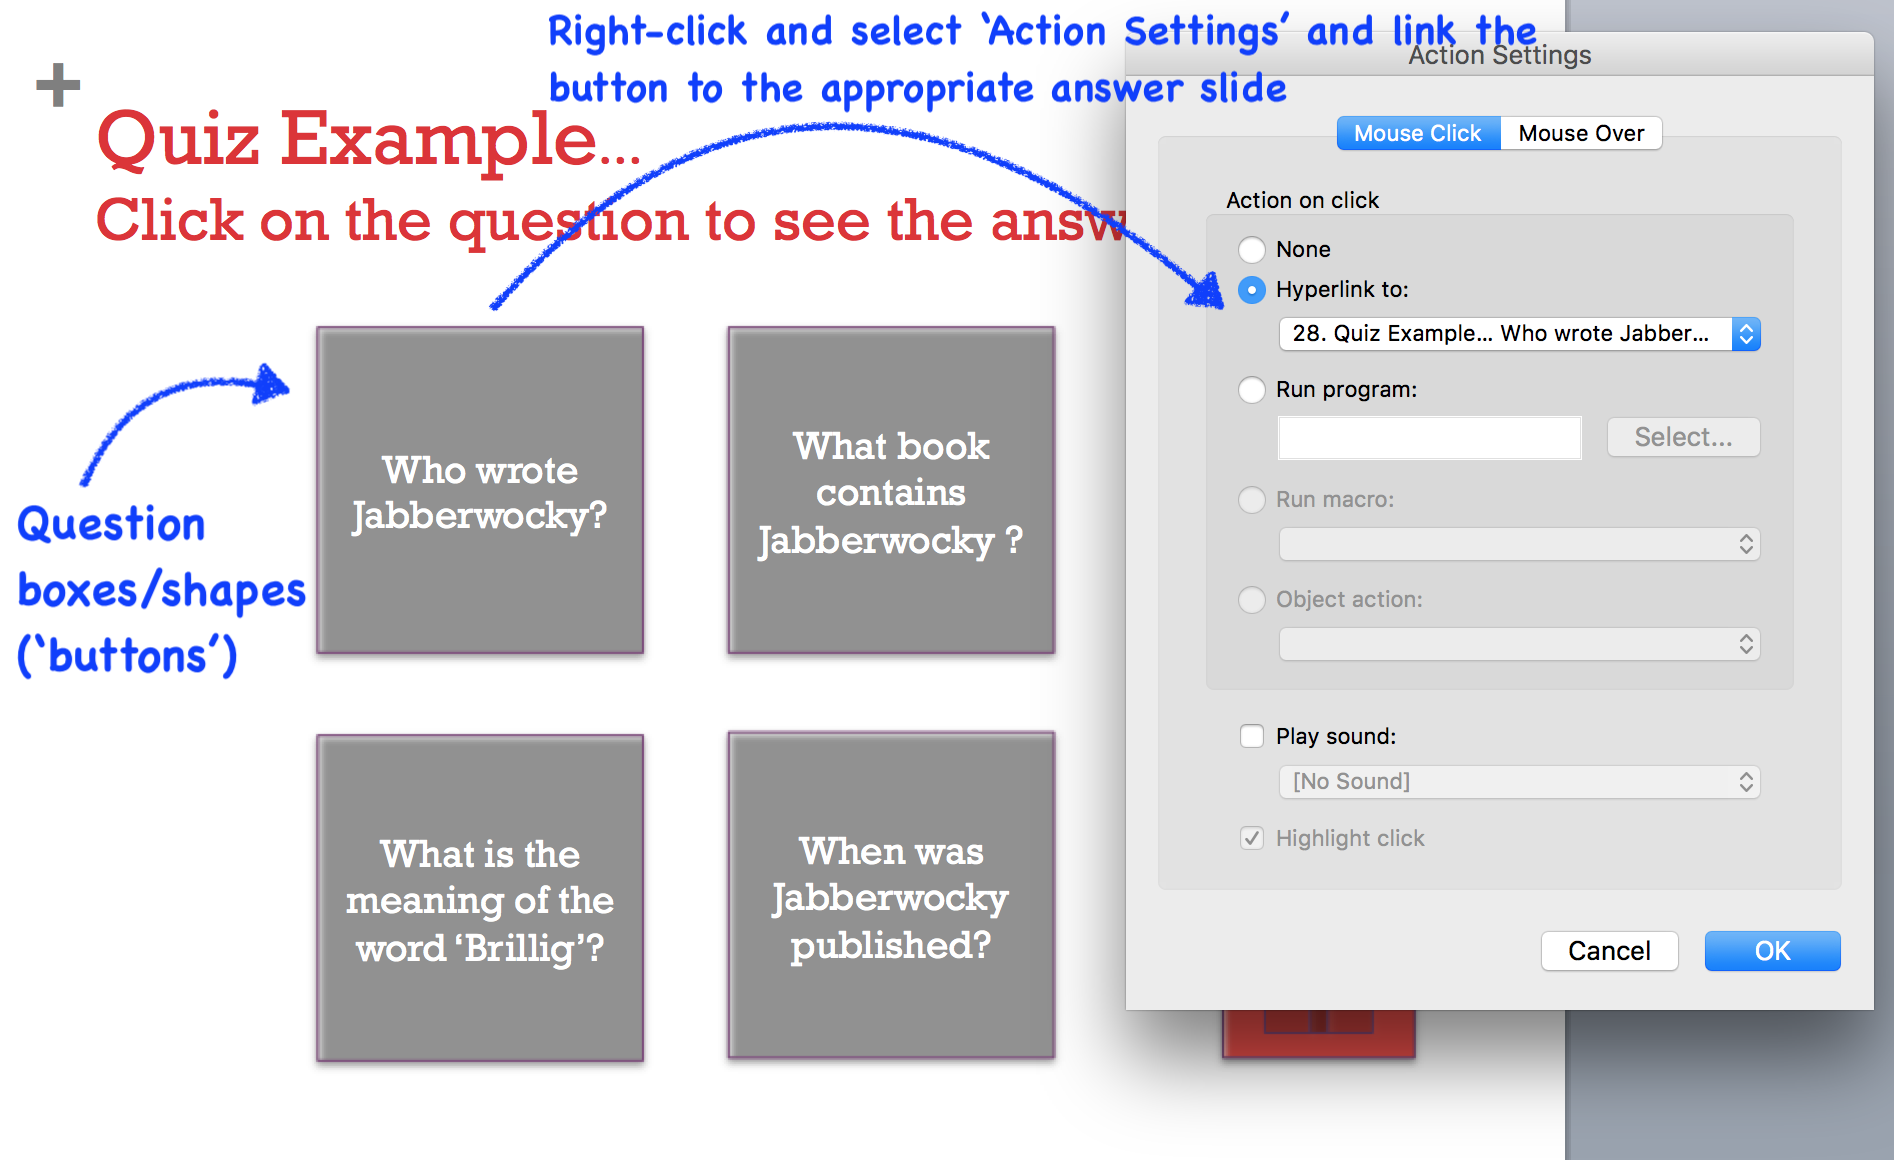
Figure 14
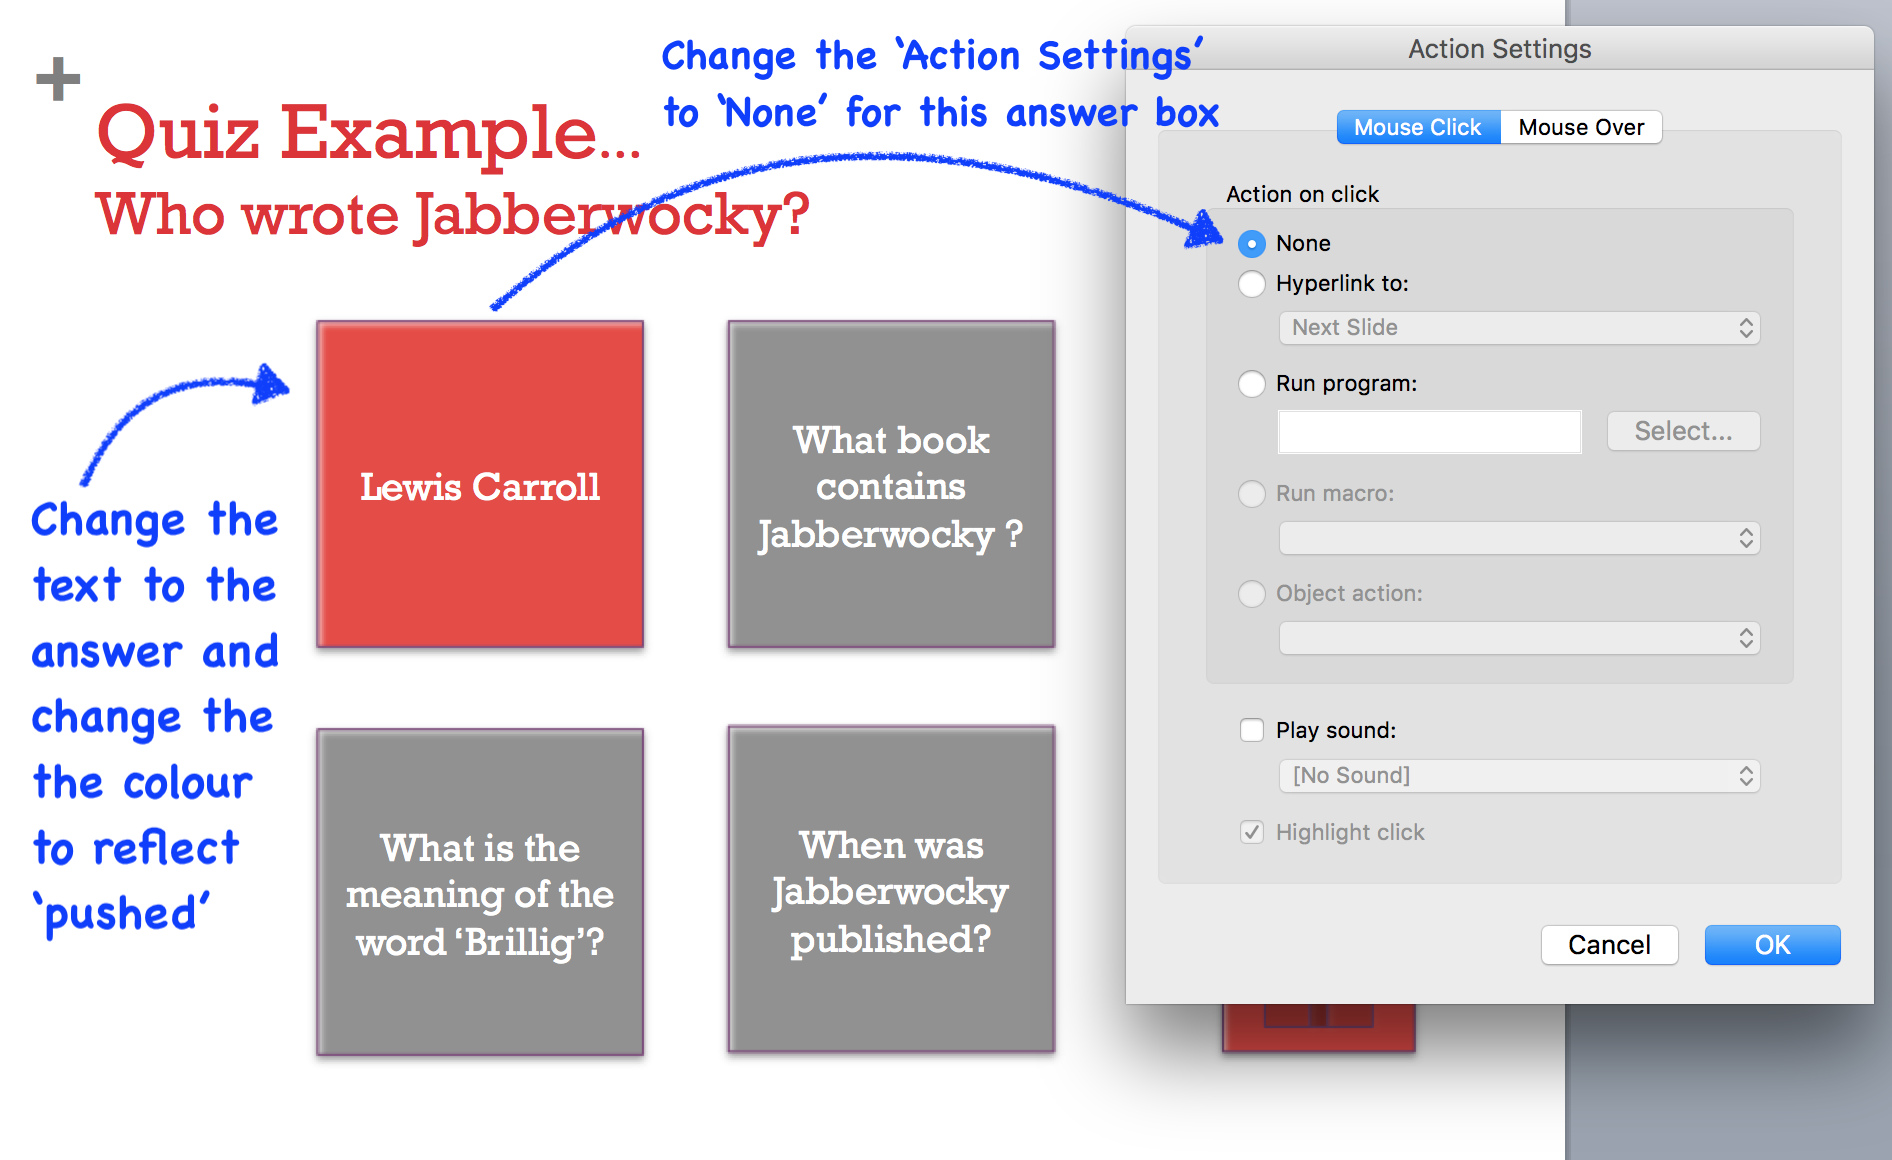
Figure 15
Interactive Image Navigation (Click & Learn) – Again a similar technique to the examples above, but in this case the learning is by clicking on an interactive image. The process is as follows:
- Add an image to your slide, I have chosen the picture of the Jabberwocky.
- Add as many slides as you will have interactive areas, I have 4 interactive point-and-click areas (‘The Tulgey Wood’, ‘The Claws That Catch’, ‘The Jaws That Bite’ and ‘The Manxome Foe’) so I added 4 blank slides. Add the name of interactive answer to the name of the slide to help with the navigation setup, ‘The Tulgey Wood’ for example.
- Over the main image, define the ‘click-areas’ with shapes. If you have a simple square image then you can use simple shapes, as my example is very organic, I used the ‘Freeform’ shape to define my ‘click-areas’ (Figure 16).
- When the shapes are defined (Figure 17) you can right-click on each shape, select ‘Action Settings’ and link it to the appropriate ‘discovery’ slide. Some slides may have more than one shape linking to it.
- When all of the shapes are linked, select them all and change the lines, fill, shadow etc to make them invisible (no line, no fill etc.). Noe they define the areas but it looks like just an image.
- Copy *the whole* image and shapes set on the first slide and paste it onto the next 4 slides so that the navigation will work from any slide.
- Now go to the slide for ‘The Tulgey Wood’ and add the discovery text or the additional information (Figure 18). Repeat this for the other ‘discovery’ slides.
- As with the earlier example, you may want to add a ‘Picture Home’ button in the same manner as the ‘Quiz Home’ button above and link this to the original image/navigation slide.
This setup allows learners to click on parts of an image or a text or a graph to learn more. Test in slideshow mode as before.
Figure 16
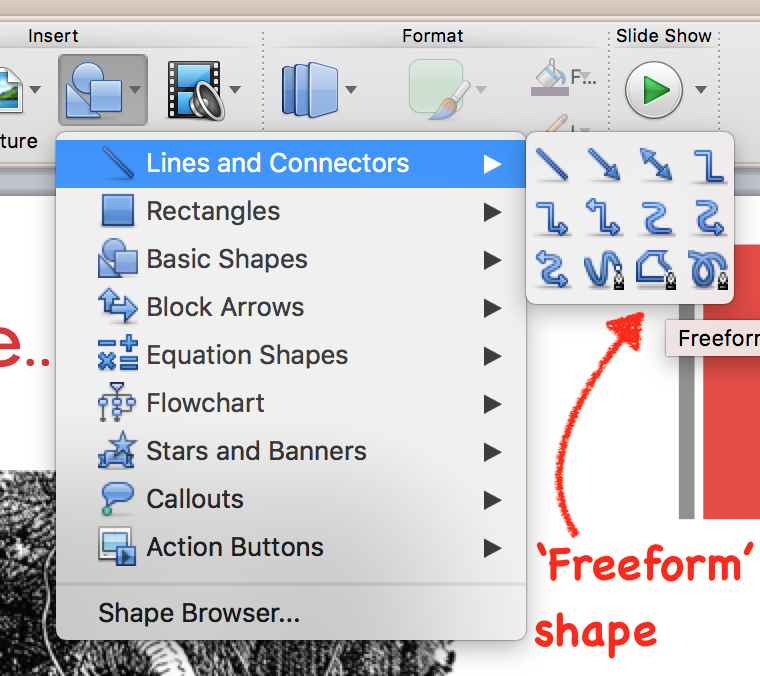
Figure 17

Figure 18
