There are fully integrated conferencing providers that are already deeply integrated with Connect. These providers just require you to enable the provider under the ‘Administration’ tab and ‘Audio Providers’. You can then add your personal conference information from the ‘My Profile’ tab and then ‘My Audio Profiles’. Connect already knows how to use the information to call into the conference etc.
Note on fully integrated providers – Currently the providers that are fully integrated with Connect are Arkadin, Meeting One, Intercall and PGi (please note that PGi does not sell Adobe Connect any more and I have seen some issues with the reliability of their integration and their service quality).
But what if you just have a toll-free number from a conferencing provider that is not already integrated with Connect? In this case you have to ‘teach’ Connect how to start the conference and dial into the call. Below is a generic explanation of the process that should work for any toll-free provider.
Note on toll-free numbers – You *must* have a toll-free number to integrate a conference service with Connect. You cannot use a toll or local number for the integration as Connect will essentially be dialling into the call and there is no way for the toll number to charge the Connect server. Similarly, you may have a local number, but the Connect server is not ‘local’. Typically, toll-free numbers have the prefix 800, 844, 855, 866, 877 and 888.
IMPORTANT – When you test the conference line below, you are actually starting and stopping a conference line. You might want to be sure the line is not being used by someone else at the time or you will mess with their conference.
Creating a Custom Audio Provider
The first thing to do is to ‘teach’ Connect how your conference provider actually dials into a call. You are essentially going to mimic the process you might use on a regular phone if you called and punched the numbers into a physical phone.
You have the option of creating a personal audio provider that is just for your own use, or an account-wide audio provider that can be used by everyone on your account. The advantage of an account-wide audio provider is that you can create the provider once (the dial-in process) and your users can simply add their own conferencing information. As this is an account-wide setting, you need to be an Administrator on your Connect account to make an account-wide audio provider.
Personal Audio Provider – go to the ‘My Profile’ tab and then ‘My Audio Providers’ and ‘New Provider’.
Account-Wide Audio Provider – As an Administrator, go to the ‘Administration’ tab and then ‘Audio Providers’ and ‘New Provider’.
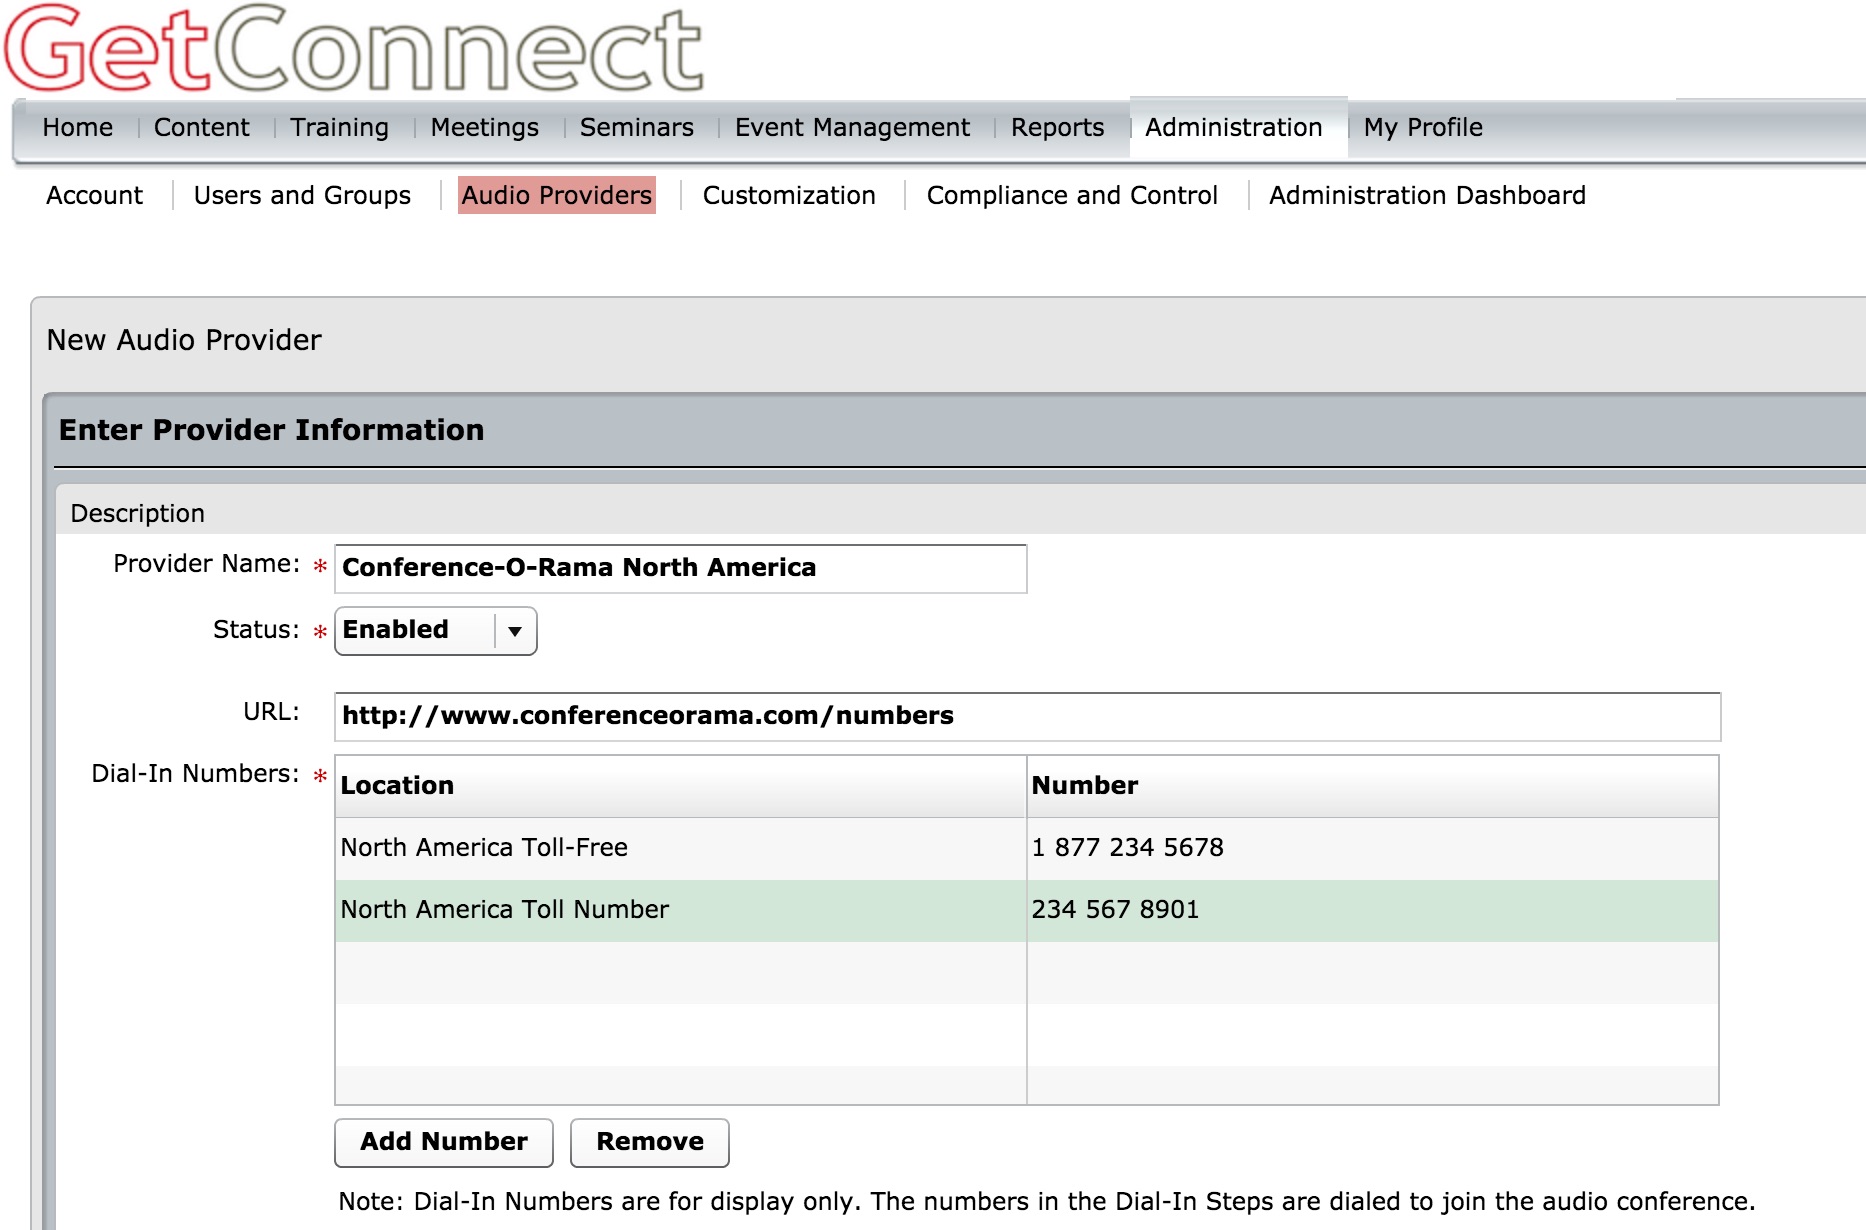
Once you have selected ‘New Provider’, the process is essentially the same for both of the above options. We will cover the fields below and you can see them in Figure 1.
Provider Name – If this is an account-wide profile then you should make this something your users will recognize such as ‘Conference-O-Rama North America’. If this is a personal audio provider then you will be the only person using the provider so the name is up to you.
Status – You will not be making this available to yourself or your users until you select ‘Enabled’.
URL – This link is displayed in the meeting room to give attendees the option to click to find a local area or country number for dial-in. Your conference provider will have this link listed in your documentation.
Dial-In Numbers – These numbers do not affect Connect and the integration. These are just displayed in the room for the participants to see. In the example below we have included toll-free and toll numbers.
Figure 1
Dial-In Steps – This is the real key to cresting a provider so we will walk through these in as much detail as possible. As noted above, we are going to mimic the dial-in process of a traditional phone, here is how I walk through the process for clients. The steps are shown in Figure 2 (my conference numbers are redacted of course to maintain privacy).
Note – The steps below discuss setting up the initial configuration and testing the process. When you want to make this available to let others configure the provider to their own private room or PIN number, you will follow the instructions further down this email. If this provider is for you only you have the option to leave the numbers ‘hard-coded’ into the profile.
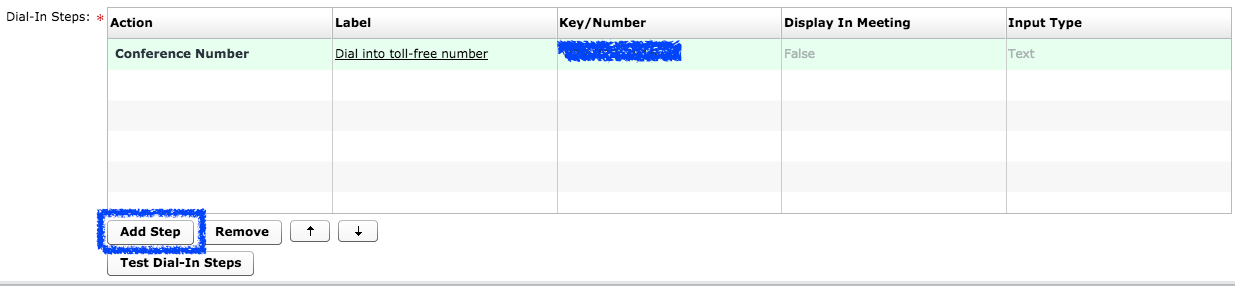
Step 1, Enter the toll-free number – This is always the first step as you have to get Connect to dial into the toll-free line. Click ‘Add Step’ and the default ‘Action’ is a ‘Conference Number’. I click on the ‘Label’ field and describe the step, in this example ‘Dial into toll-free number’. Add the toll-free number as well in the ‘Key/Number’ field (Figure 2).
Figure 2
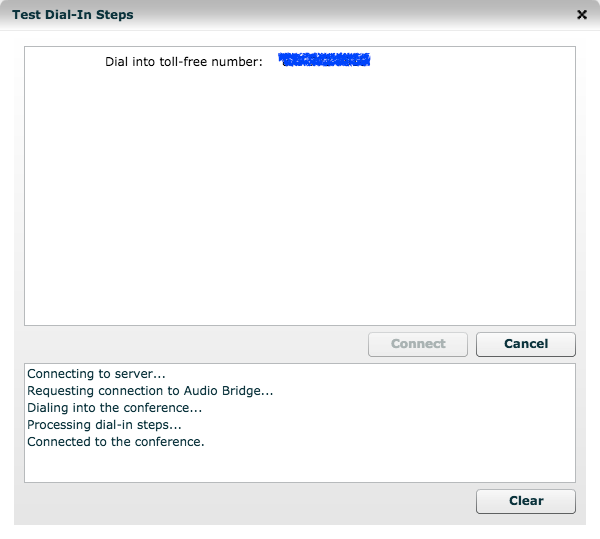
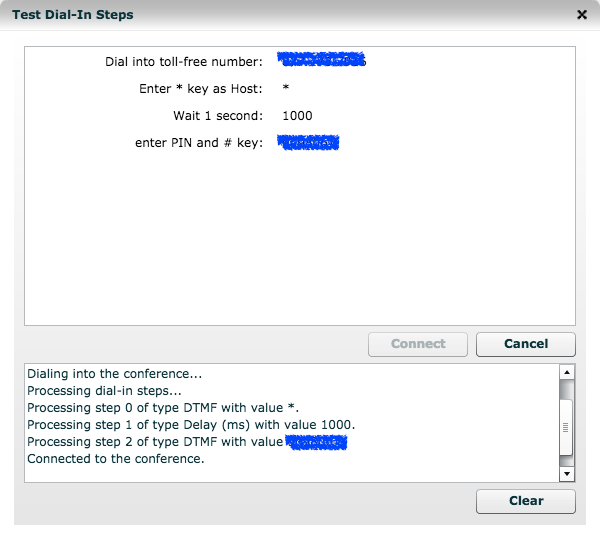
Now you can test this step by clicking on the ‘Test Dial-In Steps’ button at the bottom of the form. I know this seems extreme as there is only one step so far, but the point is to turn up your speakers and listen to the test and determine your next step. In my case the nice lady says “Welcome to GetConnect Conferencing. If you are the host enter ‘*’, your PIN and the ‘#’ key”. The visual dialogue that tells me what is happening in the call process in the process is shown in Figure 3.
Figure 3
So now I can keep going with the next step.
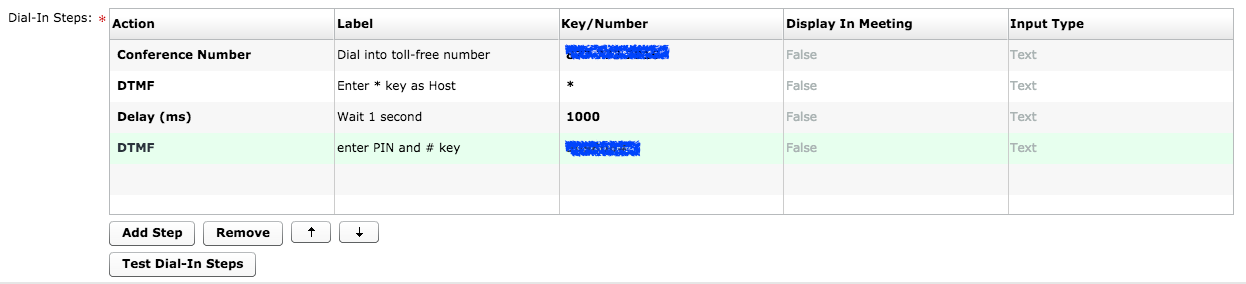
Step 2, Enter the ‘*’ key as I am the host – Click ‘Add Step’ and this time change the ‘Action’ field to ‘DTMF’ (Dial Tone Media Frequency’, a fancy name for ‘beep’). The description in this case is ‘Enter * key as Host’ and the ‘Number/Key’ is ‘*’.
Hopefully you are getting the idea now.
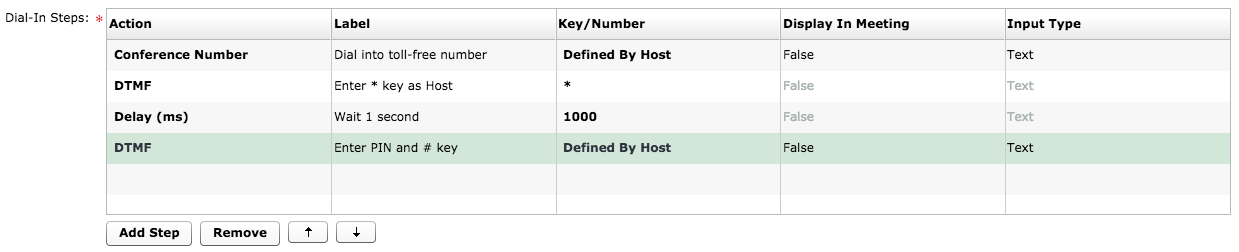
Step 3, Wait for a second – This is not always necessary, but I tend to put a pause in between each action to be sure the conference has time to register the keys. In this case I will add a second pause. Click ‘Add Step’ and the change the ‘Action’ field to ‘Delay (ms)’ and the ‘Label’ field to ‘Wait 1 second’. In the ‘Key/Number’ field add ‘1000’. As this delay is in milliseconds, 1000 equals 1 second of delay (Figure 4).
Step 4, add the PIN and then press ‘#’ – We will add the next 2 commands in one step. Click ‘Add Step’ and then change the ‘Action’ field to ‘DTMF’. For the ‘Label’ field add ‘Enter PIN and # key’ and then the PIN and the ‘#’ key in the ‘Key/Number’ field (Figure 4).
Figure 4
I would test again at this stage, just to be sure it is all working as expected. My test had the nice lady saying “You are connected to your conference, you are entering as the host…”. From this I know that the sequence is working correctly (Figure 5).
Figure 5
Note on detailed configuration and troubleshooting – In all honesty, in my specific configuration I could have merged steps 2 and 4 into one ‘DTMF’ and used the ‘Key/Number’ field *12345# to do this all in one step without the delay, but I wanted to let you see how to add a delay.
Delays are the most important thing when you are setting up these dial-in steps as often you are expected to wait until the nice lady has stopped talking, or until she has moved on to the next prompt before adding say the PIN number.
This is why you need to test the steps and listen to the prompts. if you enter all of the keys at the same time you may find that the ‘#’ key is used before the conferencing system is ready to accept the ‘#’ key. This is best carried out as an iterative process where you listen and get the steps right. You can typically hear the prompts going wrong.
You may find that the conference will ask ‘…enter your name followed by the # key’. In this case add enough delay to let the prompt finish, then ‘Delay (ms)’ time for a name to be said (there is no name) and use ‘DTMF’ to add the ‘#’ key.
The point being that every conference system may be different so you have to listen and then work out the steps.
Configuring for multiple users and different PIN and room numbers – To test the configuration steps above, we used a hard-coded conference line and PIN etc. We do not want to use these specific numbers if we are going to set up a provider that may users can configure to themselves, so once we have tested the configuration as we did above, we can make the provider more ‘generic’.
To give the ultimate user the option to configure the provider to their own numbers, we change the ‘Key/Number’ field fro the specific number to ‘Defined by Host’. To do this go to the first step where we enter the ‘Conference Number’ and click on the actual number, form the pull-down menu select ‘Defined by Host’.
You can do the same for the PIN step and indeed any other fields that are user-configured (Figure 6).
Remember – The ‘Label’ field needs to describe to the end -user just what they need to add into the field. If you replace the PIN ‘12345#’ with ‘Defined by Host’, your label needs to tell the user to ‘Enter PIN number and the # key’. If you had one step of ‘Enter PIN number’ and then you have already added another step with the ‘#’ after that then your label should say ‘Enter PIN number only, no # key’.
Figure 6
Make a personal Audio Profile
Note – until now we have been configuring an ‘Audio Provider’, the mechanics of the dial-in. You do this once and ideally you do it as an Administrator for your whole account. Now we are going to create a personal ‘Audio Profile’ we can use with out meetings:
Audio Profile – The mechanics of starting the conference
Audio Provider – My personal dial-in information, that uses the ‘Audio Profile’ to start the conference.
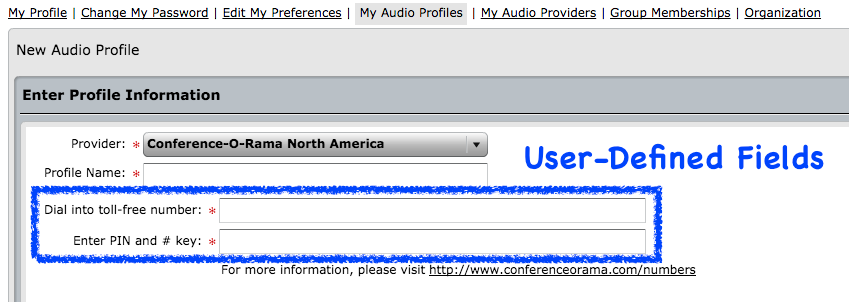
Login as yourself and go to the ‘My Profile’ tab, then select ‘My Audio Profiles’ and ‘New Profile’. Select the Audio Provider you created from the drop-down menu. If you ‘hard-coded’ the numbers into the audio provider then you will only need to give it a name, such as ‘Ian’s NA Conferencing Profile’. If you created the audio provider with user-defined fields then you will see the additional fields in Figure 7 below where you can add your own personal conferencing information as well as the profile name.
Figure 7
When you have entered the information required, click ‘Save’.
Note on multiple audio profiles – You might have more than one conference number that you use to bill specific clients or cost centers. You can create a new profile for each conference number set and name them accordingly, then choose the one you want to assign to your room or to a specific session.
Assign your Audio Profile to your Meeting Room
Finally, you can now link your audio profile or audio profiles to your meeting room, or meeting rooms.
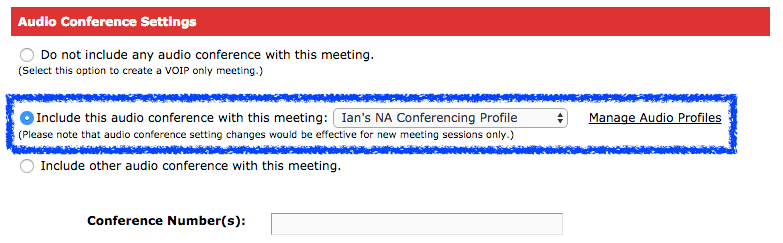
Create or find your meeting room in the Connect Central web interface. During the creation of the room or with ‘Edit Information’, scroll down to the ‘Audio Conference Settings’ section and select the ‘Include this audio conference with this meeting’ radio button. From the drop-down menu to the right select the conferencing profile you wish to assign to this room. You may have a lost of providers you have created and you may reassign a different provider at a later date of course (Figure 8). Save your changes.
Figure 8
You have now configured an Audio Provider, created an Audio Profile and assigned it to your meeting room and you are ready to go.
Further References – To understand more about using the audio conferencing in a room, please see the Blog Post here, (Guide to using the voice options in Connect Meetings) and look under ‘Universal Voice’ or ‘UV’, you may also want to read the section on pages 11 through 15 in my document ‘Getting Started with Adobe Connect Meetings’ under the ‘Resources’ tab in my Blog here.