As an Administrator on the Connect Account, you may have need to input the audio profiles for everyone in your organization, not a fun task if there are hundreds or more users. This is particularly challenging if every user has their own passcode and even their own dial-in number for the conference lines
There are some options for streamlining this process that I have outlined below. For the sake of this example, I have used a ‘Universal Voice’ account, meaning a regular Toll-Free number from any provider, not a fully integrated provider such as Meeting One or Intercall. The example below would be used in a similar way for a fully-integrated provider in that the information in ‘Figure 1’ is already set up for you, the Meeting Host just has to enter the specific information required by that provider
IMPORTANT – everyone’s conference provider is different, so please be sure to test this process with at least two people and two different profiles and codes before rolling this out company-wide
Bulk import of Audio Providers into the Connect Account
Please note that I have not tested this on my account, but the article is posted on the Adobe Support Blog so I wold expect this to be reliable. Please test this process in a non-destructive manner and on a small segment of your users (or fake users) before rolling this out across your account:
http://blogs.adobe.com/connectsupport/using-the-built-in-bulk-import-utility-in-acp-to-provision-audio-profiles/
Create a Generic Audio Profile that Meeting Hosts can tailor to their information
First, make an Audio Provider at the Administration level that all users on your account can access. Go to ‘Administration’>’Audio Providers’>’New Provider’. In the next dialogue you will need to give a name for this Audio Provider (maybe ‘Verizon’ or ‘AT&T Corporate’, whatever describes the profile for your users appropriately when they select it)
I have outlined the fields and just what they mean in Figure 1 below. The key to making this generic for all users is to set the ‘Key/Number’ field in the ‘Dial-In Steps’ to ‘Defined by Host’. In this case the ‘Conference Number’ and the ‘DTMF’ (Dial Tone Media Frequency or ‘passcode’) fields are both set to be entered by the individual Meeting Host when they create their own profile. You can choose to only make the ‘DTMF’ a variable field if the Dial-in Number is consistent
Figure 1
Now save the New Provider. You have built a generic Audio Provider that can be selected by a regular Meeting Hosts and they can add their own personal dial-in Number and Passcode
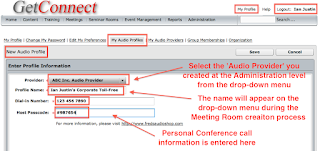
Now, to test this, login as a regular user (or test this with your own account) and go to ‘My Profile’, from there select ‘My Audio Profiles’ and ‘New Profile’. I have outlined the fields and their meaning in Figure 2 below, but essentially the Meeting Host/user is adding their personal information
Figure 2
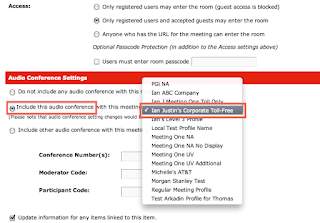
Now when the Meeting Host/user creates a new Meeting Room, they can select the Audio Profile when they check the ‘Include this audio conference with this meeting:’ radio button (See Figure 3 below)
Figure 3


