As Adobe Connect recordings are very interactive and make great ‘on-demand’ content, one of the question I am often asked is how to add some way for viewers of the recording to ask questions or chat with the trainer
In a live session of course, the Chat Pod or the Q&A Pod can be used for interactive conversations. In a Connect recording you can add the option to use your chat/IM client with a simple link. I have outlined my process below
What IM Client or Chat Client?
Everyone has a different preferred IM Client and you can usually find the syntax to start a chat from a hyperlink with a search in Google. I chose to link to a page on my Blog that has the IM client inserted there as this gives me the option to change the client or the settings for every recording from one page as they will all point to this page. If the client you are using changes then you do not want all of the existing recordings to stop working so this give me the most flexibility in my view
This ‘web page’ option also gives me the chance to include my other information such as my e-mail address and the Adobe Support information (helpful in my case) to help people if I am unavailable
You can see the page I use here
How do you create the link in Adobe Connect?
You can have a link in the Chat Pod, but it will look a little intimidating (potentially a long and complex link), I prefer to have the link under a button/shape on a single PPT slide and add that to my layouts
To create a link in PPT, create a shape and then right-click and select ‘Hyperlink’, from the dialogue add the link to your page or to your IM Client. You can see my link in PPT in Figure 1 below
Figure 1
Save the PPT file, I suggest you make it a single slide so that it is always visible in the Connect session. Load the PPT file into a Share Pod from in your Meeting Room either by drag and drop or by browsing your computer. If you would like multiple people to have access to this then load it into the ‘Share Content’ area under the ‘Content’ tab. If you would like this in all of your Meeting Rooms moving forward, add this logo to the appropriate Template in the ‘My Templates’ or the ‘Shared Templates’ folder
Yahoo Instant Messenger Client and ‘Pingbox’ Example
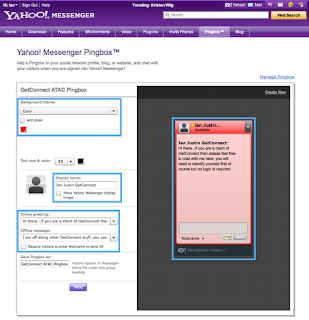
In my working example, I have used the Yahoo IM Client and a tool called ‘Pingbox’ (http://messenger.yahoo.com/pingbox/studio/). This is a simple tool that requires you to have a Yahoo IM login and the it allows you to create a widget and gives you the code to add to a webpage or to a Blog…it is a simple cut-and-paste if you follow the instructions. You can see the Pingbox Studio creation interface in Figure 2 below. You can edit the online and offline greeting/messages, your name and themes/colours
You can see the editing interface in Figure 2 below and the creation of the widget and code in Figure 3 below
Note – This is a 3rd Party Software and GetConnect is not responsible for this software, you will want to use your own client and certainly do your own research before downloading of using any software
Figure 2
Figure 3
Your Meeting Room layout is of course up to you, I have this on my Q&A Layout and you can see this in Figure 4 below
Figure 4
The recording looks pretty much the same (see Figure 5) and you can see the recording itself from the link below to test this live yourself:
http://getconnect.adobeconnect.com/p1yxtcddujn/
You might want to change the title of the share Pod with the link to the live chat to make it a little more obvious to viewers, mine is renamed to ‘Watching the recording?’ for example. You can rename any pod by double-clicking on the title bar
Figure 5
I hope you find this useful


